大家好,今天分享一下在centos linux上部署pxe服务器来实现自动化的装机
关于这个东西的话,记住一点就可以了
就是pxe可以给很多服务器自动的安装操作系统,这样省时省力
这是pxe服务器的工作流程 (我个人觉得他已经很详细了)

下面来做一下这个
我们pxe服务器的ip地址是192.168.1.12
使用远程终端来连一下服务器

因为我们使用网络yum 源的方式来安装软件
所以,我们要看一下服务器的网络是否有问题
[root@localhost ~]# ping www.baidu.com
PING www.a.shifen.com (180.101.49.11) 56(84) bytes of data.
64 bytes from 180.101.49.11 (180.101.49.11): icmp_seq=1 ttl=128 time=42.2 ms
64 bytes from 180.101.49.11 (180.101.49.11): icmp_seq=2 ttl=128 time=29.1 ms
64 bytes from 180.101.49.11 (180.101.49.11): icmp_seq=3 ttl=128 time=23.0 ms
64 bytes from 180.101.49.11 (180.101.49.11): icmp_seq=4 ttl=128 time=18.5 ms
^C
--- www.a.shifen.com ping statistics ---
4 packets transmitted, 4 received, 0% packet loss, time 4115ms
rtt min/avg/max/mdev = 18.545/28.257/42.227/8.907 ms
[root@localhost ~]#
这样网络就会没问题的
安装dhcp服务
[root@localhost ~]# yum install dhcp -y
安装Apache
[root@localhost ~]# yum install httpd -y
安装syslinux
[root@localhost ~]# yum install syslinux -y
安装tftp服务器端程序
[root@localhost ~]# yum install tftp-server.x86_64 -y
看dhcp目录
[root@localhost ~]# cd /etc/dhcp/
[root@localhost dhcp]# ll
总用量 8
drwxr-xr-x. 2 root root   37 6月  10 2021 dhclient.d
drwxr-xr-x. 2 root root   28 4月  20 12:08 dhclient-exit-hooks.d
-rw-r--r--. 1 root root  120 6月  10 2021 dhcpd6.conf
-rw-r--r--. 1 root root  117 6月  10 2021 dhcpd.conf
drwxr-x---. 2 root dhcpd  28 4月  20 12:08 scripts
这是dhcp的主配置文件
[root@localhost dhcp]# cat dhcpd.conf
#
# DHCP Server Configuration file.
#   see /usr/share/doc/dhcp*/dhcpd.conf.example
#   see dhcpd.conf(5) man page
#
一看什么都没有
拷贝一个现成的模板到我们dhcp主配置文件当中
[root@localhost dhcp]# cp /usr/share/doc/dhcp-4.2.5/dhcpd.conf.example ./dhcpd.conf
cp:是否覆盖"./dhcpd.conf"? y
[root@localhost dhcp]#
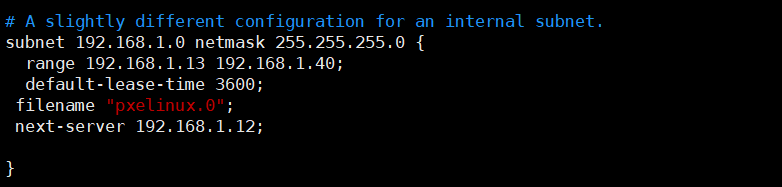
编辑dhcp主配置文件
[root@localhost dhcp]# vim dhcpd.conf
subnet 192.168.1.0 netmask 255.255.255.0 {
  range 192.168.1.13 192.168.1.40;
  default-lease-time 3600;
 filename "pxelinux.0";
 next-server 192.168.1.12;
我们要这几个
截图
重启dhcp服务
[root@localhost dhcp]# systemctl restart dhcpd
进入到TFTP指定目录
[root@localhost ~]# cd /etc/xinetd.d/
[root@localhost xinetd.d]# ls
tftp
[root@localhost xinetd.d]#
编辑这个文件
[root@localhost xinetd.d]# vim tftp
改一下这个配置 写成no就可以了

重启tftp服务
[root@localhost xinetd.d]# systemctl restart tftp.socket
看一下状态
[root@localhost xinetd.d]# systemctl  status  tftp.socket
● tftp.socket - Tftp Server Activation Socket
   Loaded: loaded (/usr/lib/systemd/system/tftp.socket; disabled; vendor preset: disabled)
   Active: active (listening) since 三 2022-04-20 13:27:17 CST; 45s ago
   Listen: [::]:69 (Datagram)

4月 20 13:27:17 localhost.localdomain systemd[1]: Listening on Tftp Server Activation Socket.
4月 20 13:27:17 localhost.localdomain systemd[1]: Starting Tftp Server Activation Socket.
注意看这个目录

进入指定目录
[root@localhost xinetd.d]# cd /var/lib/tftpboot/
[root@localhost tftpboot]# ls
[root@localhost tftpboot]#

[root@localhost tftpboot]# cp /usr/share/syslinux/pxelinux.0 ./

这是菜单文件
[root@localhost tftpboot]# cp /usr/share/syslinux/menu.c32 ./
新建一个挂载点
[root@localhost tftpboot]# mkdir /media/cdrom/
实现挂载
[root@localhost tftpboot]# mount /dev/cdrom  /media/cdrom/
mount: /dev/sr0 写保护,将以只读方式挂载
把光盘下的引导文件拷贝到当前目录下(安装)
[root@localhost tftpboot]# cp /media/cdrom/isolinux/vmlinuz ./
[root@localhost tftpboot]# cp /media/cdrom/isolinux/initrd.img ./
[root@localhost tftpboot]#
现在这个目录下就有了四个文件

新建这个目录(这个文件名是一定要这样写的)
[root@localhost tftpboot]# mkdir pxelinux.cfg
进入改目录
[root@localhost tftpboot]# cd pxelinux.cfg/
创建文件
[root@localhost pxelinux.cfg]# touch default
[root@localhost pxelinux.cfg]# ls
default
编辑default这个文件
[root@localhost pxelinux.cfg]# vim default
把这个复制进去就可以了,地址改成你自己的就可以了
default menu.c32
timeout 300
prompt 0

label 1
menu label ^1) Install CentOS7
menu default
kernel vmlinuz
append initrd=initrd.img method=http: //192.168.1.12/CentOS7 ks=http://192.168.1.12/ks.cfg
重启Apache
[root@localhost pxelinux.cfg]# systemctl restart httpd
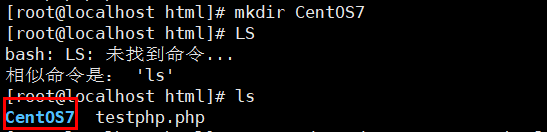
进入这个目录
[root@localhost pxelinux.cfg]# cd /var/www/html/
这个不用管,这只是随意写的一个测试脚本文件,与这个部署没有关系
[root@localhost html]# ls
testphp.php
挂载
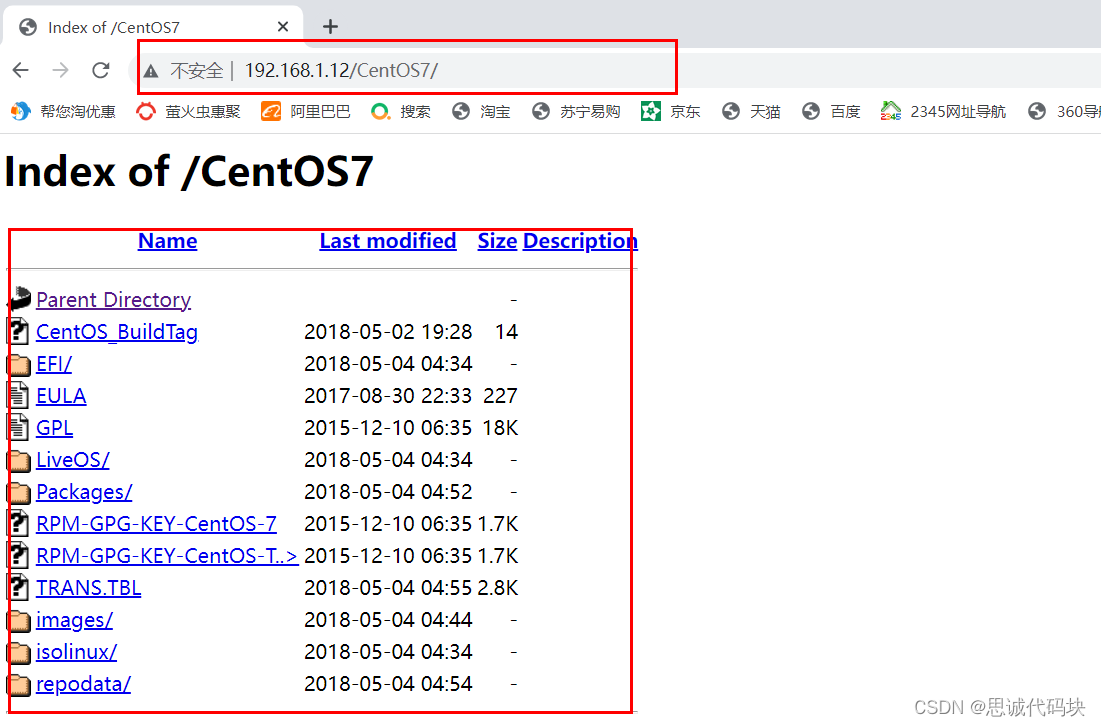
[root@localhost html]# mount /dev/cdrom /var/www/html/CentOS7/
这样就可以看见光盘的内容
[root@localhost html]# cd CentOS7/
[root@localhost CentOS7]# ls
CentOS_BuildTag  EULA  images    LiveOS    repodata              RPM-GPG-KEY-CentOS-Testing-7
EFI              GPL   isolinux  Packages  RPM-GPG-KEY-CentOS-7  TRANS.TBL
[root@localhost CentOS7]#
浏览器测试:(Apache服务器正常)

这个时候,在浏览器上可以访问到光盘的文件
在root目录下

将这个文件拷贝到/var/www.html下
[root@localhost ~]# cp anaconda-ks.cfg /var/www/html/
将指定文件改个名
[root@localhost ~]# cd /var/www/html/
[root@localhost html]# ls
anaconda-ks.cfg  CentOS7  testphp.php
[root@localhost html]# mv anaconda-ks.cfg  ks.cfg
浏览器访问,会有一个403的错误,因为我们的权限不够

加一个读取权限
[root@localhost html]# chmod +r ks.cfg

现在访问就是正常的(这是自动脚本的文件)

编辑这个文件
[root@localhost html]# vim ks.cfg
注销掉第五行

加上这一行

把这个图形化注释掉

使用文本安装

把第36行也注释掉

这样写

在最后加上重启的命令

重启服务
[root@localhost html]# systemctl  restart  httpd.service
[root@localhost html]# systemctl  restart  tftp.socket
[root@localhost html]# systemctl  restart  dhcpd
新建一个虚拟机


到这里,pxe就可以部署成功了,谢谢大家