#关闭防火墙
1firewalld
2setforece
#配置时钟服务器
#设置打开文件数


#服务端(backServerIP) 需要配置用户名密码 参数设置module 生成密码文件
#客户端 (MasterServerIP)


#安装rsync
1、在备机上配置rsync
uid = root
gid = root
use chroot = no                         # 安全相关
max connections = 2000                  # 并发连接数
timeout = 600                           # 超时时间(秒)
pid file =/var/run/rsyncd.pid           # 指定rsync的pid目录
lock file =/var/run/rsync.lock          # 指定rsync的锁文件【重要】
log file = /var/log/rsyncd.log          # 指定rsync的日志目录
ignore errors
read only = false
list = false
hosts allow = 192.168.133.120/24
hosts deny = 0.0.0.0/32
auth users = rsync_backup
secrets file =/etc/rsync.password

[vfs_data]  # 模块
comment = vfs_data
path = /vfs_data

2创建秘钥文件
echo 'rsync_backup:123456'>/etc/rsync.password  //文件用户名和路径为上面定义,别写错,密码自己定
chmod 600 /etc/rsyncd.passwd        //修改权限

#客户机上执行
echo '123456'>/etc/rsync.password  //文件用户名和路径为上面定义,别写错,密码自己定
chmod 600 /etc/rsyncd.passwd        //修改权限
3.启动rsync服务

systemctl stop rsyncd.service

systemctl restart rsyncd.service

systemctl enable rsyncd.service

#特别注意启动一定要指定配置文件 否则配置可能不生效
rsync --daemon --config=/etc/rsyncd.conf
#服务端根据配置文件生成密码文件
user:passwd
#服务端需要配置模块因为客户端需要用
模块
[vfs_data]                                   # 模块
comment = vfs_data
path = /vfs_data

#客户端密码文件格式
passwd

#rsync搭建好之后测试密码是否成功 在客户端验证
	rsync -avz /tmp/1 rsync_backup@192.168.133.120::vfs_data/  --password-file=/etc/rsync.password

cd /vfs_data && rsync -avzP -R --delete ./ rsync_backup@192.168.133.120::vfs_data --password-file=/etc/rsync.password

#设置开机启动 启动就开始往备机同步注意是否需要
 echo "rsync --daemon --config=/etc/rsyncd.conf" >> /etc/rc.d/rc.local
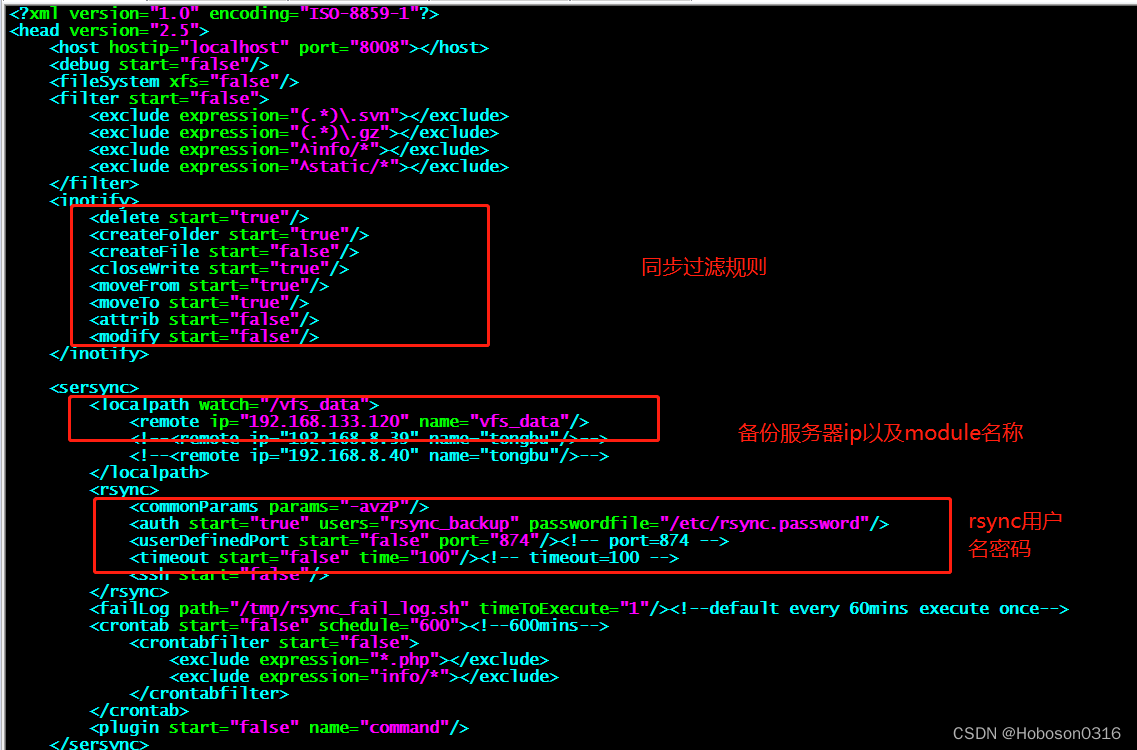
在主机上安装配置sersync
配置文件如下:


?
?总结:分清楚客户端和服务端 配置好服务端和客户端后,在客户端测试rsync是否正常,比如:权限和密码是否OK,检查完毕后配置sersync的配置文件,启动实时同步
