同 Pod,主要补齐前面没有讲到的部分。
service
Service在很多情况下只是一个概念,真正起作用的其实是kube-proxy服务进程,每个Node节点上都运行了一个kube-proxy的服务进程。当创建Service的时候会通过API Server向etcd写入创建的Service的信息,而kube-proxy会基于监听的机制发现这种Service的变化,然后它会将最新的Service信息转换为对应的访问规则。
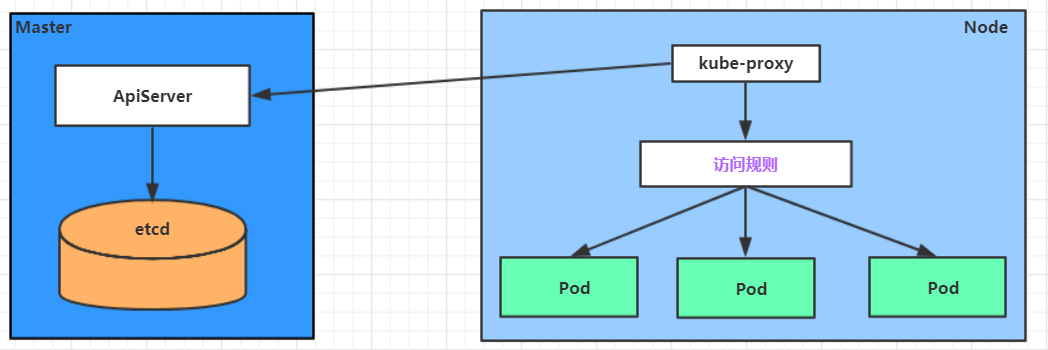
kube-proxy目前支持三种工作模式:
userspace 模式
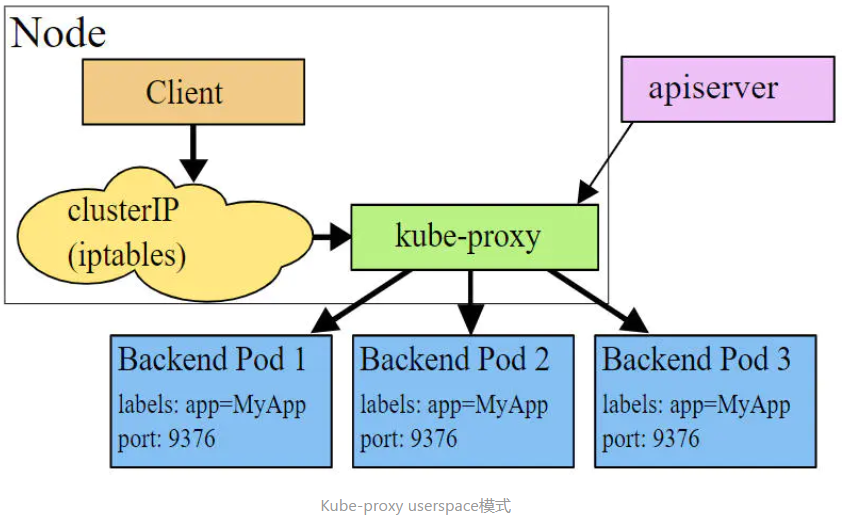
userspace模式下,kube-proxy会为每一个Service创建一个监听端口,发向Cluster IP的请求被Iptables规则重定向到kube-proxy监听的端口上,kube-proxy根据LB算法选择一个提供服务的Pod并和其建立链接,以将请求转发到Pod上。 该模式下,kube-proxy充当了一个四层负责均衡器的角色。由于kube-proxy运行在userspace中,在进行转发处理时会增加内核和用户空间之间的数据拷贝,虽然比较稳定,但是效率比较低。
iptables 模式
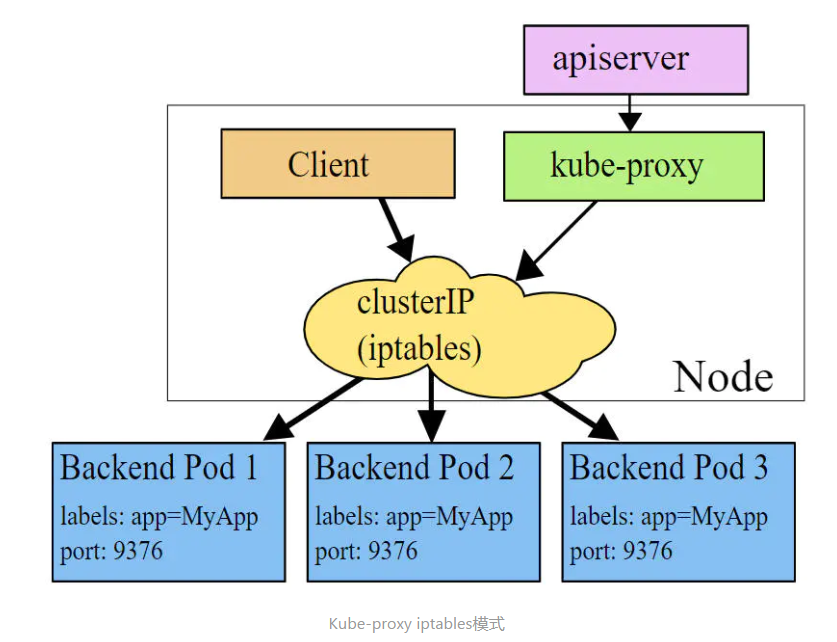
iptables模式下,kube-proxy为service后端的每个Pod创建对应的iptables规则,直接将发向Cluster IP的请求重定向到一个Pod IP。 该模式下kube-proxy不承担四层负责均衡器的角色,只负责创建iptables规则。该模式的优点是较userspace模式效率更高,但不能提供灵活的LB策略,当后端Pod不可用时也无法进行重试。
ipvs 模式
ipvs模式和iptables类似,kube-proxy监控Pod的变化并创建相应的ipvs规则。ipvs相对iptables转发效率更高。除此以外,ipvs支持更多的LB算法。
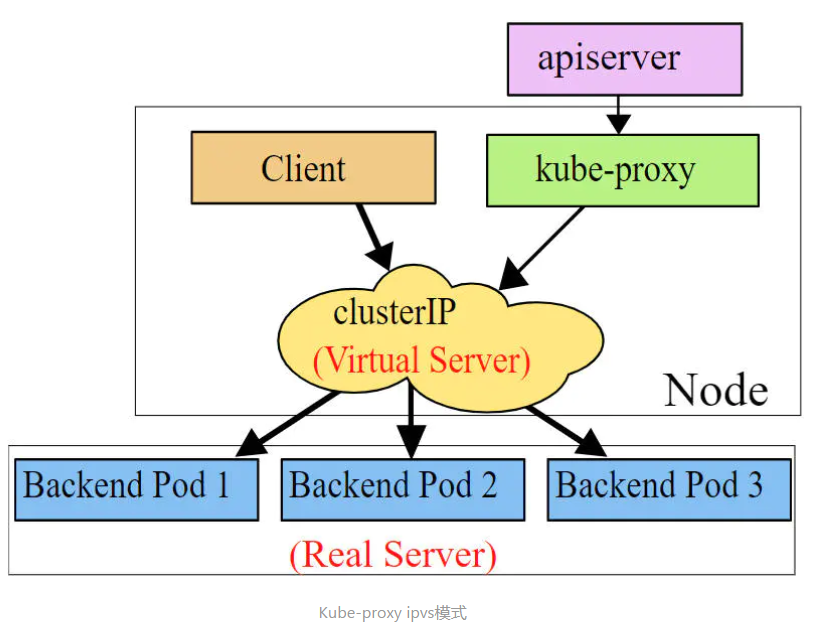
# 此模式必须安装ipvs内核模块,否则会降级为iptables
# 开启ipvs
[root@k8s-master01 ~]# kubectl edit cm kube-proxy -n kube-system
# 修改mode: "ipvs"
[root@k8s-master01 ~]# kubectl delete pod -l k8s-app=kube-proxy -n kube-system
[root@node1 ~]# ipvsadm -Ln
IP Virtual Server version 1.2.1 (size=4096)
Prot LocalAddress:Port Scheduler Flags
  -> RemoteAddress:Port           Forward Weight ActiveConn InActConn
  # 如果没有启用 ipvs 的话,这个命令的输出也就到这里为止
TCP  172.17.0.1:31206 rr
  -> 10.244.102.152:80            Masq    1      0          0
  -> 10.244.102.153:80            Masq    1      0          0
TCP  192.168.122.1:31206 rr
  -> 10.244.102.152:80            Masq    1      0          0
  -> 10.244.102.153:80            Masq    1      0          0
TCP  192.168.190.141:31206 rr
  -> 10.244.102.152:80            Masq    1      0          0
  -> 10.244.102.153:80            Masq    1      0          0
TCP  10.96.0.1:443 rr
  -> 192.168.190.141:6443         Masq    1      0          0
TCP  10.96.0.10:53 rr
  -> 10.244.235.208:53            Masq    1      0          0
  -> 10.244.235.210:53            Masq    1      0          0
TCP  10.96.0.10:9153 rr
  -> 10.244.235.208:9153          Masq    1      0          0
  -> 10.244.235.210:9153          Masq    1      0          0
TCP  10.106.249.47:80 rr
  -> 10.244.102.152:80            Masq    1      0          0
  -> 10.244.102.153:80            Masq    1      0          0
TCP  10.111.114.186:80 rr
  -> 10.244.102.152:80            Masq    1      0          0
  -> 10.244.102.153:80            Masq    1      0          0
TCP  10.244.235.192:31206 rr
  -> 10.244.102.152:80            Masq    1      0          0
  -> 10.244.102.153:80            Masq    1      0          0
TCP  127.0.0.1:31206 rr
  -> 10.244.102.152:80            Masq    1      0          0
  -> 10.244.102.153:80            Masq    1      0          0
UDP  10.96.0.10:53 rr
  -> 10.244.235.208:53            Masq    1      0          0
  -> 10.244.235.210:53            Masq    1      0          0
service 资源清单
apiVersion: v1 # 版本
kind: Service # 类型
metadata: # 元数据
  name: # 资源名称
  namespace: # 命名空间
spec:
  selector: # 标签选择器,用于确定当前Service代理那些Pod
    app: nginx
  type: NodePort # Service的类型,指定Service的访问方式
  clusterIP: # 虚拟服务的IP地址
  sessionAffinity: # session亲和性,支持ClientIP、None两个选项,默认值为None
  ports: # 端口信息
    - port: 8080 # Service端口
      protocol: TCP # 协议
      targetPort : # Pod端口
      nodePort:  # 主机端口
Endpoint
Endpoint是kubernetes中的一个资源对象,存储在etcd中,用来记录一个service对应的所有pod的访问地址,它是根据service配置文件中selector描述产生的。
Endpoints是实现实际服务的端点集合。换句话说,service和pod之间的联系是通过endpoints实现的。

查看方法也简单:
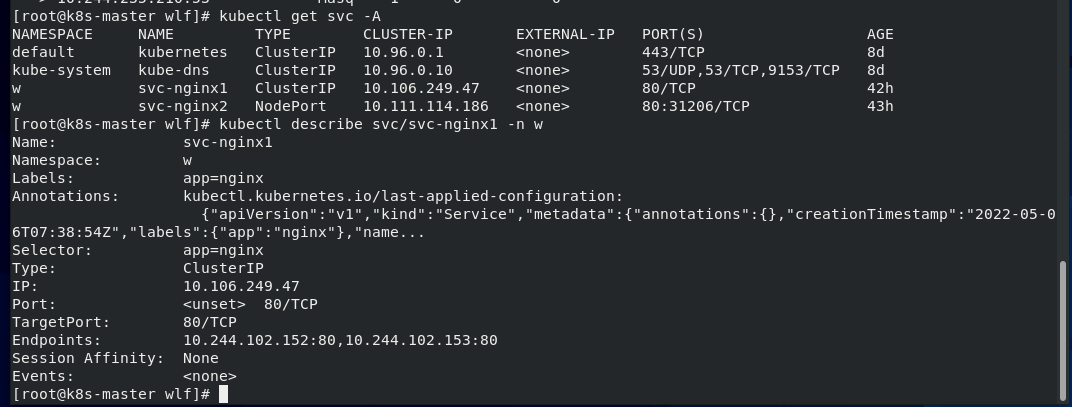
需要注意的是,只有处于 Running 状态,且 readinessProbe 检查通过的 Pod,才会出现在 Service 的 Endpoints 列表里。并且,当某一个 Pod 出现问题时,Kubernetes 会自动把它从 Service 里摘除掉。
负载分发策略
对Service的访问被分发到了后端的Pod上去,目前kubernetes提供了两种负载分发策略:
- 如果不定义,默认使用kube-proxy的策略,比如随机、轮询等。
- 基于客户端地址的会话保持模式,即来自同一个客户端发起的所有请求都会转发到固定的一个Pod上,这对于传统基于Session的认证项目来说很友好,此模式可以在spec中添加sessionAffinity: ClusterIP选项。
我们来做个实验:
1、创建三个 pod:
apiVersion: apps/v1
kind: Deployment
metadata:
  name: pc-deployment
  namespace: dev
spec:
  replicas: 3
  selector:
    matchLabels:
      app: nginx-pod
  template:
    metadata:
      labels:
        app: nginx-pod
    spec:
      containers:
      - name: nginx
        image: nginx:1.17.1
        ports:
        - containerPort: 80
2、查看创建结果
[root@k8s-master wlf]# kubectl get pods -n w -o wide --show-labels
NAME                             READY   STATUS    RESTARTS   AGE     IP               NODE                    NOMINATED NODE   READINESS GATES   LABELS
pc-deployment-6696798b78-2jpf4   1/1     Running   0          2m50s   10.244.102.155   localhost.localdomain   <none>           <none>            app=nginx-pod,pod-template-hash=6696798b78
pc-deployment-6696798b78-lggkb   1/1     Running   0          2m50s   10.244.102.156   localhost.localdomain   <none>           <none>            app=nginx-pod,pod-template-hash=6696798b78
pc-deployment-6696798b78-vsxj8   1/1     Running   0          2m50s   10.244.102.154   localhost.localdomain   <none>           <none>            app=nginx-pod,pod-template-hash=6696798b78
3、为了方便后面的测试,修改下三台nginx的index.html页面。
kubectl exec -it pc-deployment-6696798b78-2jpf4 -n w /bin/sh
echo "10.244.102.155" > /usr/share/nginx/html/index.html
4、测试一下是否写入成功
[root@k8s-master wlf]# curl 10.244.102.154
10.244.102.154
5、创建集群负载服务:
apiVersion: v1
kind: Service
metadata:
  name: service-clusterip
  namespace: w
spec:
  selector:
    app: nginx-pod
  clusterIP: 10.97.97.97 # service的ip地址,如果不写,默认会生成一个
  type: ClusterIP
  ports:
  - port: 80  # Service端口
    targetPort: 80 # pod端口
6、 查看service的详细信息
# 在这里有一个Endpoints列表,里面就是当前service可以负载到的服务入口[root@k8s-master wlf]# kubectl describe svc service-clusterip -n w
Name:              service-clusterip
Namespace:         w
Labels:            <none>
Annotations:       <none>
Selector:          app=nginx-pod
Type:              ClusterIP
IP:                10.97.97.97
Port:              <unset>  80/TCP
TargetPort:        80/TCP
Endpoints:         10.244.102.154:80,10.244.102.155:80,10.244.102.156:80
Session Affinity:  None
Events:            <none>
7、查看ipvs的映射规则【rr 轮询】
TCP  10.97.97.97:80 rr
  -> 10.244.102.154:80            Masq    1      0          0
  -> 10.244.102.155:80            Masq    1      0          0
  -> 10.244.102.156:80            Masq    1      0          0
8、默认访问测试

是轮询吧。
9、修改分发策略
apiVersion: v1
kind: Service
metadata:
  name: service-clusterip
  namespace: dev
spec:
  selector:
    app: nginx-pod
  clusterIP: 10.97.97.97 # service的IP地址,如果不写,默认会生成一个
  type: ClusterIP
  sessionAffinity: ClientIP # 修改分发策略为基于客户端地址的会话保持模式
  ports:
    - port: 80 # Service的端口
      targetPort: 80 # Pod的端口
10、再测试

无头 service
开发人员可能不想使用Service提供的负载均衡功能,而希望自己来控制负载均衡策略,针对这种情况,kubernetes提供了HeadLiness Service,这类Service不会分配Cluster IP,如果想要访问service,只能通过service的域名进行查询。
创建一个无头service:
apiVersion: v1
kind: Service
metadata:
  name: service-headliness
  namespace: dev
spec:
  selector:
    app: nginx-pod
  clusterIP: None # 将clusterIP设置为None,即可创建headliness Service
  type: ClusterIP
  ports:
  - port: 80
    targetPort: 80
进入pod 中:
kubectl exec -it pc-deployment-6696798b78-2jpf4 -n w bash
root@pc-deployment-6696798b78-2jpf4:/# cat /etc/resolv.conf
nameserver 10.96.0.10
search w.svc.cluster.local svc.cluster.local cluster.local localdomain
options ndots:5
通过Service的域名进行查询:
dig @10.96.0.10 service-headliness.w.svc.cluster.local

service-headliness.w.svc.cluster.local.	30 IN A	10.244.102.155
service-headliness.w.svc.cluster.local.	30 IN A	10.244.102.154
service-headliness.w.svc.cluster.local.	30 IN A	10.244.102.156
如何排查Service 相关的问题
其实都可以通过分析 Service 在宿主机上对应的 iptables 规则(或者 IPVS 配置)得到解决。
比如,当你的 Service 没办法通过 DNS 访问到的时候。你就需要区分到底是 Service 本身的配置问题,还是集群的 DNS 出了问题。一个行之有效的方法,就是检查 Kubernetes 自己的 Master 节点的 Service DNS 是否正常:
# 在一个Pod里执行
$ nslookup kubernetes.default
Server:    10.0.0.10
Address 1: 10.0.0.10 kube-dns.kube-system.svc.cluster.local

Name:      kubernetes.default
Address 1: 10.0.0.1 kubernetes.default.svc.cluster.local
如果上面访问 kubernetes.default 返回的值都有问题,那你就需要检查 kube-dns 的运行状态和日志了。否则的话,你应该去检查自己的 Service 定义是不是有问题。而如果你的 Service 没办法通过 ClusterIP 访问到的时候,你首先应该检查的是这个 Service 是否有 Endpoints:
$ kubectl get endpoints hostnames
NAME        ENDPOINTS
hostnames   10.244.0.5:9376,10.244.0.6:9376,10.244.0.7:9376
需要注意的是,如果你的 Pod 的 readniessProbe 没通过,它也不会出现在 Endpoints 列表里。而如果 Endpoints 正常,那么你就需要确认 kube-proxy 是否在正确运行。在我们通过 kubeadm 部署的集群里,你应该看到 kube-proxy 输出的日志如下所示:
I1027 22:14:53.995134    5063 server.go:200] Running in resource-only container "/kube-proxy"
I1027 22:14:53.998163    5063 server.go:247] Using iptables Proxier.
I1027 22:14:53.999055    5063 server.go:255] Tearing down userspace rules. Errors here are acceptable.
I1027 22:14:54.038140    5063 proxier.go:352] Setting endpoints for "kube-system/kube-dns:dns-tcp" to [10.244.1.3:53]
I1027 22:14:54.038164    5063 proxier.go:352] Setting endpoints for "kube-system/kube-dns:dns" to [10.244.1.3:53]
I1027 22:14:54.038209    5063 proxier.go:352] Setting endpoints for "default/kubernetes:https" to [10.240.0.2:443]
I1027 22:14:54.038238    5063 proxier.go:429] Not syncing iptables until Services and Endpoints have been received from master
I1027 22:14:54.040048    5063 proxier.go:294] Adding new service "default/kubernetes:https" at 10.0.0.1:443/TCP
I1027 22:14:54.040154    5063 proxier.go:294] Adding new service "kube-system/kube-dns:dns" at 10.0.0.10:53/UDP
I1027 22:14:54.040223    5063 proxier.go:294] Adding new service "kube-system/kube-dns:dns-tcp" at 10.0.0.10:53/TCP
如果 kube-proxy 一切正常,你就应该仔细查看宿主机上的 iptables 了。而一个 iptables 模式的 Service 对应的规则,它们包括:
KUBE-SERVICES 或者 KUBE-NODEPORTS 规则对应的 Service 的入口链,这个规则应该与 VIP 和Service 端口一一对应;
KUBE-SEP-(hash) 规则对应的 DNAT 链,这些规则应该与 Endpoints 一一对应;
KUBE-SVC-(hash) 规则对应的负载均衡链,这些规则的数目应该与 Endpoints 数目一致;
如果是 NodePort 模式的话,还有 POSTROUTING 处的 SNAT 链。
通过查看这些链的数量、转发目的地址、端口、过滤条件等信息,你就能很容易发现一些异常的蛛丝马迹。
当然,还有一种典型问题,就是 Pod 没办法通过 Service 访问到自己。这往往就是因为 kubelet 的 hairpin-mode 没有被正确设置。你只需要确保将 kubelet 的 hairpin-mode 设置为 hairpin-veth 或者 promiscuous-bridge 即可。
其中,在 hairpin-veth 模式下,你应该能看到 CNI 网桥对应的各个 VETH 设备,都将 Hairpin 模式设置为了 1,如下所示:
$ for d in /sys/devices/virtual/net/cni0/brif/veth*/hairpin_mode; do echo "$d = $(cat $d)"; done
/sys/devices/virtual/net/cni0/brif/veth4bfbfe74/hairpin_mode = 1
/sys/devices/virtual/net/cni0/brif/vethfc2a18c5/hairpin_mode = 1
而如果是 promiscuous-bridge 模式的话,你应该看到 CNI 网桥的混杂模式(PROMISC)被开启,如下所示:
$ ifconfig cni0 |grep PROMISC
UP BROADCAST RUNNING PROMISC MULTICAST  MTU:1460  Metric:1
