我这里以libfastcommon-1.0.57、fastdfs-6.08、nginx-1.20.2、fastdfs-nginx-module-1.22为例进行搭建
《官网下载libfastcommon-1.0.57.tar.gz》
《官网下载fastdfs-6.08.tar.gz》
《官网下载nginx-1.20.2.tar.gz》
《官网下载fastdfs-nginx-module-1.22.tar.gz》
创建文件夹
#文件存放根目录
mkdir -p /fastdfs_log
#client.conf
mkdir -p /fastdfs_log/fastdfs/client
#storage.conf、mod_fastdfs.conf
mkdir -p /fastdfs_log/fastdfs/file
#storage.conf
mkdir -p /fastdfs_log/fastdfs/storage
#tracker.conf
mkdir -p /fastdfs_log/fastdfs/tracker
安装依赖
gcc
yum install gcc-c++
PCRE pcre-devel
yum install -y pcre pcre-devel
zlib
yum install -y zlib zlib-devel
OpenSSL
yum install -y openssl openssl-devel
把他们上传到linx服务器的 /usr/local/ 目录下进行解压
cd /usr/local
分别进行tar解压
tar -zxvf libfastcommon-1.0.57.tar.gz
tar -zxvf fastdfs-6.08.tar.gz
#nginx是上传到/usr/目录下解压的,安装是安装到/usr/local目录下的
tar -zxvf nginx-1.20.2.tar.gz
tar -zxvf fastdfs-nginx-module-1.22.tar.gz
安装libfastcommon-1.0.57
cd /usr/local/libfastcommon-1.0.57
./make.sh
./make.sh install
软链接
ln -s /usr/lib64/libfastcommon.so /usr/local/lib/libfastcommon.so
ln -s /usr/lib64/libfastcommon.so /usr/lib/libfastcommon.so
ln -s /usr/lib64/libfdfsclient.so /usr/local/lib/libfdfsclient.so
ln -s /usr/lib64/libfdfsclient.so /usr/lib/libfdfsclient.so
安装fastdfs-6.08
cd /usr/local/fastdfs-6.08
./make.sh
./make.sh install
软链接
ln -s /usr/bin/fdfs_trackerd   /usr/local/bin
ln -s /usr/bin/fdfs_storaged   /usr/local/bin
ln -s /usr/bin/stop.sh         /usr/local/bin
ln -s /usr/bin/restart.sh      /usr/local/bin
复制 FastDFS安装包下conf文件夹所有文件到/etc/fdfs文件夹下
cp /usr/local/fastdfs-6.08/conf/* /etc/fdfs/
vim /etc/fdfs/tracker.conf
主要改:
disabled=false
port=22122
base_path = /fastdfs_log/fastdfs/tracker——Tracker 数据和日志目录地址
http.server_port=80
disabled = false
bind_addr =
port = 22122
connect_timeout = 5
network_timeout = 60
base_path = /fastdfs_log/fastdfs/tracker
max_connections = 1024
accept_threads = 1
work_threads = 4
min_buff_size = 8K
max_buff_size = 128KB
store_lookup = 2
store_group = group2
store_server = 0
store_path = 0
download_server = 0
reserved_storage_space = 20%
log_level = info
run_by_group=
run_by_user =
allow_hosts = *
sync_log_buff_interval = 1
check_active_interval = 120
thread_stack_size = 256KB
storage_ip_changed_auto_adjust = true
storage_sync_file_max_delay = 86400
storage_sync_file_max_time = 300
use_trunk_file = false
slot_min_size = 256
slot_max_size = 1MB
trunk_alloc_alignment_size = 256
trunk_free_space_merge = true
delete_unused_trunk_files = false
trunk_file_size = 64MB
trunk_create_file_advance = false
trunk_create_file_time_base = 02:00
trunk_create_file_interval = 86400
trunk_create_file_space_threshold = 20G
trunk_init_check_occupying = false
trunk_init_reload_from_binlog = false
trunk_compress_binlog_min_interval = 86400
trunk_compress_binlog_interval = 86400
trunk_compress_binlog_time_base = 03:00
trunk_binlog_max_backups = 7
use_storage_id = false
storage_ids_filename = storage_ids.conf
id_type_in_filename = id
store_slave_file_use_link = false
rotate_error_log = false
error_log_rotate_time = 00:00
compress_old_error_log = false
compress_error_log_days_before = 7
rotate_error_log_size = 0
log_file_keep_days = 0
use_connection_pool = true
connection_pool_max_idle_time = 3600
http.server_port = 80
http.check_alive_interval = 30
http.check_alive_type = tcp
http.check_alive_uri = /status.html
启动Tracker
service fdfs_trackerd start
然后按ctrl+c(不要按太快,等一会)
netstat -unltp|grep fdfs

修改/etc/fdfs/storage.conf
vim /etc/fdfs/storage.conf
主要是:
disabled = false
group_name=group1
port=23000
base_path = /fastdfs_log/fastdfs/storage
store_path0 = /fastdfs_log/fastdfs/file
tracker_server = 192.168.18.111:22122
http.server_port = 80
disabled = false
group_name = group1
bind_addr =
client_bind = true
port = 23000
connect_timeout = 5
network_timeout = 60
heart_beat_interval = 30
stat_report_interval = 60
base_path = /fastdfs_log/fastdfs/storage
max_connections = 1024
buff_size = 256KB
accept_threads = 1
work_threads = 4
disk_rw_separated = true
disk_reader_threads = 1
disk_writer_threads = 1
sync_wait_msec = 50
sync_interval = 0
sync_start_time = 00:00
sync_end_time = 23:59
write_mark_file_freq = 500
disk_recovery_threads = 3
store_path_count = 1
store_path0 = /fastdfs_log/fastdfs/file
subdir_count_per_path = 256
tracker_server = 192.168.18.111:22122
log_level = info
run_by_group =
run_by_user =
allow_hosts = *
file_distribute_path_mode = 0
file_distribute_rotate_count = 100
fsync_after_written_bytes = 0
sync_log_buff_interval = 1
sync_binlog_buff_interval = 1
sync_stat_file_interval = 300
thread_stack_size = 512KB
upload_priority = 10
if_alias_prefix =
check_file_duplicate = 0
file_signature_method = hash
key_namespace = FastDFS
keep_alive = 0
use_access_log = false
rotate_access_log = false
access_log_rotate_time = 00:00
compress_old_access_log = false
compress_access_log_days_before = 7
rotate_error_log = false
error_log_rotate_time = 00:00
compress_old_error_log = false
compress_error_log_days_before = 7
rotate_access_log_size = 0
rotate_error_log_size = 0
log_file_keep_days = 0
file_sync_skip_invalid_record = false
use_connection_pool = true
connection_pool_max_idle_time = 3600
compress_binlog = true
compress_binlog_time = 01:30
check_store_path_mark = true
http.domain_name =
http.server_port = 80
启动Storage
service fdfs_storaged start
然后按ctrl+c(不要按太快,等一会)
netstat -unltp|grep fdfs

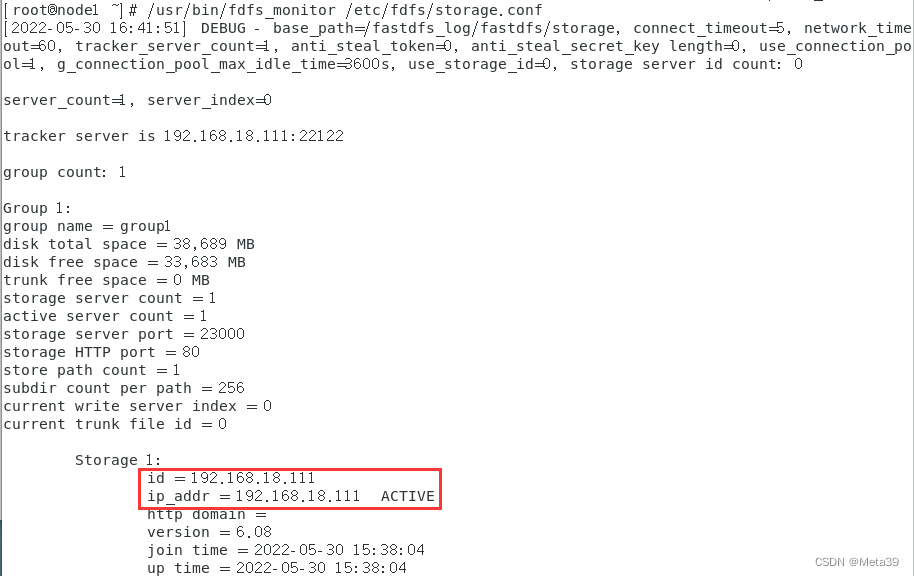
查看Storage和Tracker是否在通信:
/usr/bin/fdfs_monitor /etc/fdfs/storage.conf

文件上传测试
vim /etc/fdfs/client.conf
主要是:
base_path = /fastdfs_log/fastdfs/client
tracker_server = 192.168.18.111:22122
http.tracker_server_port = 80
connect_timeout = 5
network_timeout = 60
base_path = /fastdfs_log/fastdfs/client
tracker_server = 192.168.18.111:22122
log_level = info
use_connection_pool = false
connection_pool_max_idle_time = 3600
load_fdfs_parameters_from_tracker = false
use_storage_id = false
storage_ids_filename = storage_ids.conf
http.tracker_server_port = 80
上传一张图片到linux服务器的/data/文件夹下,如:1.jpeg
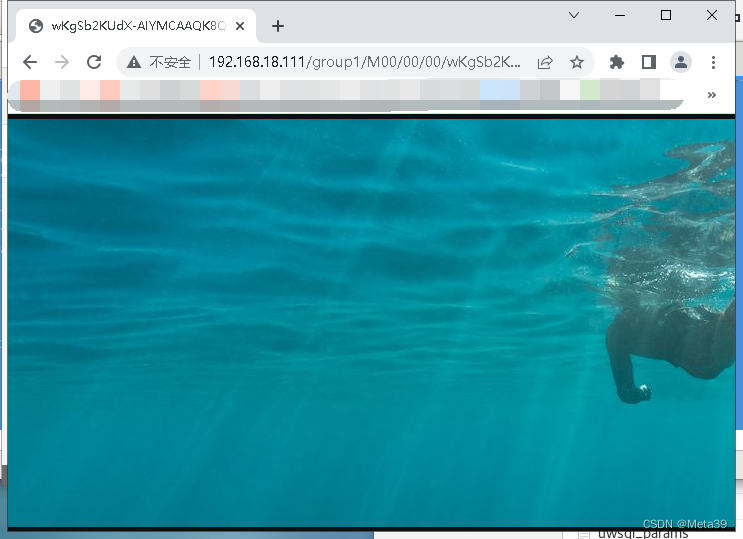
/usr/bin/fdfs_upload_file /etc/fdfs/client.conf /data/1.jpeg
返回的文件ID由group、存储目录、两级子目录、fileid、文件后缀名(由客户端指定,主要用于区分文件类型)拼接而成。
group1/M00/00/00/wKgSb2KUdX-AIYMCAAQK8QLNwFc13.jpeg
nginx访问图片
修改nginx.conf
vim /usr/local/nginx-1.20.2/conf/nginx.conf
主要是:
location /group1/M00 {
alias /fastdfs_log/fastdfs/file/data;
}
worker_processes  1;
pid        logs/nginx.pid;
events {
    worker_connections  1024;
}

http {
    include       mime.types;
    default_type  application/octet-stream;
    sendfile        on;
    keepalive_timeout  65;
    server {
        listen       80;
        server_name  localhost;
        location / {
            root   html;
            index  index.html index.htm;
        }
		location /group1/M00 {
			alias /fastdfs_log/fastdfs/file/data;
		}
     }
}
浏览器访问192.168.18.111/group1/M00/00/00/wKgSb2KUdX-AIYMCAAQK8QLNwFc13.jpeg

fastdfs-nginx-module安装
fastdfs-nginx-module 可以重定向文件链接到源服务器取文件,避免客户端由于复制延迟导致的文件无法访问错误
进入到nginx的解压包目录我的是usr
停止nginx(我是配了软链接的,没配的要进入到nginx的sbin/nginx目录下执行./ngnin -s stop)
nginx -s stop
cd /usr/nginx-1.20.2/
这里根据自己的nginx和fastdfs-nginx-module目录去配置
./configure --with-stream --add-module=/usr/local/fastdfs-nginx-module-1.22/src --prefix=/usr/local/nginx-1.20.2
编译安装
make && make install
查看fastdfs-nginx-module是否安装成功(我是配了软链接的,没配的要进入到nginx的sbin/nginx目录下执行./ngnin -V)
nginx -V

复制 fastdfs-nginx-module 源码中的配置文件到==/etc/fdfs ==目录, 并修改
cp /usr/local/fastdfs-nginx-module-1.22/src/mod_fastdfs.conf /etc/fdfs/
修改mod_fastdfs.conf
vim /etc/fdfs/mod_fastdfs.conf
主要是:
connect_timeout=10
tracker_server=192.168.18.111:22122
storage_server_port=23000
url_have_group_name = true
store_path0=/fastdfs_log/fastdfs/file
connect_timeout=10
network_timeout=30
base_path=/tmp
load_fdfs_parameters_from_tracker=true
storage_sync_file_max_delay = 86400
use_storage_id = false
storage_ids_filename = storage_ids.conf
tracker_server=192.168.18.111:22122
storage_server_port=23000
group_name=group1
url_have_group_name = true
store_path_count=1
store_path0=/fastdfs_log/fastdfs/file
log_level=info
log_filename=
response_mode=proxy
if_alias_prefix=
flv_support = true
flv_extension = flv
group_count = 0
复制 FastDFS 的部分配置文件到/etc/fdfs 目录
cd /usr/local/fastdfs-6.08/conf/
cp anti-steal.jpg http.conf mime.types /etc/fdfs/
修改nginx.conf
vim /usr/local/nginx-1.20.2/conf/nginx.conf
在80端口下添加fastdfs-nginx模块
worker_processes  1;
pid        logs/nginx.pid;
events {
    worker_connections  1024;
}

http {
    include       mime.types;
    default_type  application/octet-stream;
    sendfile        on;
    keepalive_timeout  65;
    server {
        listen       80;
        server_name  localhost;
        location / {
            root   html;
            index  index.html index.htm;
        }

		#location /group1/M00 {
			#alias /fastdfs_log/fastdfs/file/data;
		#}
		location ~/group([0-9])/M00 {
    		ngx_fastdfs_module;
		}
     }
}
题外
关闭Tracker
service fdfs_trackerd stop
设置Tracker开机启动
chkconfig fdfs_trackerd on
关闭Storage
service fdfs_storaged stop
设置 Storage 开机启动
chkconfig fdfs_storaged on
springboot引入fastdfs依赖
        <!--        fastDFS-->
        <dependency>
            <groupId>com.github.tobato</groupId>
            <artifactId>fastdfs-client</artifactId>
            <version>1.27.2</version>
        </dependency>
    </dependencies>
application.yml
fdfs:
  so-timeout: 1501
  connect-timeout: 601
  thumb-image:             #缩略图生成参数
    width: 150
    height: 150
  tracker-list:            #TrackerList参数,支持多个
    - 192.168.18.111:22122
FastDFSUtils.java
import com.github.tobato.fastdfs.domain.conn.FdfsWebServer;
import com.github.tobato.fastdfs.domain.fdfs.StorePath;
import com.github.tobato.fastdfs.domain.proto.storage.DownloadByteArray;
import com.github.tobato.fastdfs.service.FastFileStorageClient;
import com.sun.org.slf4j.internal.Logger;
import com.sun.org.slf4j.internal.LoggerFactory;
import org.apache.commons.io.FilenameUtils;
import org.springframework.stereotype.Component;
import org.springframework.util.StringUtils;
import org.springframework.web.multipart.MultipartFile;

import javax.annotation.Resource;
import java.io.File;
import java.io.FileInputStream;
import java.io.IOException;

/**
 * @Description FastDFS文件管理工具类
 */
@Component
public class FastDFSUtils {

    private static final Logger log = LoggerFactory.getLogger(FastDFSUtils.class);

    @Resource
    private FastFileStorageClient fastFileStorageClient;
    @Resource
    private FdfsWebServer fdfsWebServer;

    public String uploadFile(MultipartFile file) throws IOException {
        StorePath storePath = fastFileStorageClient.uploadFile(file.getInputStream(), file.getSize(), FilenameUtils.getExtension(file.getOriginalFilename()), null);
        String fullPath = storePath.getFullPath();
//        return getResAccessUrl(fullPath);
        return fullPath;
    }

    public String uploadFile(File file) {
        try {
            FileInputStream inputStream = new FileInputStream(file);
            StorePath storePath = fastFileStorageClient.uploadFile(inputStream, file.length(), FilenameUtils.getExtension(file.getName()), null);
            return storePath.getFullPath();
        } catch (Exception e) {
            log.error("上传文件失败!", e);
            return null;
        }
    }

    public byte[] downloadFile(String filePath) throws IOException{
        StorePath storePath = StorePath.parseFromUrl(filePath);
        byte[] bytes = fastFileStorageClient.downloadFile(storePath.getGroup(), storePath.getPath(), new DownloadByteArray());
        return bytes;
    }

    public Boolean deleteFile(String filePath) {
        if (StringUtils.isEmpty(filePath)) {
            return false;
        }
        try {
            StorePath storePath = StorePath.parseFromUrl(filePath);
            fastFileStorageClient.deleteFile(storePath.getGroup(), storePath.getPath());
        } catch (Exception e) {
            log.error("上传文件失败!", e);
            return false;
        }
        return true;
    }

    /*
     * 封装文件完整URL地址
     */
    public String getResAccessUrl(String path) {
        String url = fdfsWebServer.getWebServerUrl() + path;
        log.debug("上传文件地址为:\n" + url);
        return url;
    }
}
FastDFSController.java测试
import com.fu.demo.util.FastDFSUtils;
import org.springframework.web.bind.annotation.PostMapping;
import org.springframework.web.bind.annotation.RequestParam;
import org.springframework.web.bind.annotation.RestController;
import org.springframework.web.multipart.MultipartFile;

import javax.annotation.Resource;
import java.io.IOException;

@RestController
public class FastDFSController {

    @Resource
    private FastDFSUtils fastDFSUtils;

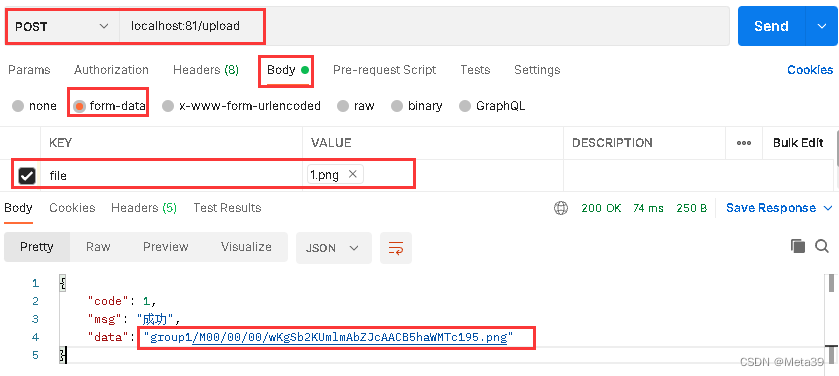
    @PostMapping("upload")
    public String upload(@RequestParam(name = "file") MultipartFile file) throws IOException {
        return fastDFSUtils.uploadFile(file);
    }
}

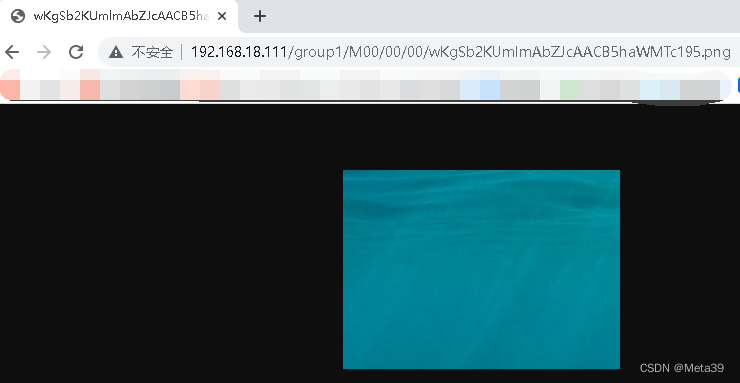
访问:http://192.168.18.111/group1/M00/00/00/wKgSb2KUmlmAbZJcAACB5haWMTc195.png

