1.前端项目自动化部署需要的环境依赖
Node 安装项目依赖、打包都需要
Nginx web 项目部署必须「正向代理、方向代理、负载均衡等等」、 GitLab 也会用到
Nginx(默认自动安装)
Git 自动化部署,需要拉取代码
GitLab 没啥好说
GitLab-Runner 配合 GitLab CI/CD 使用的应用程序
2.安装 Node
下载和解压
# 下载安装包,需要哪个版本,在url中修改就可以了
wget https://nodejs.org/dist/v12.9.0/node-v12.9.0-linux-x64.tar.xz

# 解压
tar xf node-v12.9.0-linux-x64.tar.xz

# 复制
cp -rf /root/node-v12.9.0-linux-x64 /usr/local/node

#编辑配置文件
vim /etc/profile

#在文件的最后,加上下面的内容
export PATH=$PATH:/usr/local/node/bin

#重载系统配置文件
source /etc/profile

#测试 node 环境变量是否生效
[root@jumpserver node]# node -v
v12.9.0
3.安装 Git
Gitlab自动化部署需要拉取代码,需要用到 Git。尽量安装Git 2.x.x版本,不然新版的 GitLab 自动化部署无法拉取代码。
本人安装的是 Git 2.24.4 版本,其他版本请自行尝试
使用 IUS 仓库(yum源),执行完下面的命令,应该就能安装了git
yum -y install \
https://repo.ius.io/ius-release-el7.rpm \
https://dl.fedoraproject.org/pub/epel/epel-release-latest-7.noarch.rpm

#安装 Git
[root@jumpserver yum.repos.d]# yum install -y git
#查看 Git版本
[root@jumpserver yum.repos.d]# git --version
git version 1.8.3.1
4.源码编译nginx
# 安装依赖包
[root@jumpserver data]# yum install -y gcc pcre-devel openssl-devel zlib-devel
[root@jumpserver data]# useradd -r -s /sbin/nologin nginx
[root@jumpserver data]# tar -xvf nginx-1.18.0.tar.gz
[root@jumpserver data]# cd nginx-1.18.0
[root@jumpserver nginx-1.18.0]#  ./configure --prefix=/usr/local/nginx \
>  --user=nginx \
>  --group=nginx \
> --with-http_ssl_module \
>  --with-http_v2_module \
>  --with-http_realip_module \
>  --with-http_stub_status_module \
>  --with-http_gzip_static_module \
>  --with-pcre \
>  --with-stream \
>  --with-stream_ssl_module \
>  --with-stream_realip_module

[root@jumpserver nginx-1.18.0]# make && make install

# 创建软链接
[root@jumpserver nginx-1.18.0]# ln -s /usr/local/nginx/sbin/nginx  /usr/sbin/
# 启动nginx
[root@jumpserver nginx]# nginx

[root@jumpserver nginx]# curl 192.168.32.132
<!DOCTYPE html>
<html>
<head>
<title>Welcome to nginx!</title>
<style>
    body {
        width: 35em;
        margin: 0 auto;
        font-family: Tahoma, Verdana, Arial, sans-serif;
    }
</style>
</head>
<body>
<h1>Welcome to nginx!</h1>
<p>If you see this page, the nginx web server is successfully installed and
working. Further configuration is required.</p>

<p>For online documentation and support please refer to
<a href="http://nginx.org/">nginx.org</a>.<br/>
Commercial support is available at
<a href="http://nginx.com/">nginx.com</a>.</p>

<p><em>Thank you for using nginx.</em></p>
</body>
</html>

# 设置自启动
[root@jumpserver system]# cat /lib/systemd/system/nginx.service
[Unit]
Description=nginx service
After=network.target

[Service]
Type=forking
ExecStart=/usr/local/nginx/sbin/nginx
ExecReload=/usr/local/nginx/sbin/nginx -s reload
ExecStop=/usr/local/nginx/sbin/nginx -s quit
PrivateTmp=true

[Install]
WantedBy=multi-user.target

# 防火墙开放80端口
[root@jumpserver system]# firewall-cmd --permanent --zone=public --add-port=80/tcp
success
# 重新加载防火墙
[root@jumpserver system]# firewall-cmd --reload
5.安装GIt Lab
# 安装 GitLab,需要的时间比较长
yum -y install https://mirrors.tuna.tsinghua.edu.cn/gitlab-ce/yum/el7/gitlab-ce-14.3.0-ce.0.el7.x86_64.rpm
#编辑配置文件
vim /etc/gitlab/gitlab.rb

#找到,external_url, 修改 gitlab 访问地址。可以是域名(请确保确定域名正确解析了),服务器IP,也可以加上端口。设置端口时,请确保自己开放了对应的端口。可以参考上面提到防火墙问题

# 192.168.32.132 对应的就是服务器的IP,端口为 1874

external_url 'http://192.168.32.132:1874'

# 开放 1874 端口
firewall-cmd --permanent --zone=public --add-port=1874/tcp

# 重载防火墙
firewall-cmd --reload

#重载配置文件,需要的时间比较长
[root@jumpserver ~]# gitlab-ctl reconfigure

# 启动gitlab服务

sudo gitlab-ctl start

# gitlab服务停止

sudo gitlab-ctl stop

# 重启gitlab服务

sudo gitlab-ctl restart

# 首次登录gitlab 密码
[root@jumpserver ~]# cat /etc/gitlab/initial_root_password
# WARNING: This value is valid only in the following conditions
#          1. If provided manually (either via `GITLAB_ROOT_PASSWORD` environment variable or via `gitlab_rails['initial_root_password']` setting in `gitlab.rb`, it was provided before database was seeded for the first time (usually, the first reconfigure run).
#          2. Password hasn't been changed manually, either via UI or via command line.
#
#          If the password shown here doesn't work, you must reset the admin password following https://docs.gitlab.com/ee/security/reset_user_password.html#reset-your-root-password.
#密码在这里:
Password: fBy1bpzI/sQ8J5bks1KS41hsW0eD9f1P/PX7HdHc6Z4=

# NOTE: This file will be automatically deleted in the first reconfigure run after 24 hours.

# 修改密码
进入 GitLab 控制台
gitlab-rails console -e production
执行命令: user = User.where(id: 1).first,此 user 则表示 root 用户
执行命令:user.password = 'admin@sjy’修改密码, user.password_confirmation = ‘admin@sjy’ 确认密码
执行命令: user.save
执行命令: exit
5.部署CI/CD
安装 gitlab-runner
# 下载
wget -O /usr/local/bin/gitlab-runner https://gitlab-runner-downloads.s3.amazonaws.com/latest/binaries/gitlab-runner-linux-amd64

# 分配运行权限
chmod +x /usr/local/bin/gitlab-runner

# 创建用户
useradd --comment 'GitLab Runner' --create-home gitlab-runner --shell /bin/bash

# 安装
gitlab-runner install --user=gitlab-runner --working-directory=/home/gitlab-runner

# 运行
gitlab-runner start
新建 runner
# 注册 runner
gitlab-runner register

# 输入 gitlab 的访问地址
http://192.168.32.132:1874

# 输入 runner token,打开 http://192.168.32.132:1874/admin/runners 页面查看
tZwc77sFFHRbX6ck9q9r

# runner 描述,随便填
测试webpack-vue项目部署

# runner tag
webpack-vue-cicd

# 输入(选择) shell
shell

# 注册 runner
[root@jumpserver /]# gitlab-runner register
Runtime platform                                    arch=amd64 os=linux pid=12332 revision=febb2a09 version=15.0.0
Running in system-mode.

# 输入 gitlab 的访问地址
Enter the GitLab instance URL (for example, https://gitlab.com/):
http://192.168.32.132:1874
# 输入 runner token,打开 http://192.168.32.132:1874/admin/runners 页面查看
Enter the registration token:
tZwc77sFFHRbX6ck9q9r
# runner 描述,随便填
Enter a description for the runner:
[jumpserver]: 测试webpack-vue项目部署

Enter tags for the runner (comma-separated):
webpack-vue-cicd

Enter optional maintenance note for the runner:
shell

Registering runner... succeeded                     runner=tZwc77sF
Enter an executor: custom, docker, ssh, virtualbox, docker-ssh+machine, kubernetes, docker-ssh, parallels, shell, docker+machine:
shell
Runner registered successfully. Feel free to start it, but if it's running already the config should be automatically reloaded!
注册完成后,就可以在http://localhost:1874/admin/runners 页面查看创建的runner
6.nginx 配置项目访问地址
# 创建目录
mkdir -pv /www/wwwroot/webpack_vue_cicd

# 分配权限
chown gitlab-runner /www/wwwroot/webpack_vue_cicd/

# 开放 3001 端口
firewall-cmd --permanent --zone=public --add-port=3001/tcp

# 重载防火墙
firewall-cmd --reload
# 打开 nginx 配置文件
vim /usr/local/nginx/conf/nginx.conf

# 在第一个 server  下方 (nginx 默认的,端口为80),加上下面的内容
server {
    listen       3001; # 端口号
    server_name  localhost; # 服务器地址

    location / {
        root   /www/wwwroot/webpack_vue_cicd; # 项目存放目录
        index  index.html index.htm; # 默认访问的主页
    }
}
# 重新加载nginx
[root@jumpserver /]# nginx -s reload
7.push 项目到gitlab 新建项目下
git remote update origin --prune  刷新分支 如果有旧分支删除 创建新的分支 就刷新到最新的分支在提交代码到那个新的分支上面

git branch  查看本地分支

git branch -a 查看本地以及远程所有分支

git branch -r 查看远程分支

git checkout -b compile remotes/origin/compile 切换到你想要提交的分支

git add .

git commit -m ''  提交代码

git status 查看状态

git pull origin compile     拉取远程指定分支

git log -3 --graph compile 查看本地提交commit的状态


操作步骤:
1.将gitlab上新建项目先拉取到本地
2.将文件夹内容复制进此目录下
3.执行相关git命令
# git branch  查看本地分支
# git checkout -b compile remotes/origin/compile 切换到你想要提交的分支
# git add .  添加当前目录下的文件到缓存区
# git commit -m ''  提交代码注释
# git push origin main 推送项目到main 分支下
# git status 查看缓存区内容
# git clean -d * 删除缓存区所有内容
8. 编写 .gitlab-ci.yml 文件
.gitlab-ci.yml 文件是存放在项目的根目录下的,要提交到gitlab上面,runner 会根据 .gitlab-ci.yml 编写的规则自动部署项目

新建 .gitlab-ci.yml,添加下面的内容

# 阶段
stages:
  - build
  - deploy
  # 缓存 node_modules 减少打包时间,默认会清除 node_modules 和 dist
cache:
  paths:
    - node_modules/

# 拉取项目,打包
build:
  stage: build # 阶段名称 对应,stages
  tags: # runner 标签(注册runner时设置的,可在 admin->runner中查看)
    - webpack-vue-cicd
  script: # 脚本(执行的命令行)
    - cd ${CI_PROJECT_DIR}
    - echo "当前目录位置:"
    - pwd
    - echo "安装npm步骤"
    - npm install
    - npm run build
  only:
    - main #拉取分支
  artifacts:   # 把 dist 的内容传递给下一个阶
    paths:
        - dist/

# 部署
deploy:
  stage: deploy # 阶段名称 对应,stages
  tags: # runner 标签(注册runner时设置的)
    - webpack-vue-cicd
  script: # 脚本(执行的命令行)
    - rm -rf /www/wwwroot/webpack_vue_cicd/*
    - cp -rf ${CI_PROJECT_DIR}/dist/* /www/wwwroot/webpack_vue_cicd/ # 把包完成,复制 dist 下的文件到对应的项目位置
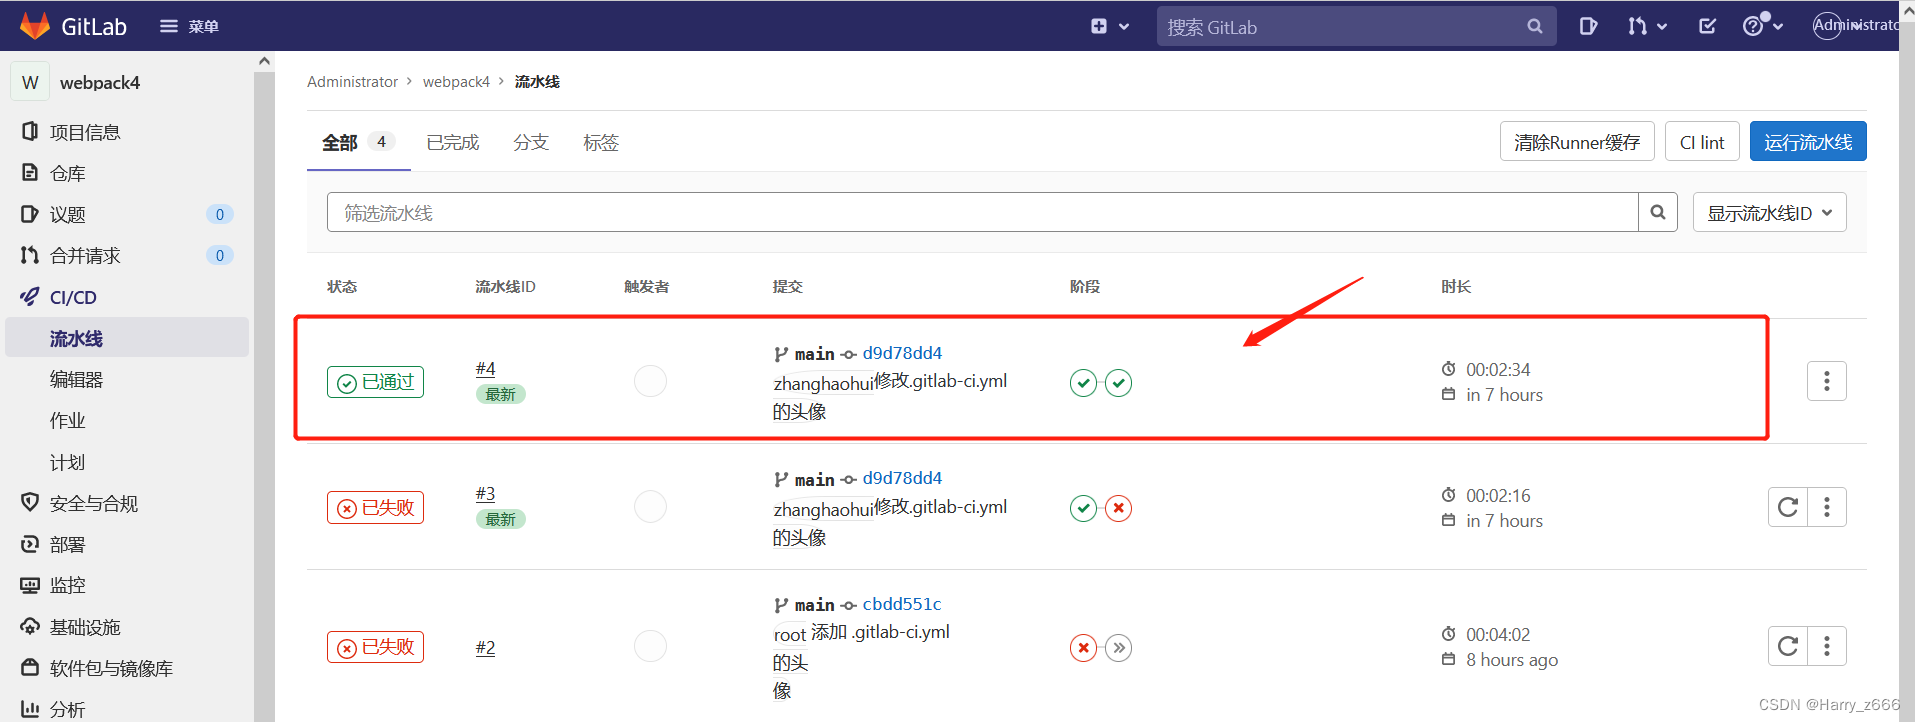
9.验收效果
每次出发流水线的条件:
1.当有新的代码提交到gitlab分支上时,就会自动触发流水线
2.自己通过gitlab上的请求合并选项手动点击流水线
3.浏览器输入192.168.32.132:3001 访问项目
