卸载
1.检查nginx服务是否运行,如果正在运行则关闭服务。
#检查服务是否在运行
ps -ef|grep nginx

#停止服务
/usr/local/nginx/sbin/nginx -s stop
2.查找并删除nginx相关文件。
#查找nginx相关文件
whereis nginx

#依次删除find找到的所有目录
find / -name nginx
3.卸载nginx依赖。
yum remove nginx
一 软件安装
1.1 安装包下载
http://nginx.org/en/download.html

1.2 解压安装包
1 将安装包上传到服务器指定的目录下
2 对安装包进行解压
tar -zxvf nginx-1.21.6.tar.gz -C /www/server/nginx/

3 修改文件名,将解压后的文件作文nginx安装的元文件
mv nginx-1.21.6 nginx-source

1.3 服务器安装
- 在nginx-source的根目录中执行如下命令(下面是目录结构)

1.3.1 安装前准备
需要提前安装nginx的依赖项
yum -y install gcc pcre-devel zlib-devel openssl openssl-devel
1.3.2 nginx安装(nginx-source的根目录中执行)
1 执行:./configure
2 执行:make && make install
1.3.3 nginx工作目录
查找并进入工作目录
whereis nginx
cd .....

二 常见问题
2.1 安装nginx的依赖项问题
问题1:You can use subscription-manager to register…
解决方法:关闭订阅管理器功能
[root@localhost yum.repos.d]# vim /etc/yum/pluginconf.d/subscription-manager.conf
[main]
enabled=0
问题2:Repository epel is listed more than once in the configuration…
解决方法:建一个bak目录将除了CentOS-Base.repo之外的文件都移动到bak目录下备份
cd /etc/yum.repos.d
mkdir bak
问题3:Loading mirror speeds from cached hostfile…
解决方法:修改yum源
cd /etc/yum.repos.d
mv CentOS-Base.repo CentOS-Base.repo.backup
wget http://mirrors.163.com/.help/CentOS7-Base-163.repo
mv CentOS7-Base-163.repo CentOS-Base.repo
yum clean all
2.2 ./configure 报错权限问题
添加权限
chmod + x configure
三 常用指令
所有指令在sbin目录下执行
查看版本:./nginx -v
检测配置:./nginx -t
检测特定配置:./nginx -t -c /usr/local/nginx/conf/nginx.conf -c表示configuration
启动特定配置:./nginx -c /usr/local/nginx/conf/nginx.conf启动命令:./nginx
-s 向正在运行的nginx主进程发送信号,信号的可用值有stop, quit, reopen, reload
暴力停止:./nginx -s stop 快速停止nginx ;
优雅停止:./nginx -s quit 完整有序的停止nginx,这个命令会等待所有请求结束后再关闭nginx
重载配置:./nginx -s reload 平滑的重启,修改配置后,重新加载配置
重启日志:./nginx -s reopen 重新打开日志文件
四 配置文件
默认在Linux上安装的Nginx,配置文件在安装的nginx目录下的conf目录下,名字叫做nginx.conf
4.1 组成部分
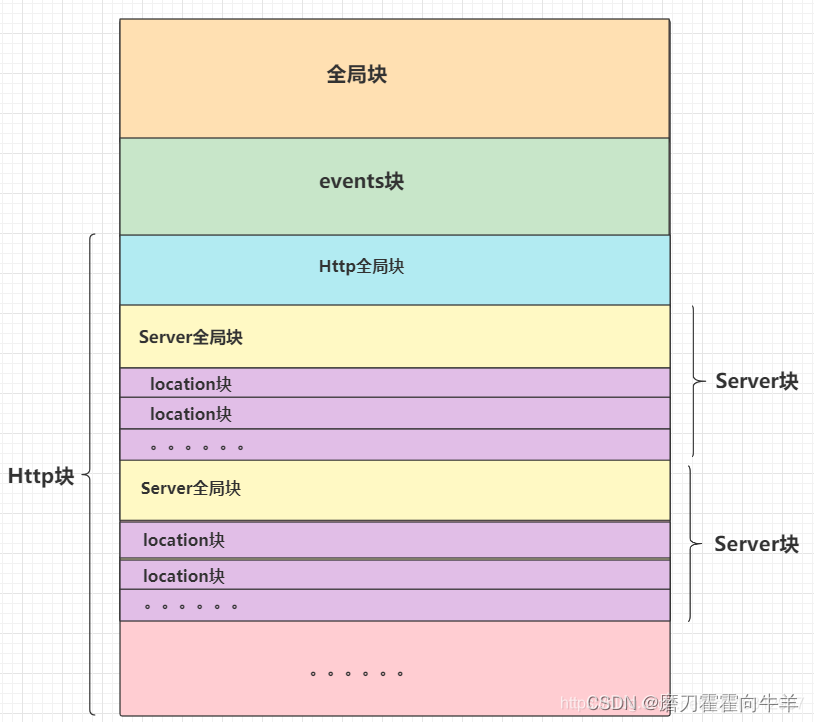
nginx.conf主要由三部分组成
- 全局块,
- events块
- http块

4.2 配置概览:
# 全局快
------------------------------------------------------------------------------
#user  nobody;
worker_processes  1;

#error_log  logs/error.log;
#error_log  logs/error.log  notice;
#error_log  logs/error.log  info;

#pid        logs/nginx.pid;

------------------------------------------------------------------------------

# events块
events {
    worker_connections  1024;
}

# http块
http {
------------------------------------------------------------------------------# http全局块
    include       mime.types;
    default_type  application/octet-stream;

    #log_format  main  '$remote_addr - $remote_user [$time_local] "$request" '
    #                  '$status $body_bytes_sent "$http_referer" '
    #                  '"$http_user_agent" "$http_x_forwarded_for"';

    #access_log  logs/access.log  main;

    sendfile        on;
    #tcp_nopush     on;

    #keepalive_timeout  0;
    keepalive_timeout  65;

    #gzip  on;
------------------------------------------------------------------------------
# server块
server {
# server全局块
        listen       80;
        server_name  localhost;

        #charset koi8-r;

        #access_log  logs/host.access.log  main;

# location块
        location / {
            root   html;
            index  index.html index.htm;
        }

        #error_page  404              /404.html;

        # redirect server error pages to the static page /50x.html
        #
        error_page   500 502 503 504  /50x.html;
        location = /50x.html {
            root   html;
        }

        # proxy the PHP scripts to Apache listening on 127.0.0.1:80
        #
        #location ~ \.php$ {
        #    proxy_pass   http://127.0.0.1;
        #}

        # pass the PHP scripts to FastCGI server listening on 127.0.0.1:9000
        #
        #location ~ \.php$ {
        #    root           html;
        #    fastcgi_pass   127.0.0.1:9000;
        #    fastcgi_index  index.php;
        #    fastcgi_param  SCRIPT_FILENAME  /scripts$fastcgi_script_name;
        #    include        fastcgi_params;
        #}

        # deny access to .htaccess files, if Apache's document root
        # concurs with nginx's one
        #
        #location ~ /\.ht {
        #    deny  all;
        #}
}
# 可以配置多个server块
}
4.3 组成说明:
- 全局块
就是配置文件从头开始到events块之间的内容,主要设置的是影响nginx服务器整体运行的配置指令比如worker_process, 值越大,可以支持的并发处理量也越多,但是还是和服务器的硬件相关 - events块
events 块涉及的指令主要影响 Nginx 服务器与用户的网络连接,常用的设置包括是否开启对多 work process下的网络连接进行序列化,是否允许同时接收多个网络连接,选取哪种事件驱动模型来处理连接请求,每个 word process 可以同时支持的最大连接数等。
上述例子就表示每个 work process 支持的最大连接数为 1024.
这部分的配置对 Nginx 的性能影响较大,在实际中应该灵活配置 - http块
包括http全局块,以及多个server块 - http全局块
http 全局块配置的指令包括文件引入、 MIME-TYPE 定义、日志自定义、连接超时时间、单链接请求数上限等。 - server块
这块和虚拟主机有密切关系,虚拟主机从用户角度看,和一台独立的硬件主机是完全一样的,该技术的产生是为了节省互联网服务器硬件成本。
每个 http 块可以包括多个 server 块,而每个 server 块就相当于一个虚拟主机
而每个 server 块也分为全局 server 块,以及可以同时包含多个 location 块。 - server全局块
最常见的配置是本虚拟机主机的监听配置和本虚拟主机的名称或 IP 配置。 - location块
一个 server 块可以配置多个 location 块。
主要作用是根据请求地址路径的匹配,匹配成功进行特定的处理
这块的主要作用是基于 Nginx 服务器接收到的请求字符串(例如 server_name/uri-string),对虚拟主机名称(也可以是 IP 别名)之外的字符串(例如 前面的 /uri-string)进行匹配,对特定的请求进行处理。地址定向、数据缓存和应答控制等功能,还有许多第三方模块的配置也在这里进行。
4.4 配置应用
root与alias区别:
- alias 实际访问文件路径不会拼接URL中的路径
location ^~ /sta/ {
   alias /usr/local/nginx/html/static/;
}
请求:http://test.com/sta/sta1.html
实际访问:/usr/local/nginx/html/static/sta1.html 文件
- root 实际访问文件路径会拼接URL中的路径
location ^~ /tea/ {
   root /usr/local/nginx/html/;
}
请求:http://test.com/tea/tea1.html
实际访问:/usr/local/nginx/html/tea/tea1.html 文件
4.4.1 单机策略
1 直接访问路径代理
server {
		#	监听端口80 即当访问服务器的端口是80时,进入这个server块处理
        listen       80;
		# server_name当配置了listen时不起作用
        server_name  localhost;

		# location后面代表访问路径 当是/ 请求时 代理到tomcat的地址
        location / {
			# 使用 proxy_pass(固定写法)后面跟要代理服务器地址
            proxy_pass http://192.168.80.102:8080;
        }
}
2 通过地址实现不同代理
server {
		# 监听9001端口
        listen       9001;
		# 进行路径匹配,匹配到edu代理到8081
        location ~/edu/ {
            proxy_pass http://192.168.80.102:8081;
        }
		# 进行路径匹配,匹配到vod代理到8082
        location ~/vod/ {
            proxy_pass http://192.168.80.102:8082;
        }
}
4.4.2 负载均衡
1 轮询(默认)
每个请求按时间顺序逐一分配到不同的后端服务器,如果后端服务器 down 掉,能自动剔除
2 权重
weight 代表权重默认为 1,权重越高被分配的客户端越多
upstream myserver {
	server 192.168.80.102:8081 weight=1 ;
	server 192.168.80.102:8082 weight=2 ;
}
server {
    listen       80;
    location / {
    proxy_pass http://myserver;
}
3 hash
每个请求按访问 ip 的 hash 结果分配,这样每个访客固定访问一个后端服务器,可以解决session问题
#配置负载均衡的服务器和端口
upstream myserver {
	server 192.168.80.102:8081;
	server 192.168.80.102:8082;
    ip_hash;
}
server {
    listen       80;
    location / {
    proxy_pass http://myserver;
   }
}
4 fair
按后端服务器的响应时间来分配请求,响应时间短的优先分配。
#配置负载均衡的服务器和端口
upstream myserver {
	server 192.168.80.102:8081;
	server 192.168.80.102:8082;
    fair;
}
server {
    listen       80;
    location / {
    proxy_pass http://myserver;
    }
}