学无止境
今天开始学习一下驱动开发。之前也写过一些内核模块的东西,但是没有系统的了解过驱动的工作方式,这次来学习一下,学习的资料来自于b站韦东山老师的视频,总结一下学习的心得体会。
感谢韦老师的无私奉献
70天30节Linux驱动开发快速入门系列课程【实战教学、技术讨论、直播答疑】

环境搭建
先来用Ubuntu学习一下,先入个门吧。
如果要开发驱动,必须要先安装内核头文件,用如下命令。
apt-cache search linux-headers-$(uname -r) // 确认有没有
sudo apt-get install linux-headers-$(uname -r) // 下载安装
开发环境就安装好了,就在/lib/modules下

如此简单

Hello World
就是直接上hello world吧,迈出第一步。
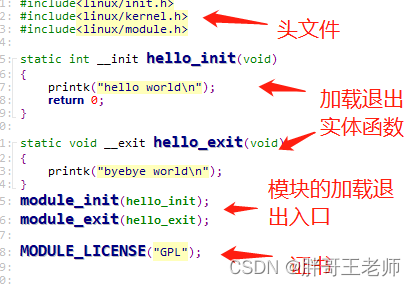
#include<linux/init.h>
#include<linux/kernel.h>
#include<linux/module.h>

static int __init hello_init(void)
{
    printk("hello world\n");
    return 0;
}

static void __exit hello_exit(void)
{
    printk("hello driver exit\n");
}
module_init(hello_init);
module_exit(hello_exit);

MODULE_LICENSE("GPL");
Makefile
ARCH=x86
CROSS_COMPILE=

KVERSION = $(shell uname -r)
KERN_DIR =  /lib/modules/$(KVERSION)/build

all:
	make -C $(KERN_DIR) M=`pwd` modules

clean:
	make -C $(KERN_DIR) M=`pwd` modules clean
	rm -rf modules.order

obj-m	+= helloworld.o
清空dmesg,
sudo dmesg -c
然后编译运行,
xxx@ubuntu:~/work/driver$ make
make -C /lib/modules/5.3.0-28-generic/build  M=`pwd` modules
make[1]: Entering directory '/usr/src/linux-headers-5.3.0-28-generic'
  CC [M]  /home/xxx/work/driver/helloworld.o
  Building modules, stage 2.
  MODPOST 1 modules
  CC      /home/xxx/work/driver/helloworld.mod.o
  LD [M]  /home/xxx/work/driver/helloworld.ko
make[1]: Leaving directory '/usr/src/linux-headers-5.3.0-28-generic'
加载模块
sudo insmod helloworld.ko
查看模块
xxx@ubuntu:~/work/driver$ lsmod |grep helloworld
helloworld             16384  0
查看内核打印
xxx@ubuntu:~/work/driver$ dmesg
[14799.880719] hello world
卸载模块
sudo rmmod helloworld
最简单的内核模块就基本完成了。虽然没什么作用,但至少已经从用户态,走进了内核了

代码解释

这也没啥能解释的了,太简单了。
内核源码
我们可以下载 一份内核源码来查看所有函数的源码,
《下载地址》
然后配合source insight,就可以查看到函数的源码了。
拓展一下
来一段简单的数据交互,从用户态传递字符串进来,在内核保存一下,然后再读出去。
深入了啊

驱动部分代码:
#include <linux/init.h>
#include <linux/module.h>
#include <linux/fs.h>
#include <linux/uaccess.h>
#include <linux/device.h>

static int major = 0;
static char sdata[64] = {0};
static int sdatalen=0;
static struct class *class_for_hello;

static ssize_t hello_read (struct file *file, char __user *buf, size_t size, loff_t *offset)
{
	printk("%s %s line %d\n", __FILE__, __FUNCTION__, __LINE__);
	copy_to_user(buf, sdata, sdatalen);
	return sdatalen;
}

static ssize_t hello_write (struct file *file, const char __user *buf, size_t size, loff_t *offset)
{
	printk("%s %s line %d\n", __FILE__, __FUNCTION__, __LINE__);
	sdatalen=size;
	copy_from_user(sdata, buf, sdatalen);
	return sdatalen;
}


static struct file_operations hello_fops = {
	.owner		= THIS_MODULE,
	.read       = hello_read,
	.write      = hello_write,
};

int __init hello_init(void)
{
	printk("hello drv init\n");
	major = register_chrdev(0, "hello_drv", &hello_fops);

	class_for_hello = class_create(THIS_MODULE, "helloclass");
	device_create(class_for_hello, NULL, MKDEV(major, 0), NULL, "hellodev"); /* /dev/hellodev*/

	return 0;
}

void __exit hello_exit(void)
{
	printk("hello drv exit\n");
	device_destroy(class_for_hello, MKDEV(major, 0));
	class_destroy(class_for_hello);
	unregister_chrdev(major, "hello_drv");

}

module_init(hello_init);
module_exit(hello_exit);
MODULE_LICENSE("GPL");
解释一下核心部分
	class_for_hello = class_create(THIS_MODULE, "hellodev");
	device_create(class_for_hello, NULL, MKDEV(major, 0), NULL, "hellodev"); /* /dev/myled */
这里是为了创建/dev/hellodev设备,这个设备就是用户态与内核态交互的地方,看成一个文件,但是操作要比普通文件多一些。不过这里只用了read和write
	device_destroy(class_for_hello, MKDEV(major, 0));
	class_destroy(class_for_hello);
退出的时候记得删掉class和device。
	copy_from_user(sdata, buf, sdatalen);
	copy_to_user(buf, sdata, sdatalen);
内核的数据与用户态的数据,通过这两个函数进行传递,不能直接访问用户态的buf指针。
否则就很容易内核崩溃

用户态代码
#include <sys/types.h>
#include <sys/stat.h>
#include <fcntl.h>
#include <unistd.h>
#include <stdio.h>
#include <string.h>

/*
 * ./userapp -w abc
 * ./userapp -r
 */
int main(int argc, char **argv)
{
	int fd;
	char buf[1024];
	int len;
	int ret;

	/* 1. 判断参数 */
	if (argc < 2)
	{
		printf("Usage: %s -w <string>\n", argv[0]);
		printf("       %s -r\n", argv[0]);
		return -1;
	}

	/* 2. 打开文件 */
	fd = open("/dev/hellodev", O_RDWR);
	if (fd == -1)
	{
		printf("can not open file /dev/hellodev\n");
		return -1;
	}

	printf("open file /dev/hellodev ok\n");

	/* 3. 写文件或读文件 */
	if ((0 == strcmp(argv[1], "-w")) && (argc == 3))
	{
		len = strlen(argv[2]) + 1;
		len = len < 1024 ? len : 1024;
		ret = write(fd, argv[2], len);
		printf("write driver: %d\n", ret);
	}
	else
	{
		len = read(fd, buf, 1024);
		printf("read driver: %d\n", len);
		buf[1023] = '\0';
		printf("APP read : %s\n", buf);
	}

	close(fd);

	return 0;
}
这个就没啥解释的,就是读写文件的标准操作。

操作
编译加载内核
root@ubuntu:/home/xxx/work/driver/2# make
make -C /lib/modules/5.4.0-120-generic/build  M=`pwd` modules
make[1]: Entering directory '/usr/src/linux-headers-5.4.0-120-generic'
  Building modules, stage 2.
  MODPOST 1 modules
make[1]: Leaving directory '/usr/src/linux-headers-5.4.0-120-generic'
root@ubuntu:/home/xxx/work/driver/2# ls
hello_drv_test.c  helloworld2.c  helloworld2.ko  helloworld2.mod  helloworld2.mod.c  helloworld2.mod.o  helloworld2.o  Makefile  modules.order  Module.symvers  userapp
root@ubuntu:/home/xxx/work/driver/2# insmod helloworld2.ko
此时可以看到/dev/下就出现了我们的hellodev的文件
root@ubuntu:/home/xxx/work/driver/2# ll /dev/hellodev
crw------- 1 root root 240, 0 Jun 27 19:16 /dev/hellodev
然后就可以编译用户态程序
root@ubuntu:/home/xxx/work/driver/2# gcc -o userapp hello_drv_test.c
root@ubuntu:/home/xxx/work/driver/2# ./userapp -w hello
open file /dev/hellodev ok
write driver: 6
root@ubuntu:/home/xxx/work/driver/2# ./userapp -r
open file /dev/hellodev ok
read driver: 6
APP read : hello
完美

结束语
这几天学这个,倒是感觉把单片机的内容要融合过来了,应用与内核驱动,再到硬件,好像可以串起来了,真是越来越有意思了。

其实刚开始学了一段时间之后,确实会有不懂的地方,慢慢理解,多看看代码和视频,把关键的点理解掉,就避免了从入门到放弃了。学习就是这样,肯定有难点,慢慢吃透就可以。
故乡的雷霆风暴结束了,好像也没听到什么结果……
樱岛火山也爆发了,好像也没有我们想听的结果……
