zabbix邮箱报警配置(三)
Zabbix监控mysql主从
部署mysql主从,使用mariadb进行操作
192.168.40.150  master
192.168.40.151  slave
将服务端、客户端、master、slave主机的/etc/hosts文件全部设置为
[root@haha ~]# vim /etc/hosts
192.168.40.99 haha
192.168.40.100 hehe
192.168.40.150 master
192.168.40.151 slave
scp root@192.168.40.99:/etc/hosts /etc/hosts   //每台都copy一份
master和slave为centos8的操作系统,将centos8的安装源下载下来,然后两台主机都安装mariadb mariadb-server
[root@master yum.repos.d]# scp root@192.168.40.99:/etc/yum.repos.d/* /etc/yum.repos.d/
[root@slave yum.repos.d]# scp root@192.168.40.99:/etc/yum.repos.d/* /etc/yum.repos.d/
[root@master ~]# dnf -y install  mariadb mariadb-server
[root@slave ~]# dnf -y install  mariadb mariadb-server
[root@master ~]# systemctl start mariadb.service
[root@master ~]# systemctl enable mariadb.service
Created symlink /etc/systemd/system/mysql.service → /usr/lib/systemd/system/mariadb.service.
Created symlink /etc/systemd/system/mysqld.service → /usr/lib/systemd/system/mariadb.service.
Created symlink /etc/systemd/system/multi-user.target.wants/mariadb.service → /usr/lib/systemd/system/mariadb.service.
[root@slave ~]# systemctl start mariadb.service
[root@slave  ~]# systemctl enable mariadb.service
Created symlink /etc/systemd/system/mysql.service → /usr/lib/systemd/system/mariadb.service.
Created symlink /etc/systemd/system/mysqld.service → /usr/lib/systemd/system/mariadb.service.
Created symlink /etc/systemd/system/multi-user.target.wants/mariadb.service → /usr/lib/systemd/system/mariadb.service.
两台主机都初始化mysql数据库
[root@master ~]# mysql_secure_installation
Disallow root login remotely? [Y/n] n
[root@slave  ~]# mysql_secure_installation
修改数据库配置文件,然后两台主机都重启mariadb服务
Master:
[root@master ~]# vim /etc/my.cnf.d/mariadb-server.cnf
[mysqld]
#添加两行数据
log_bin=mysql-bin
server_id=20

[root@master ~]# systemctl restart mariadb.service

Slave:
[root@slave  ~]# vim /etc/my.cnf.d/mariadb-server.cnf
[mysqld]
#添加两行数据
log_bin=mysql-bin
server_id=21

[root@slave ~]# systemctl restart mariadb.service
进入数据库配置主从
Master:
[root@master ~]# mysql -uroot -p123456
Welcome to the MariaDB monitor.  Commands end with ; or \g.
Your MariaDB connection id is 9
Server version: 10.3.28-MariaDB-log MariaDB Server

Copyright (c) 2000, 2018, Oracle, MariaDB Corporation Ab and others.

Type 'help;' or '\h' for help. Type '\c' to clear the current input statement.

MariaDB [(none)]> grant all privileges  on *.* to root@'%' identified by "123456";
Query OK, 0 rows affected (0.001 sec)

MariaDB [(none)]> grant replication slave on *.* to 'user'@'slave' identified by '123456';
Query OK, 0 rows affected (0.001 sec)

MariaDB [(none)]>


Slave:
[root@slave ~]# mysql -uroot -p123456
Welcome to the MariaDB monitor.  Commands end with ; or \g.
Your MariaDB connection id is 9
Server version: 10.3.28-MariaDB-log MariaDB Server

Copyright (c) 2000, 2018, Oracle, MariaDB Corporation Ab and others.

Type 'help;' or '\h' for help. Type '\c' to clear the current input statement.

MariaDB [(none)]> grant all privileges  on *.* to root@'%' identified by "123456";
Query OK, 0 rows affected (0.001 sec)

MariaDB [(none)]> change master to master_host='master',master_user='user',master_password='123456';
Query OK, 0 rows affected (0.004 sec)

MariaDB [(none)]> start slave;
Query OK, 0 rows affected (0.001 sec)

MariaDB [(none)]> show slave status \G
*************************** 1. row ***************************
                Slave_IO_State: Connecting to master
                   Master_Host: master
                   Master_User: user
                   Master_Port: 3306
                 Connect_Retry: 60
               Master_Log_File:
           Read_Master_Log_Pos: 4
                Relay_Log_File: mariadb-relay-bin.000001
                 Relay_Log_Pos: 4
         Relay_Master_Log_File:
              Slave_IO_Running: Connecting
             Slave_SQL_Running: Yes
在slave主机中安装zabbix-agent软件包,将slave添加到zabbix web监控平台中
将服务端主机的zabbix.repo复制过来,接着安装zabbix-agent
[root@slave ~]# vim /etc/yum.repos.d/zabbix.repo
[aliyun]
name=aliyun
baseurl=https://mirrors.aliyun.com/zabbix/zabbix/4.4/rhel/7/x86_64/
enable=1
gpgcheck=0
[qinghua]
name=Zabbix Official Repository - $basearch
#baseurl=http://repo.zabbix.com/zabbix/3.4/rhel/7/$basearch/
baseurl=https://mirrors.tuna.tsinghua.edu.cn/zabbix/zabbix/4.4/rhel/7/$basearch/
enabled=1
gpgcheck=0
gpgkey=file:///etc/pki/rpm-gpg/RPM-GPG-KEY-ZABBIX-A14FE591

[root@slave ~]# dnf -y install zabbix-agent
修改 /etc/zabbix/zabbix_agentd.conf,重启服务
[root@slave ~]# vim /etc/zabbix/zabbix_agentd.conf
Server=192.168.40.99
ServerActive=192.168.40.99
Hostname=slave

[root@slave ~]# systemctl restart zabbix-agent.service
[root@slave ~]# systemctl enable zabbix-agent.service
Created symlink /etc/systemd/system/multi-user.target.wants/zabbix-agent.service → /usr/lib/systemd/system/zabbix-agent.service.
[root@slave haha]# vim /etc/selinux/config
[root@slave haha]# setenforce 0
[root@slave haha]# systemctl stop firewalld.service
[root@slave haha]# systemctl disable firewalld.service
Removed /etc/systemd/system/multi-user.target.wants/firewalld.service.
Removed /etc/systemd/system/dbus-org.fedoraproject.FirewallD1.service.
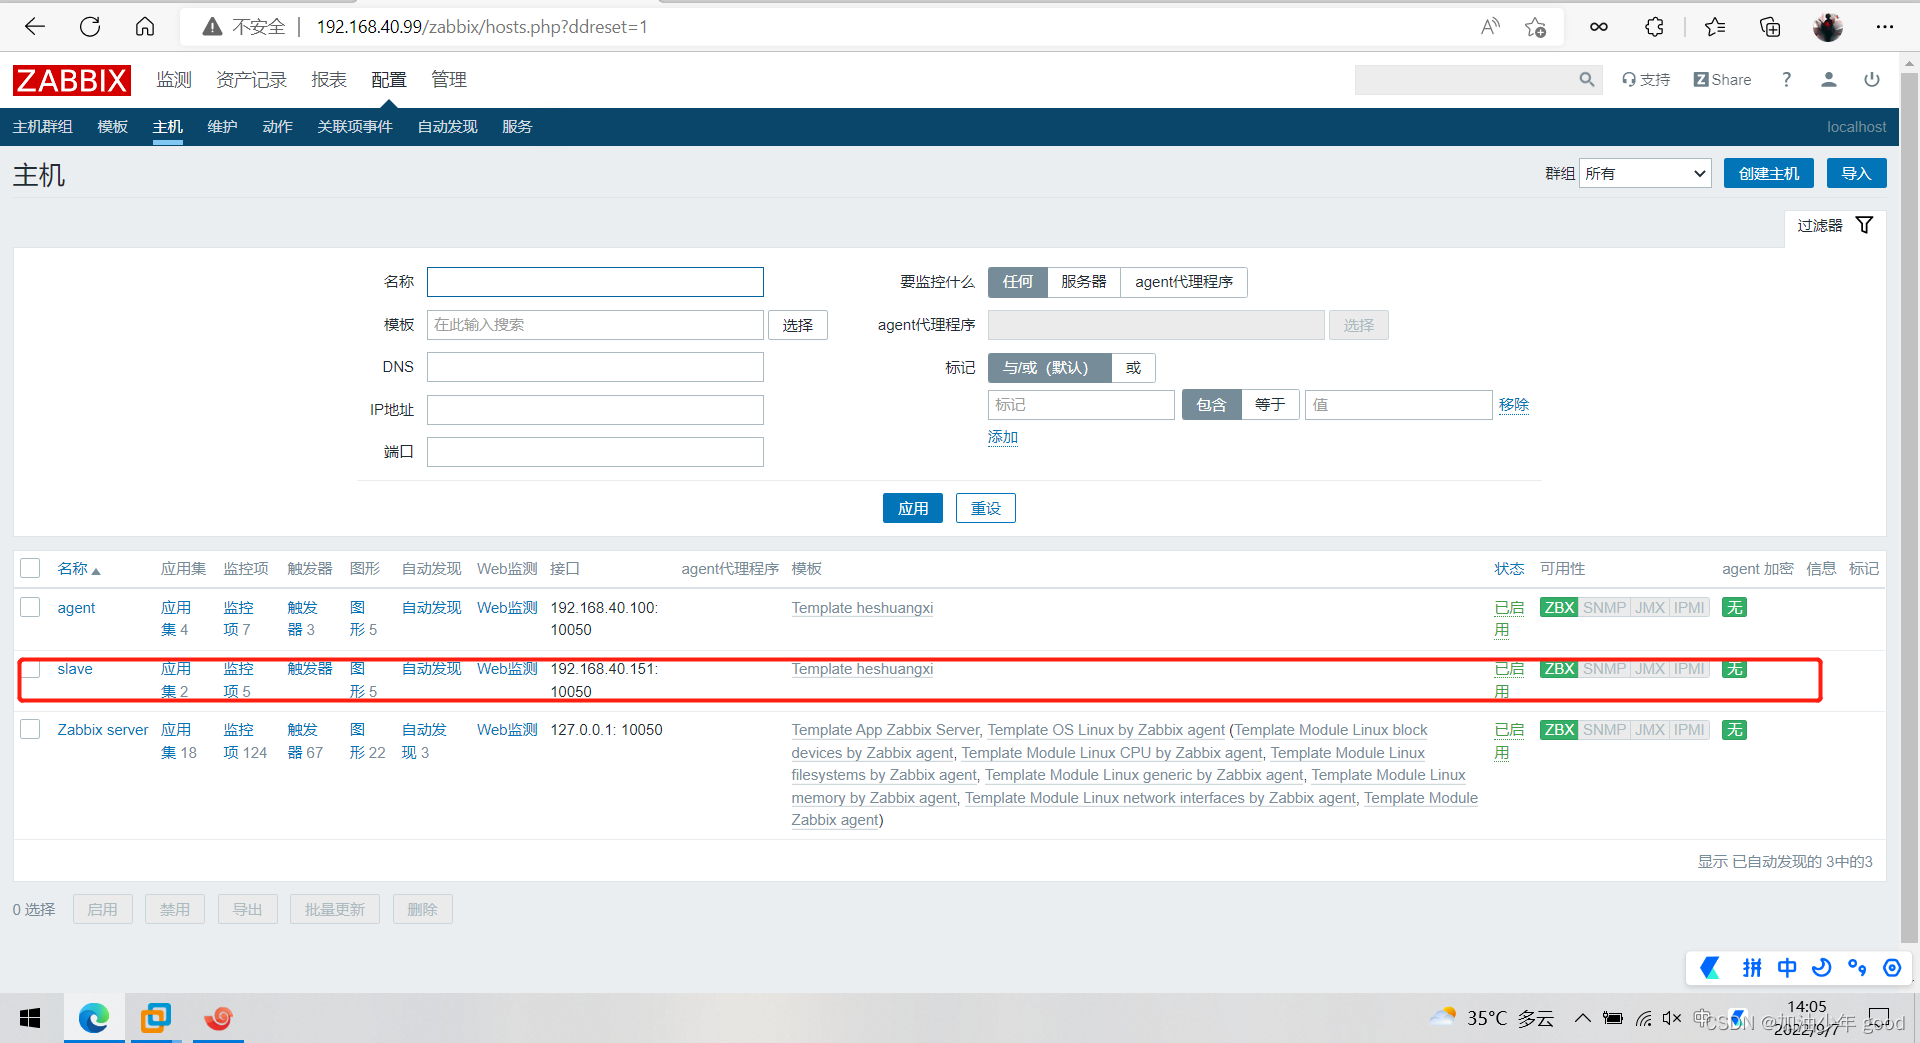
进入zabbix web监控平台,添加主机 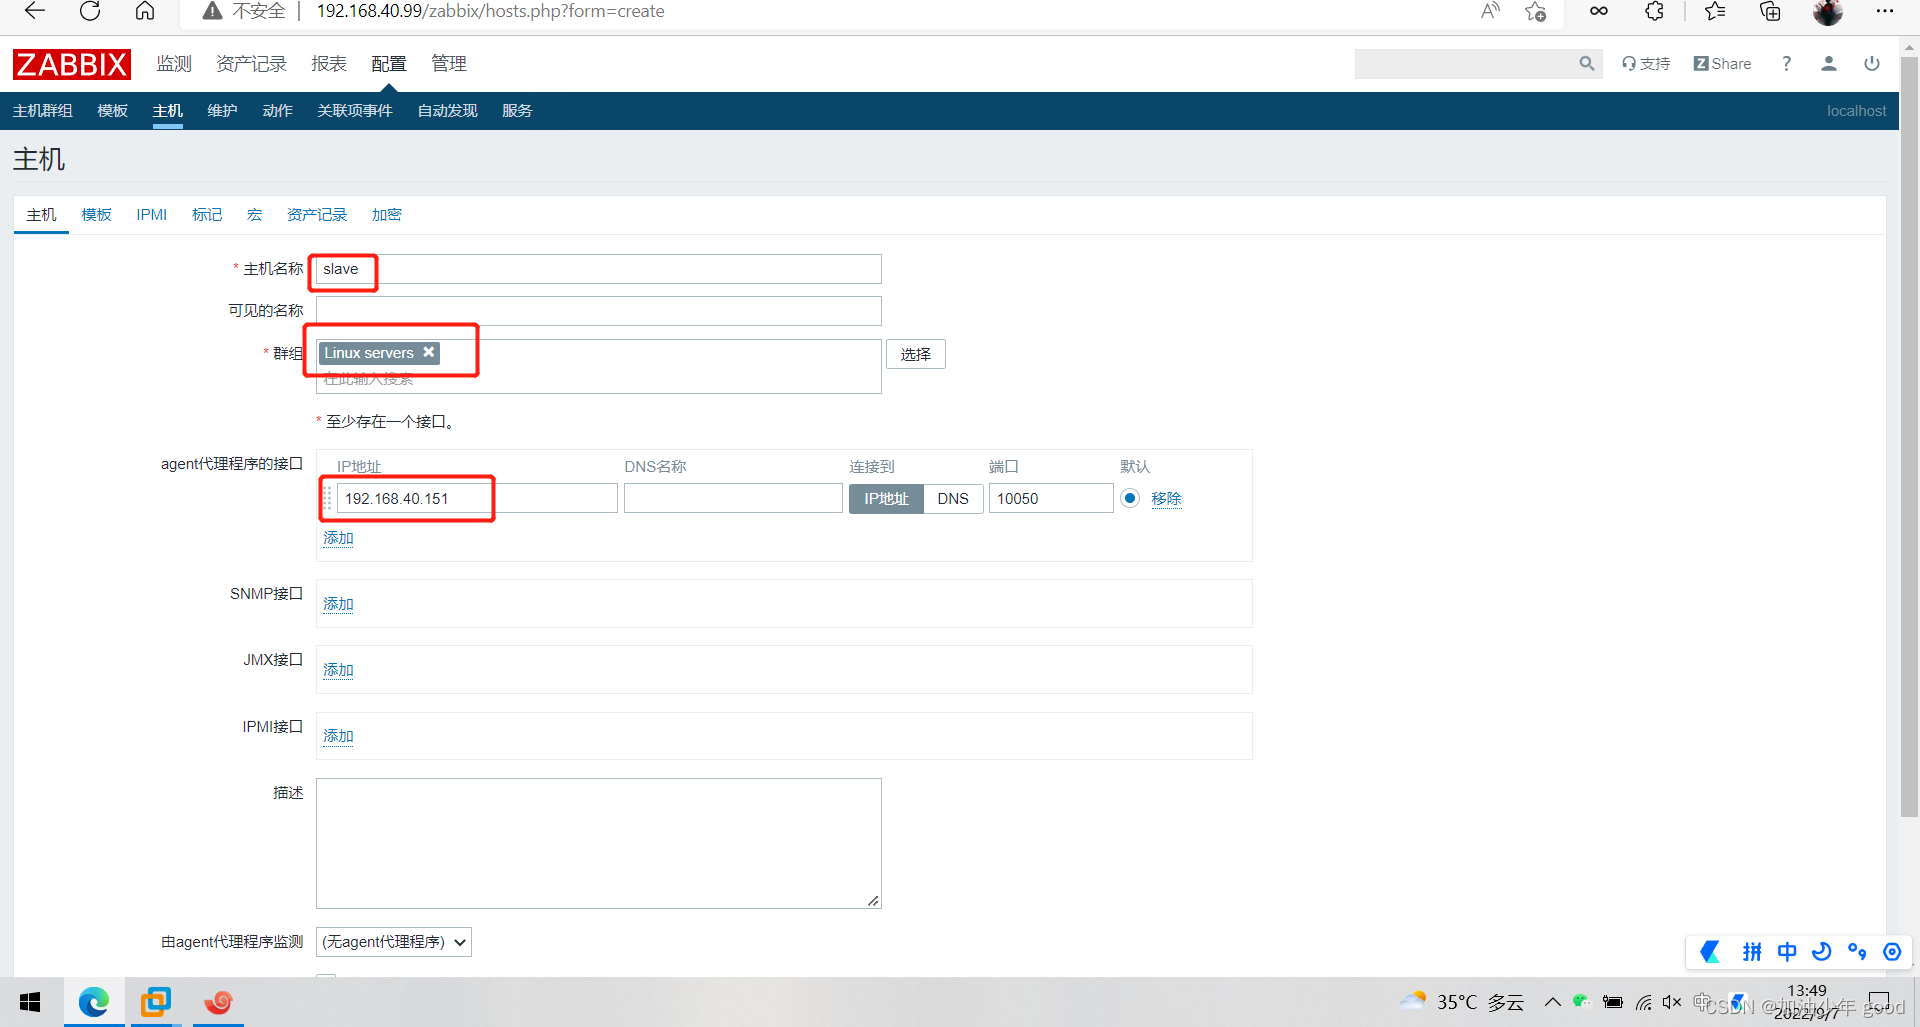
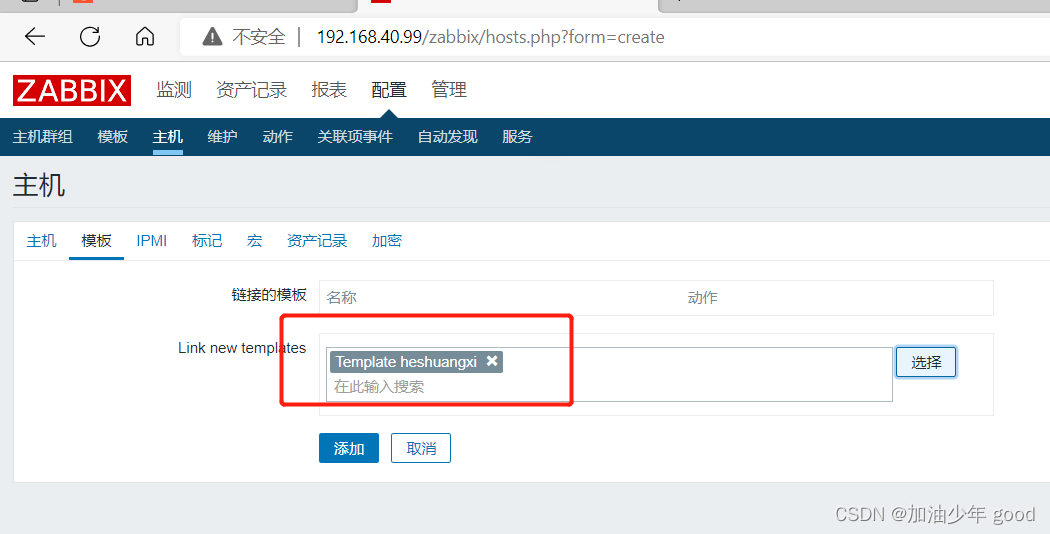
在slave主机上配置脚本
[root@slave ~]# mkdir /haha
[root@slave ~]# cd /haha/
[root@slave haha]# vim hehe.sh
#!/bin/bash
USER="root"
PASSWD="123456"
NAME=$1

function IO {
    Slave_IO_Running=`mysql -u $USER -p$PASSWD -e "show slave status\G;" 2> /dev/null |grep Slave_IO_Running |awk '{print $2}'`
    if [ $Slave_IO_Running == "Connecting" ];then
        echo 0
    else
        echo 1
    fi
}

function SQL {
    Slave_SQL_Running=`mysql -u $USER -p$PASSWD -e "show slave status\G;" 2> /dev/null |grep Slave_SQL_Running: |awk '{print $2}'`
if [ $Slave_SQL_Running == "Yes" ];then
echo 0
    else
        echo 1
    fi

}

case $NAME in
   io)
       IO
   ;;
   sql)
       SQL
   ;;
   *)
        echo -e "Usage: $0 [io | sql]"
esac

[root@slave haha]# chmod +x hehe.sh
[root@slave haha]# chown zabbix.zabbix /haha/hehe.sh
编写一个自配置文件,里面指定上面编写的脚本的路径,然后重启服务
[root@slave ~]# vim /etc/zabbix/zabbix_agentd.conf
 UserParameter=mysql.slave[*],/haha/hehe.sh $1

[root@slave ~]# chown -R zabbix.zabbix /etc/zabbix/zabbix_agentd.conf
[root@slave ~]# systemctl restart zabbix-agent.service
去zabbix服务端验证状态,使用zabbix_get命令验证,需要先下载zabbix-get软件包
[root@haha ~]# dnf -y install zabbix-get
#验证的结果如果是0,为正常,如果为1,则异常
[root@haha ~]# zabbix_get -s 192.168.40.151 -k mysql.slave[sql]
0
[root@haha ~]# zabbix_get -s 192.168.40.151 -k mysql.slave[io]
0
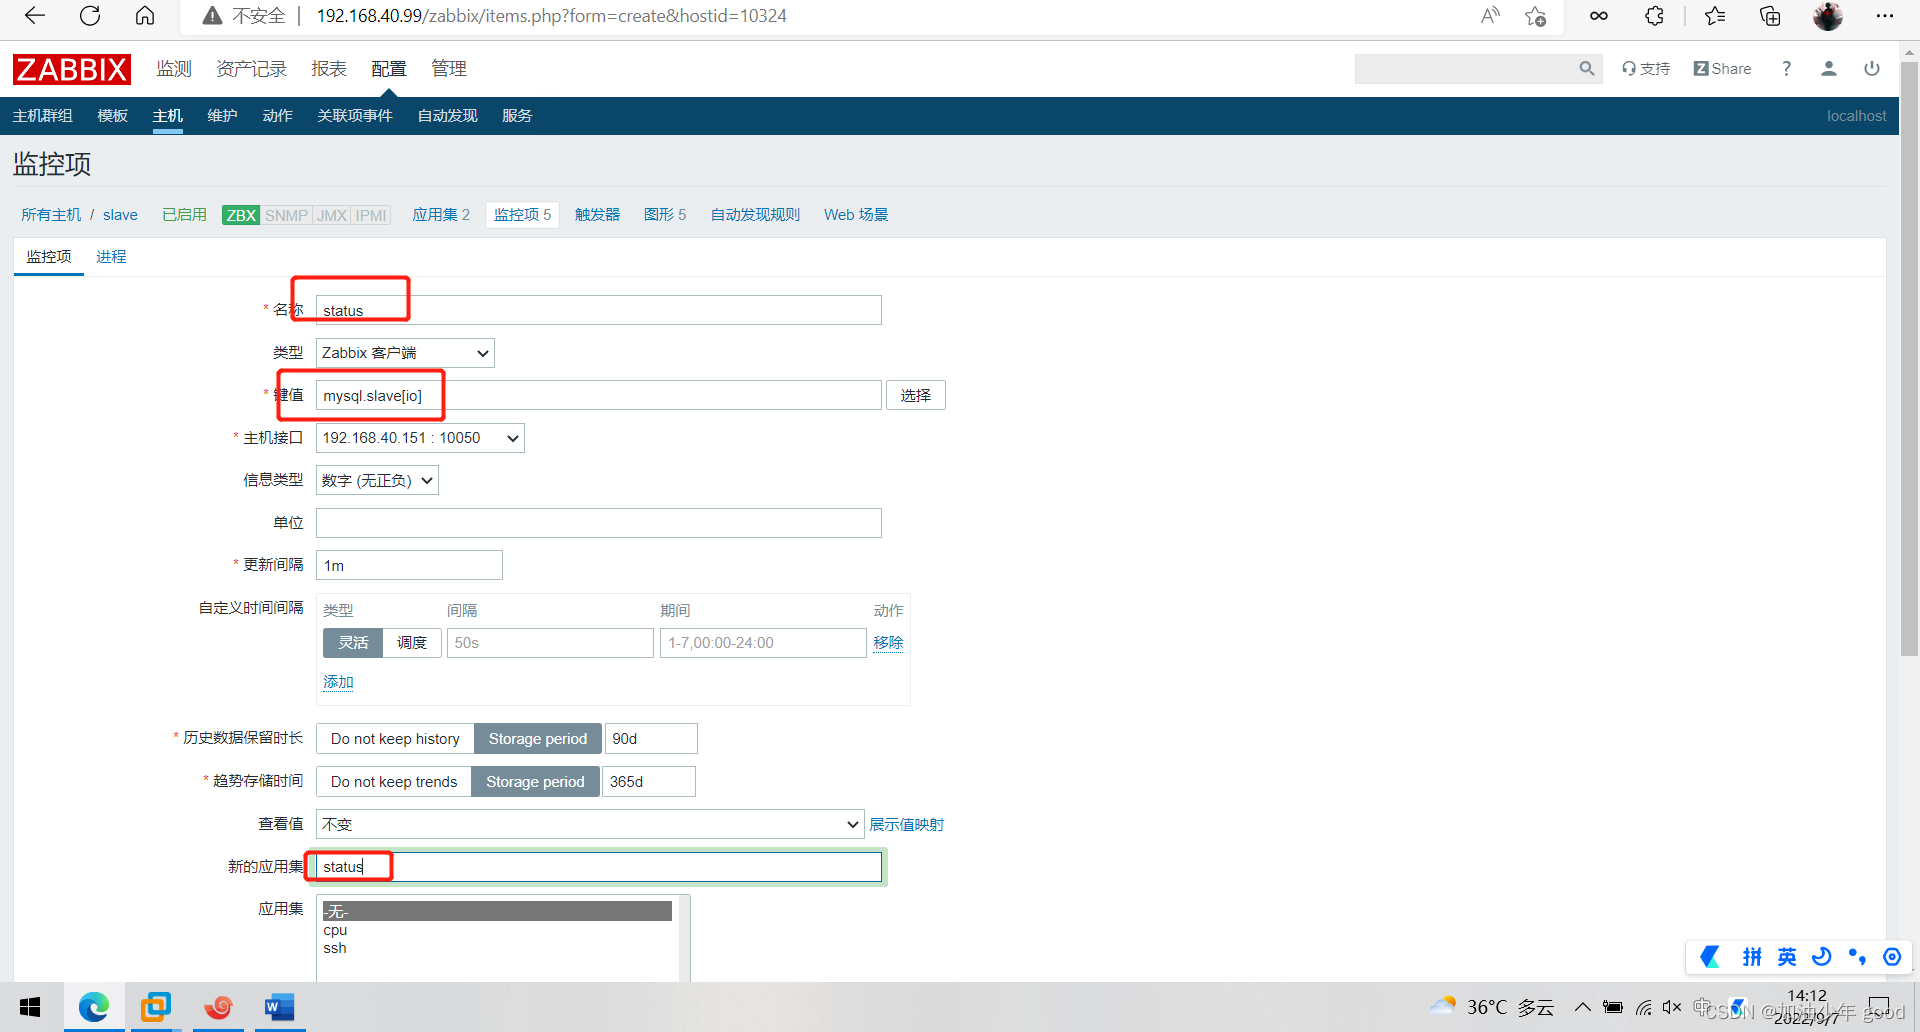
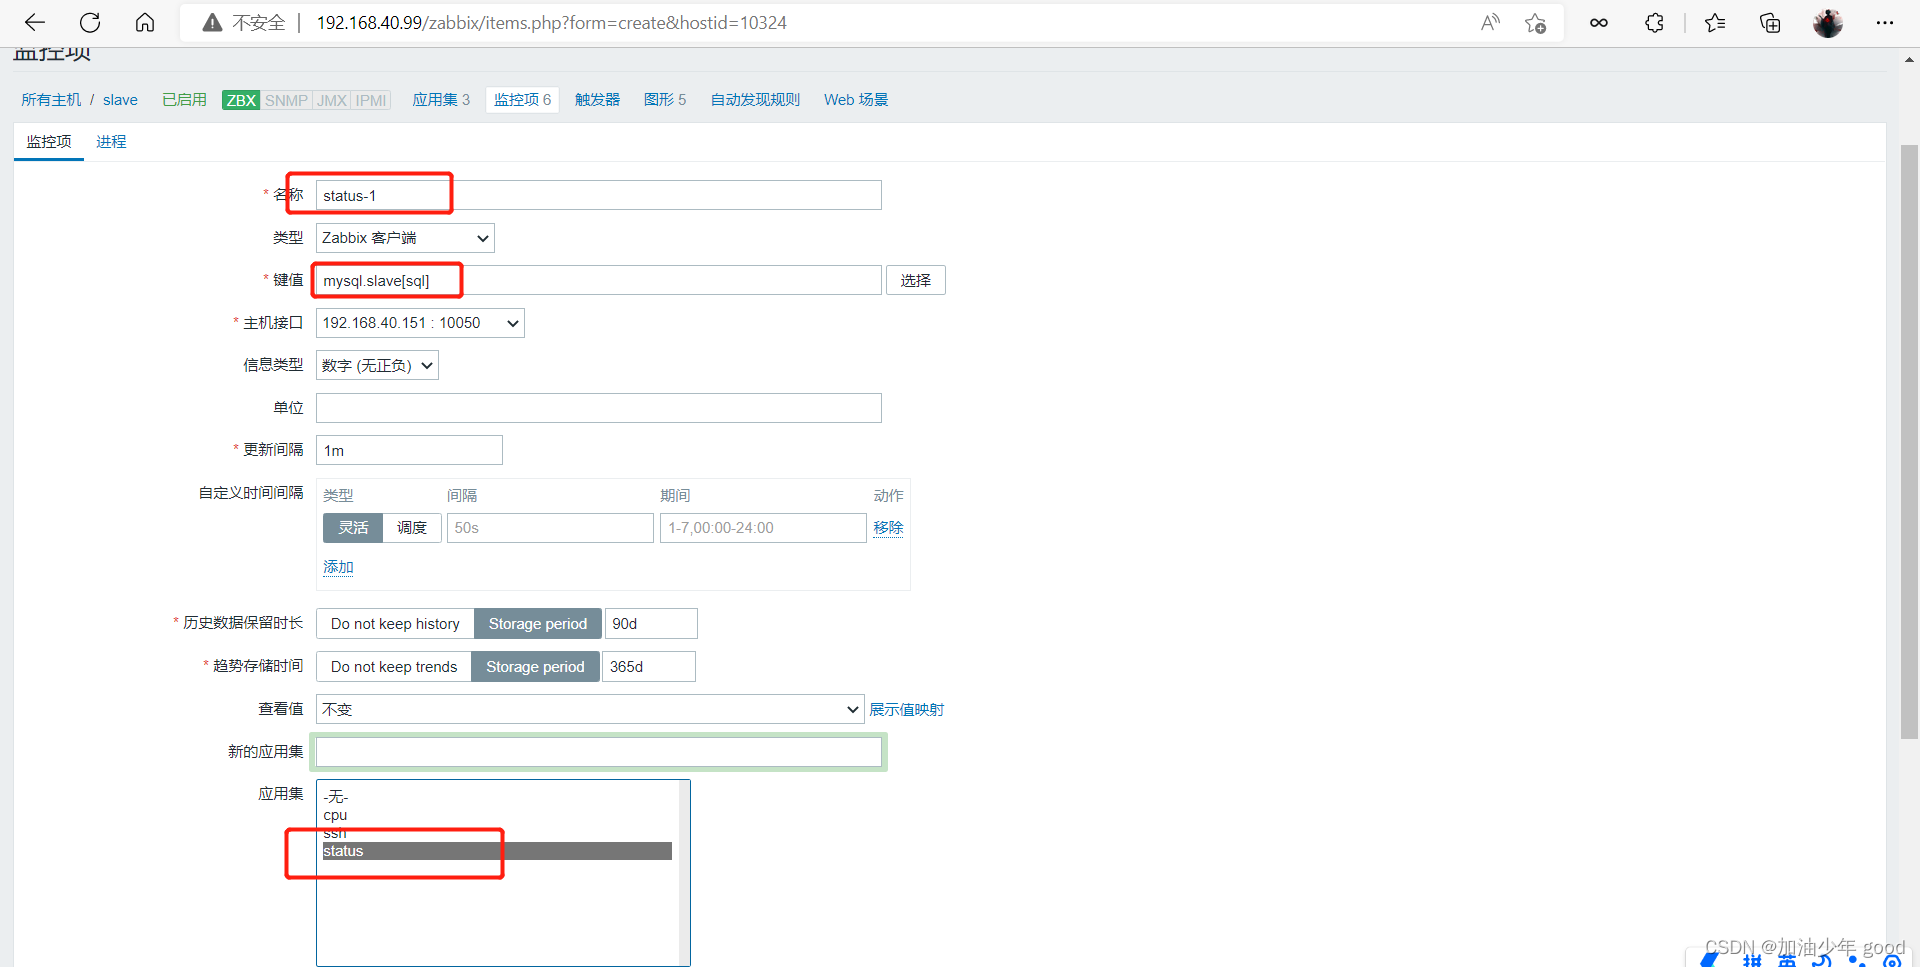
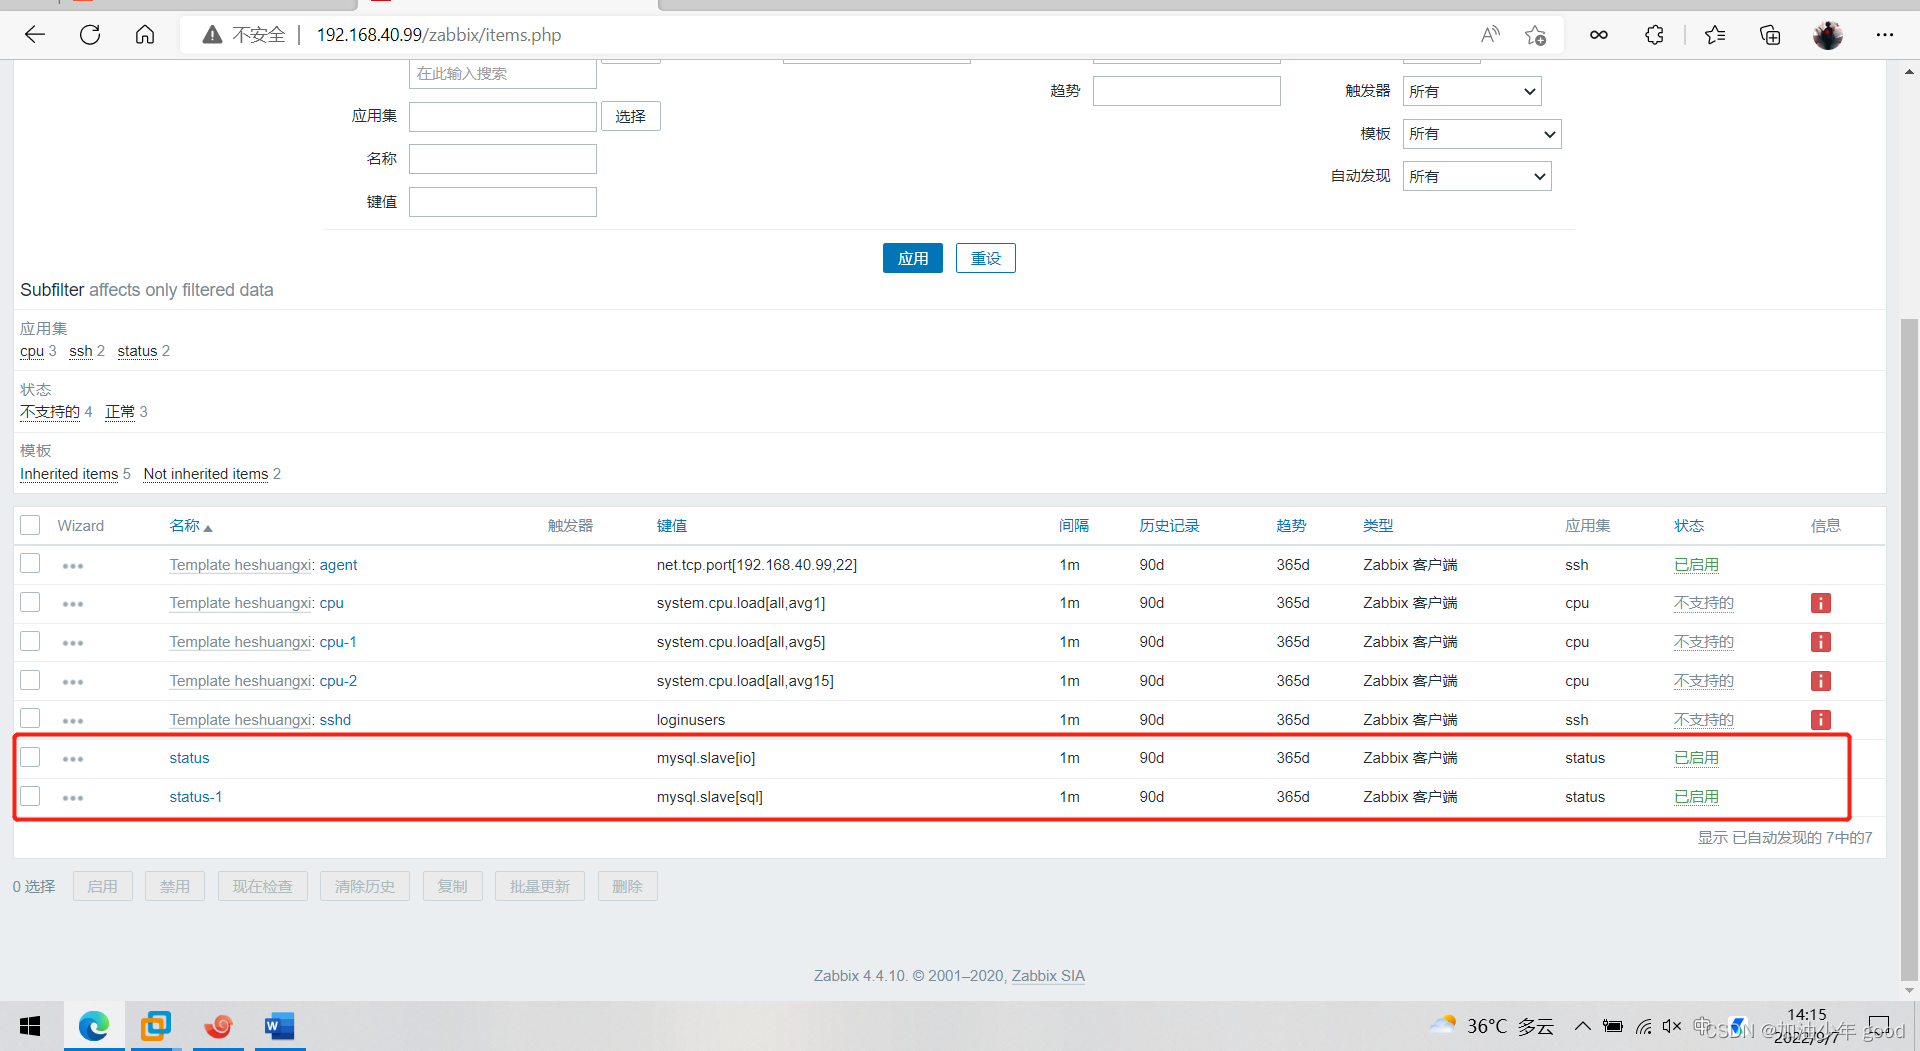
在zabbix web平台配置
新建监控项
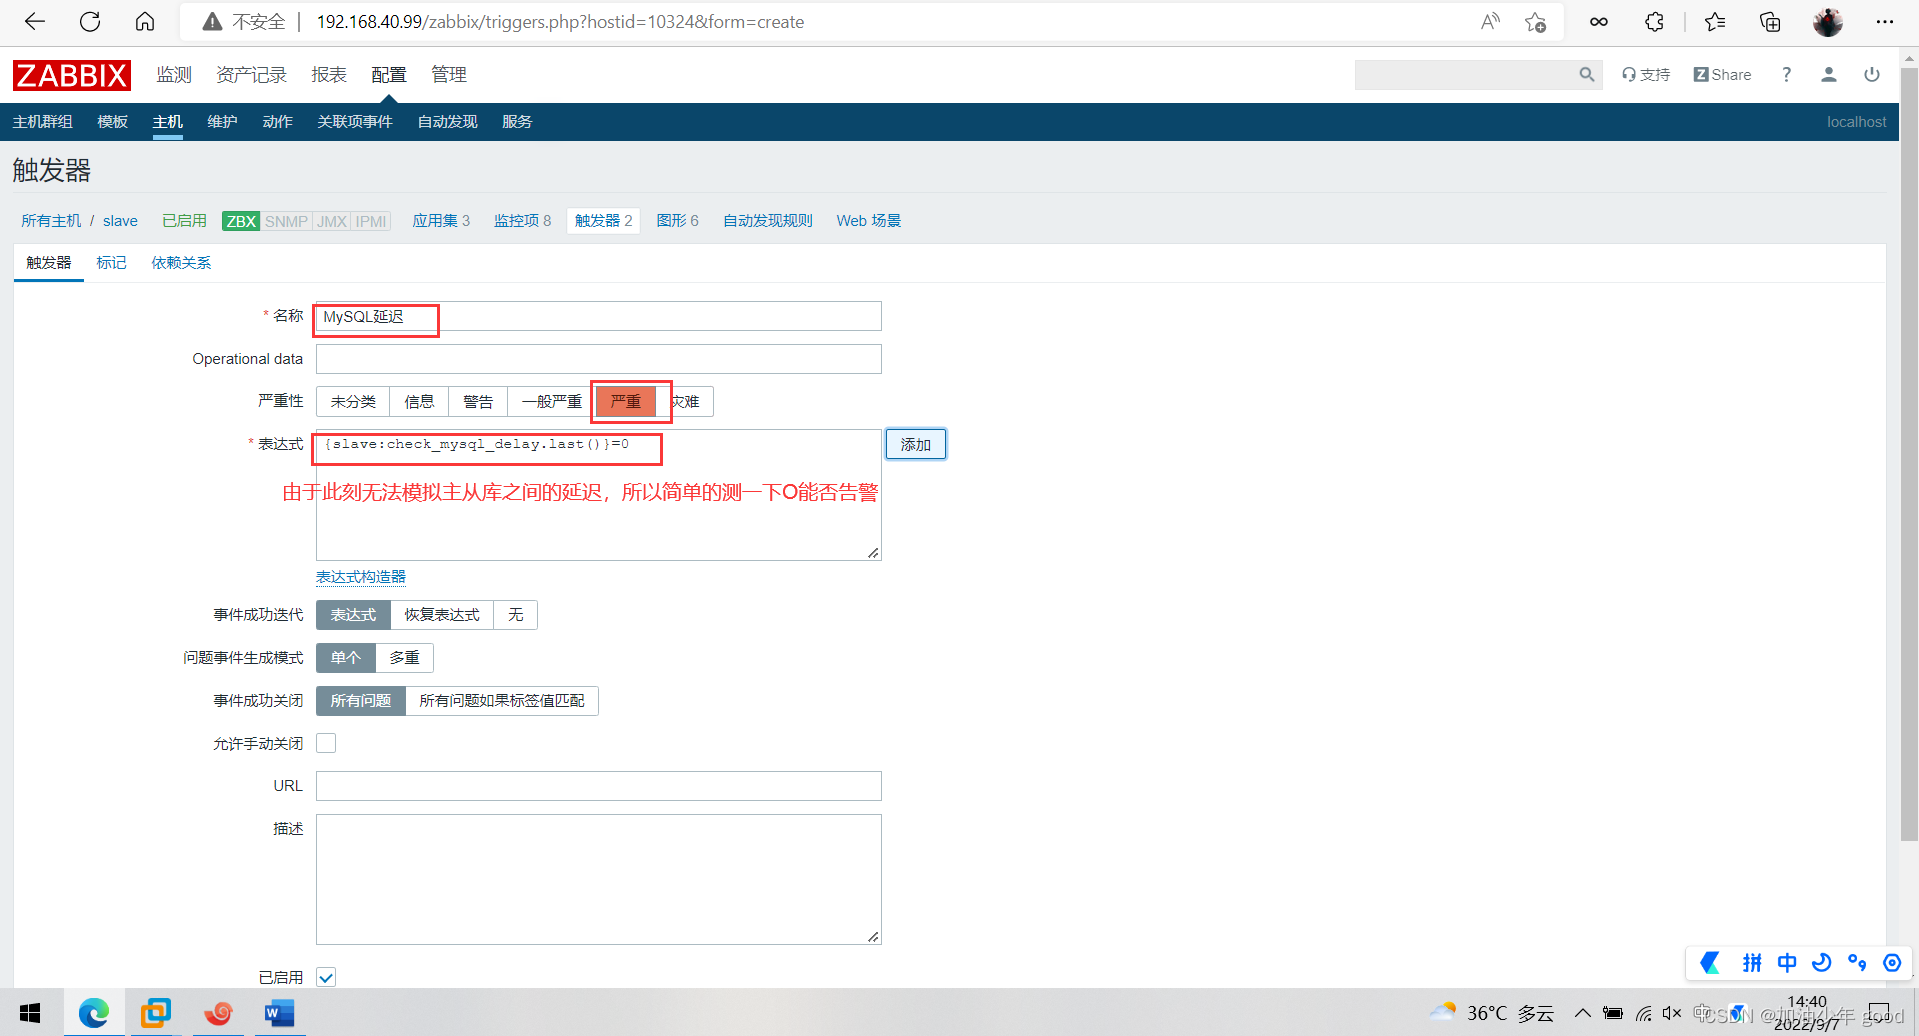
新建触发器
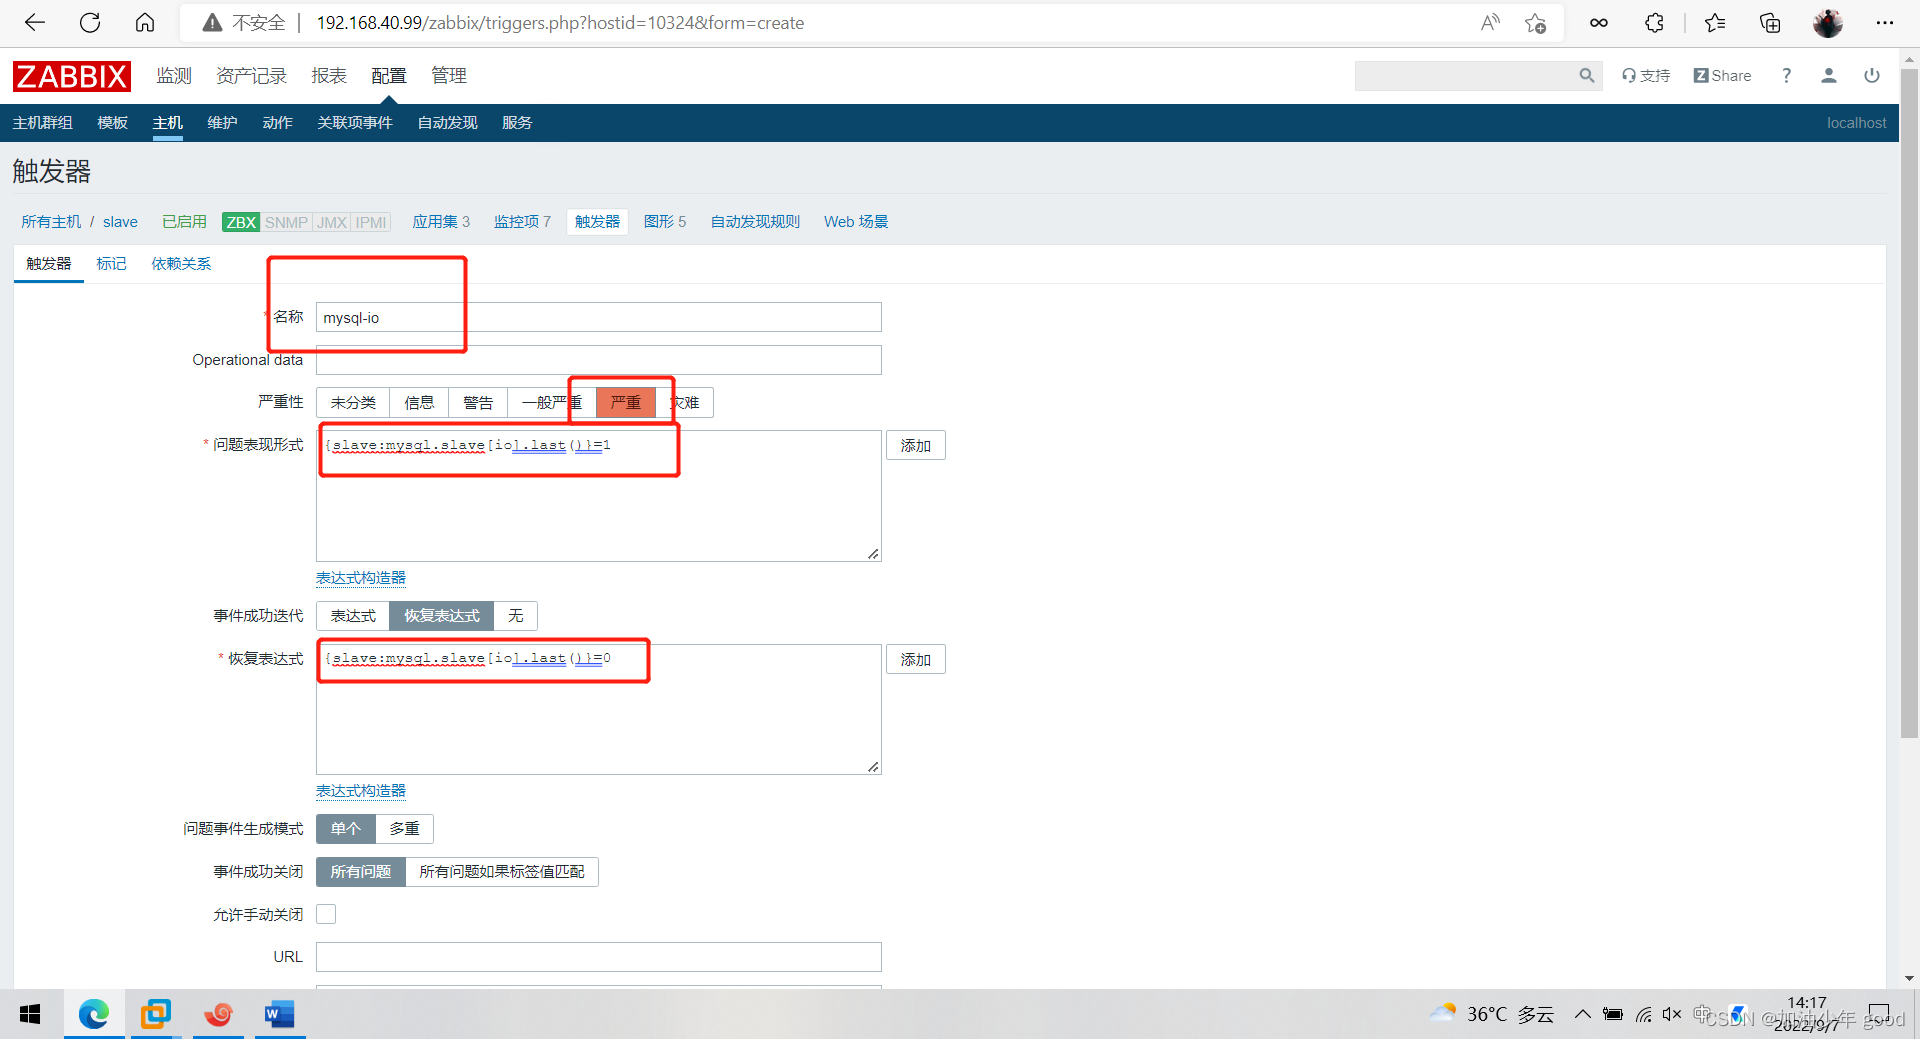
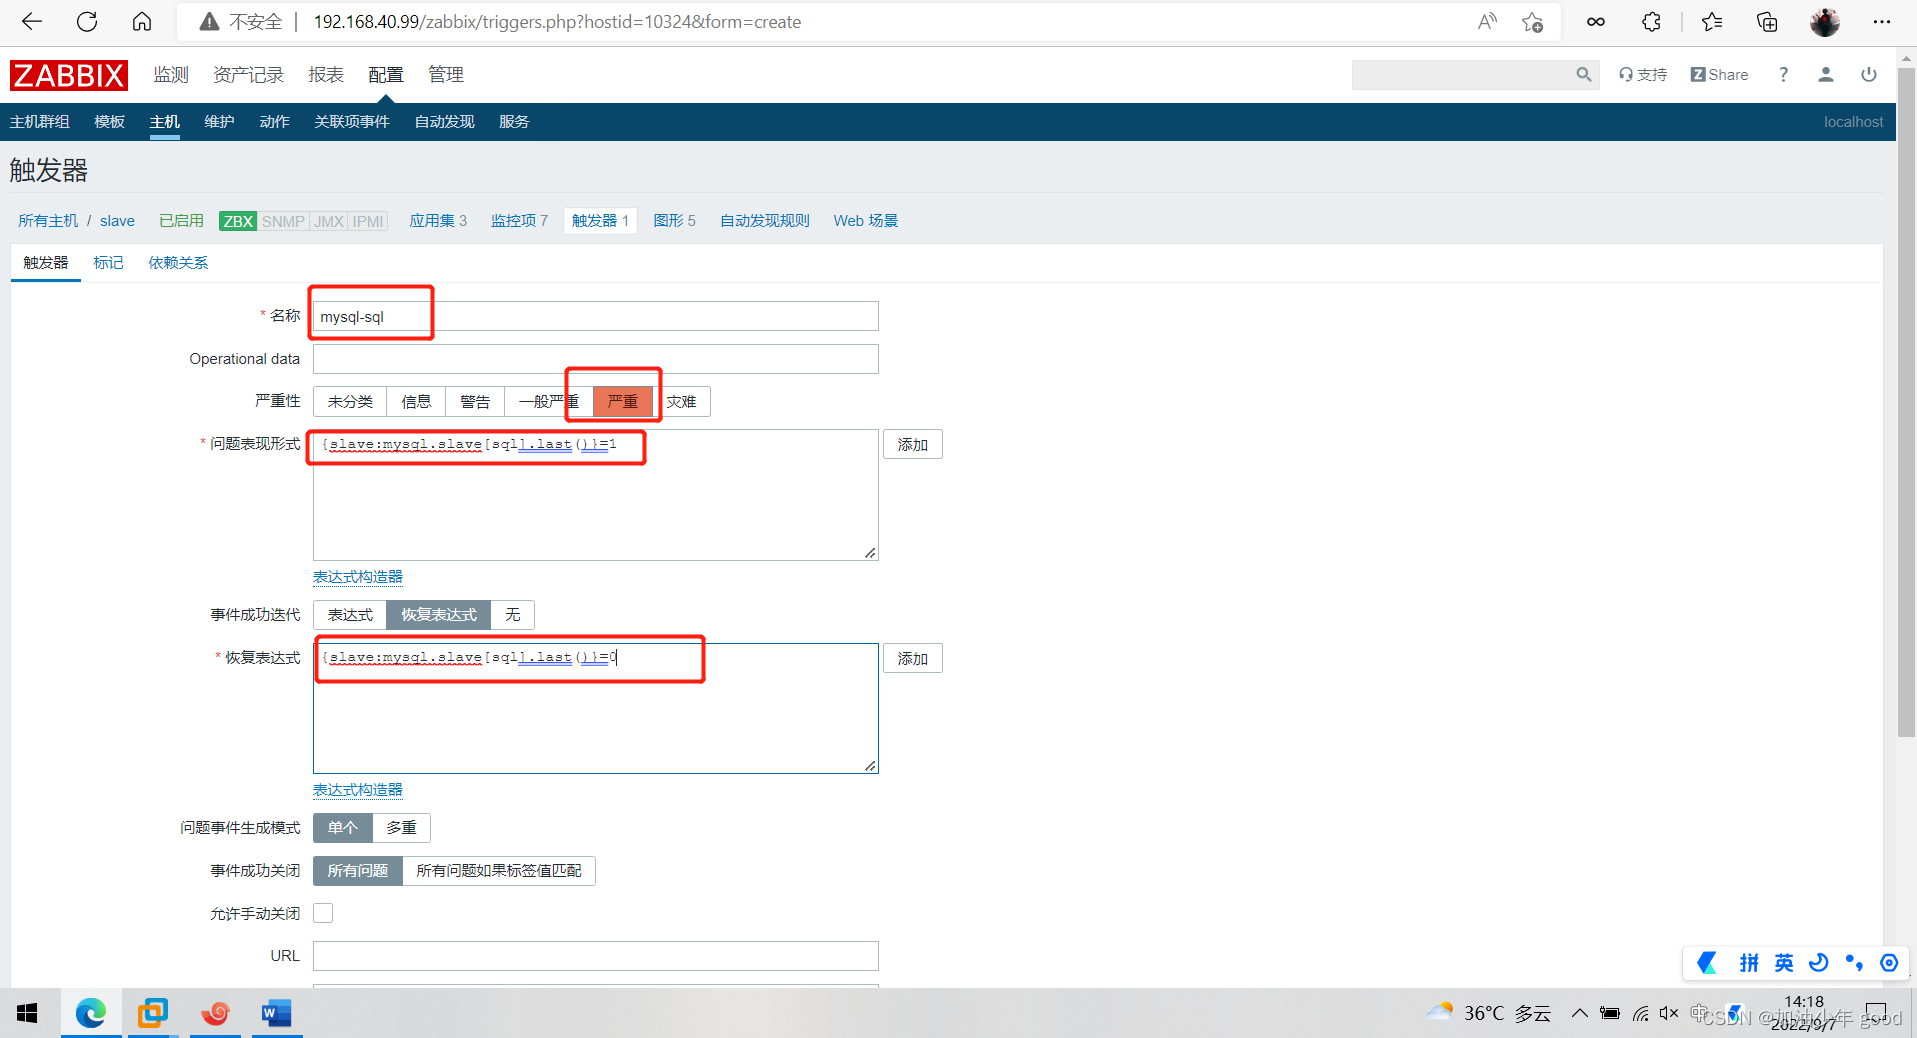
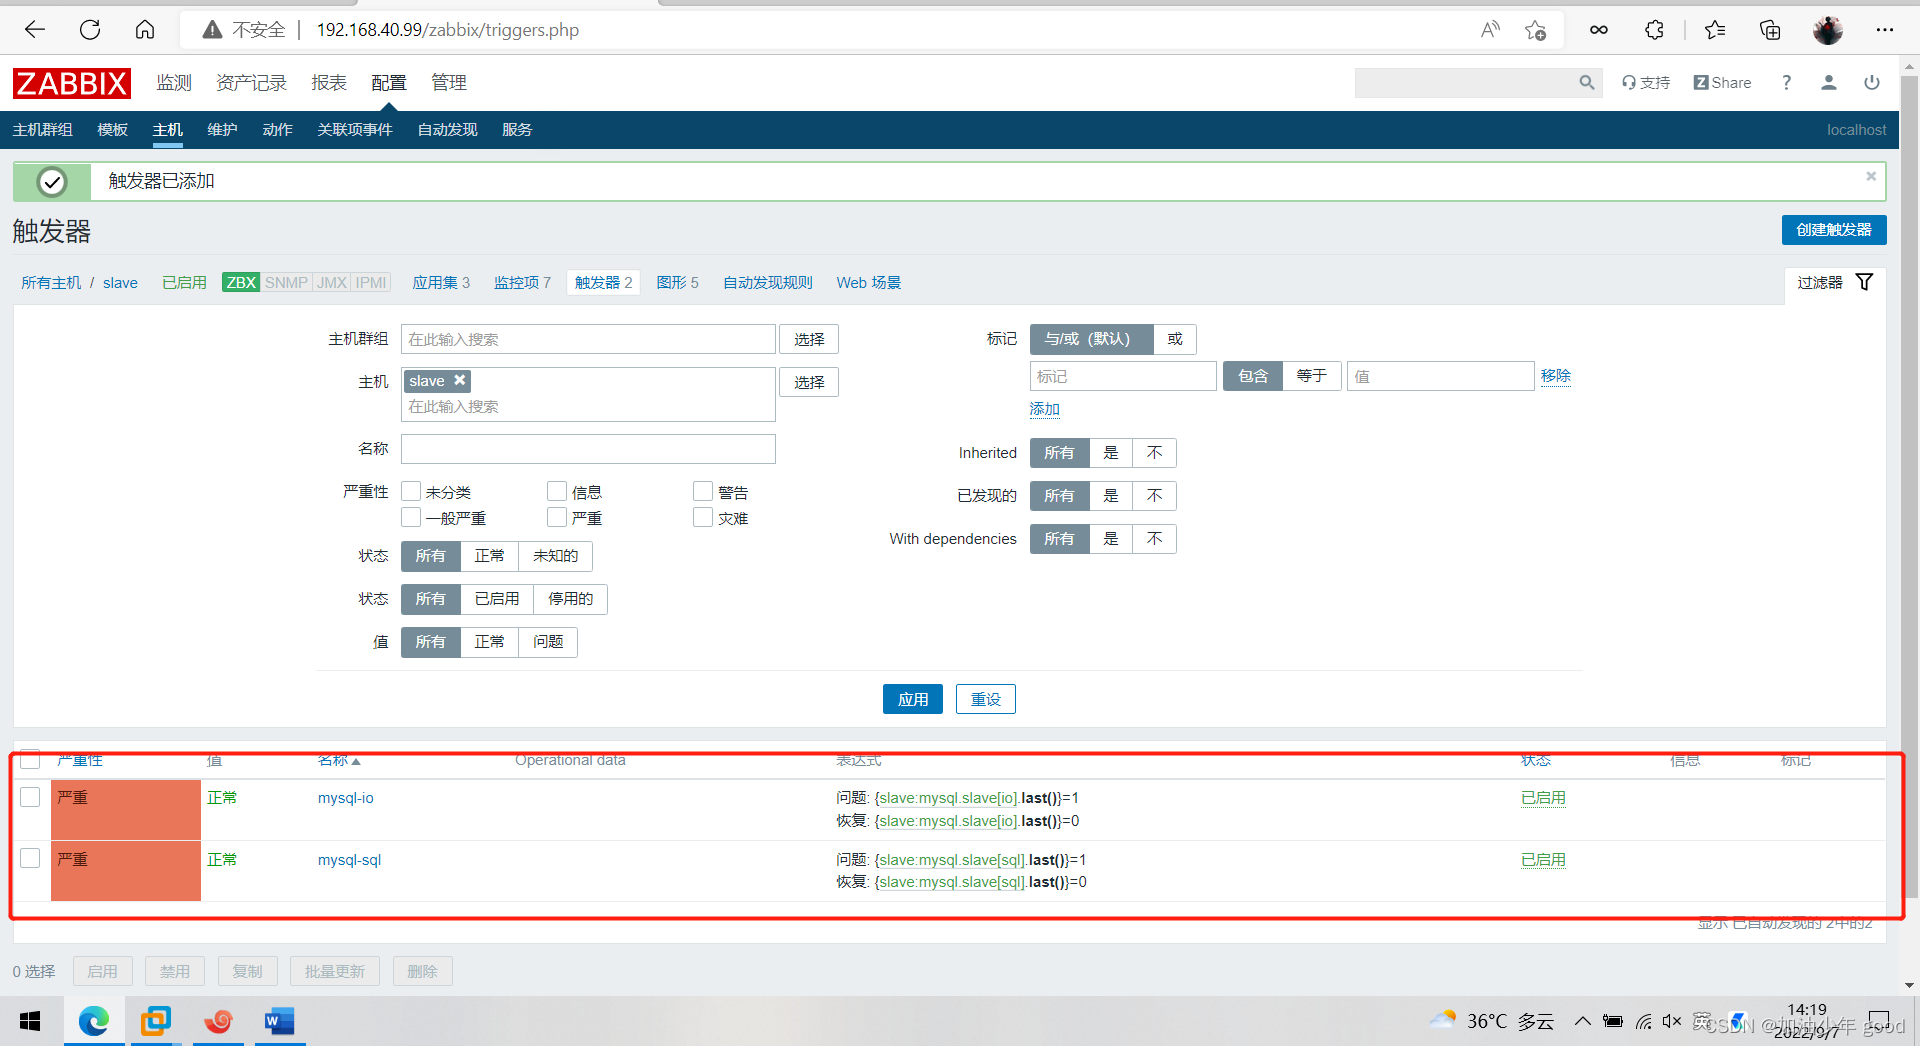
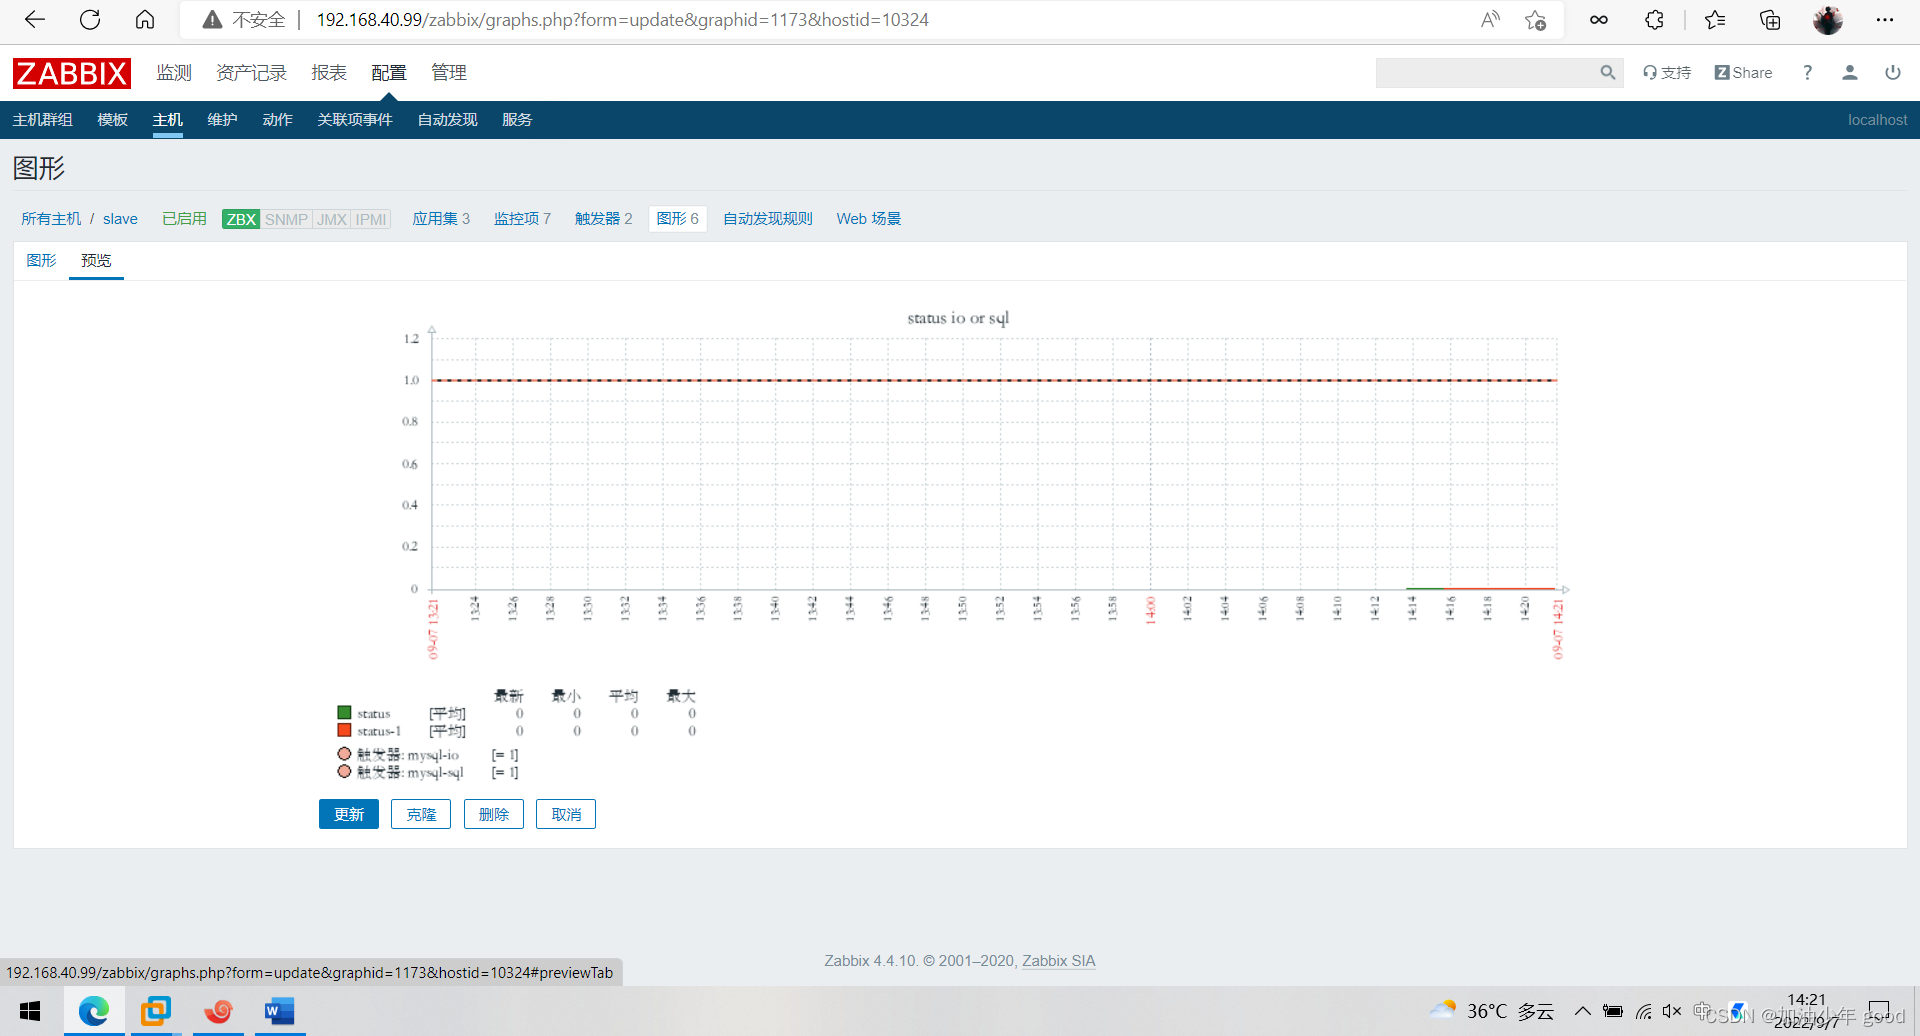
创建图形
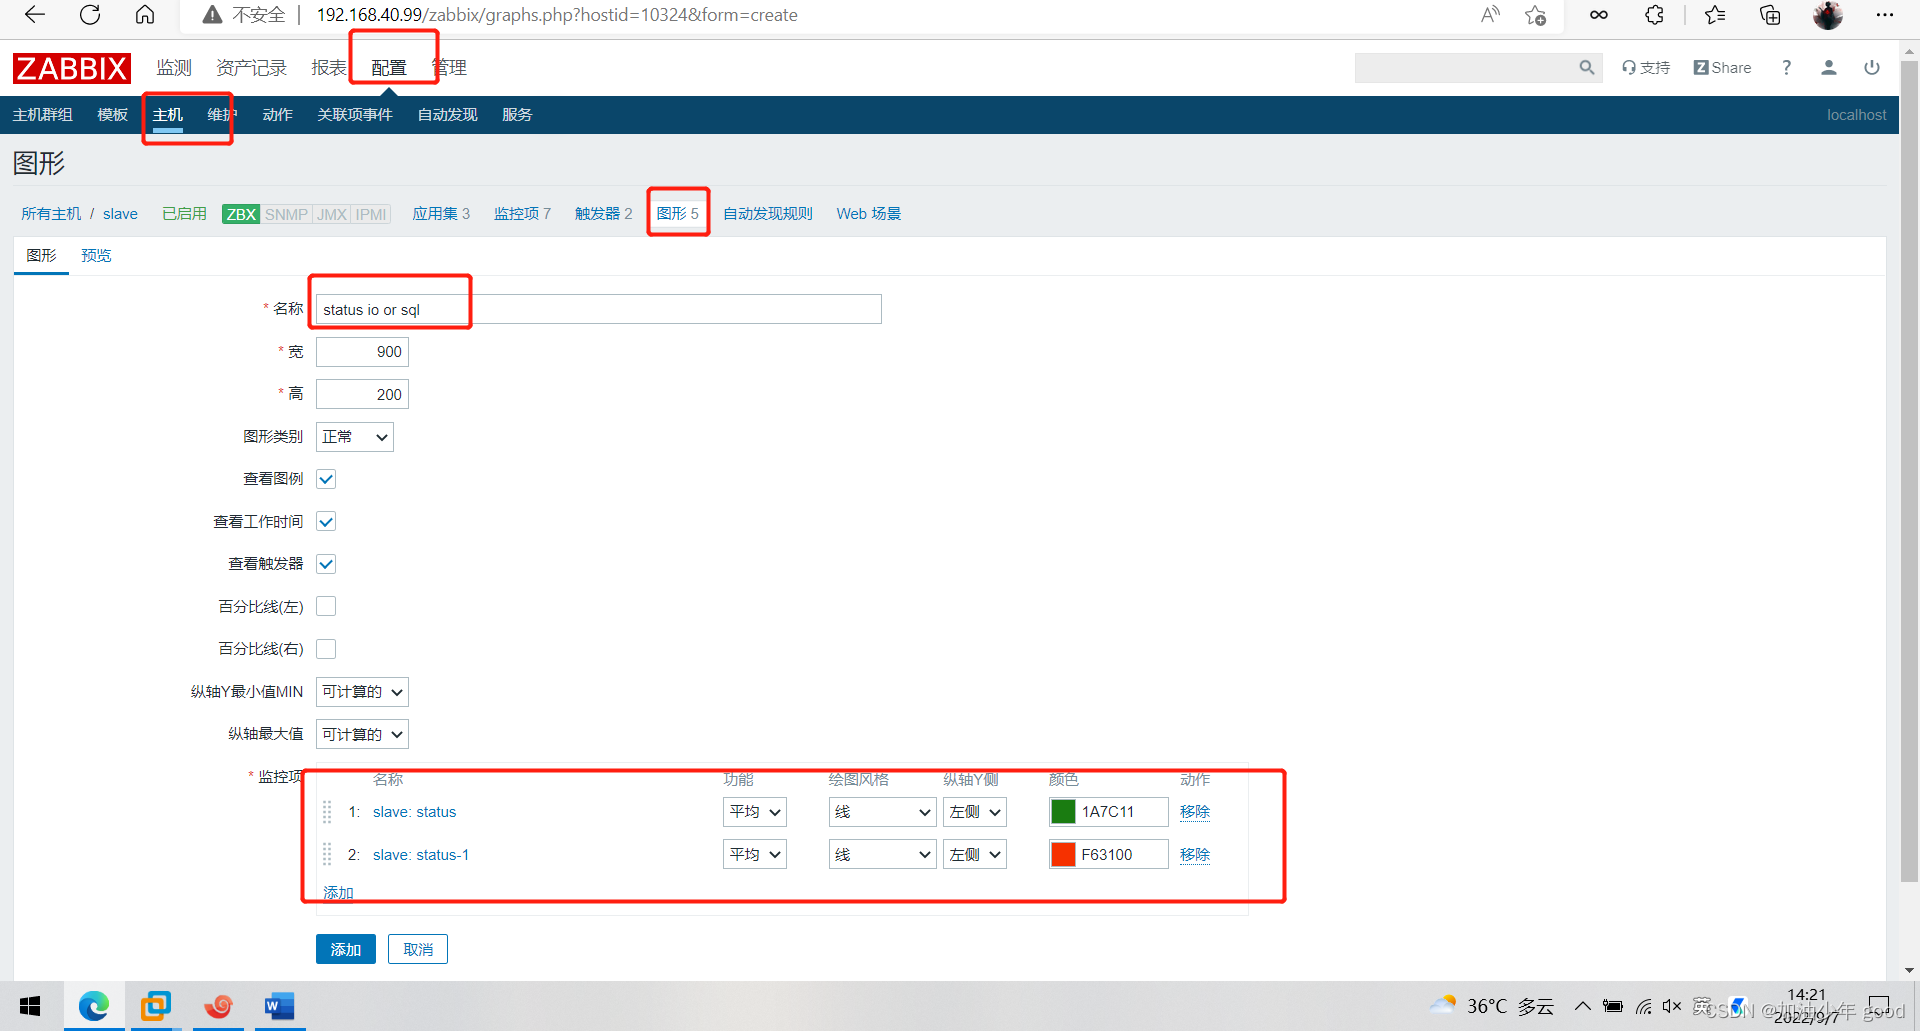
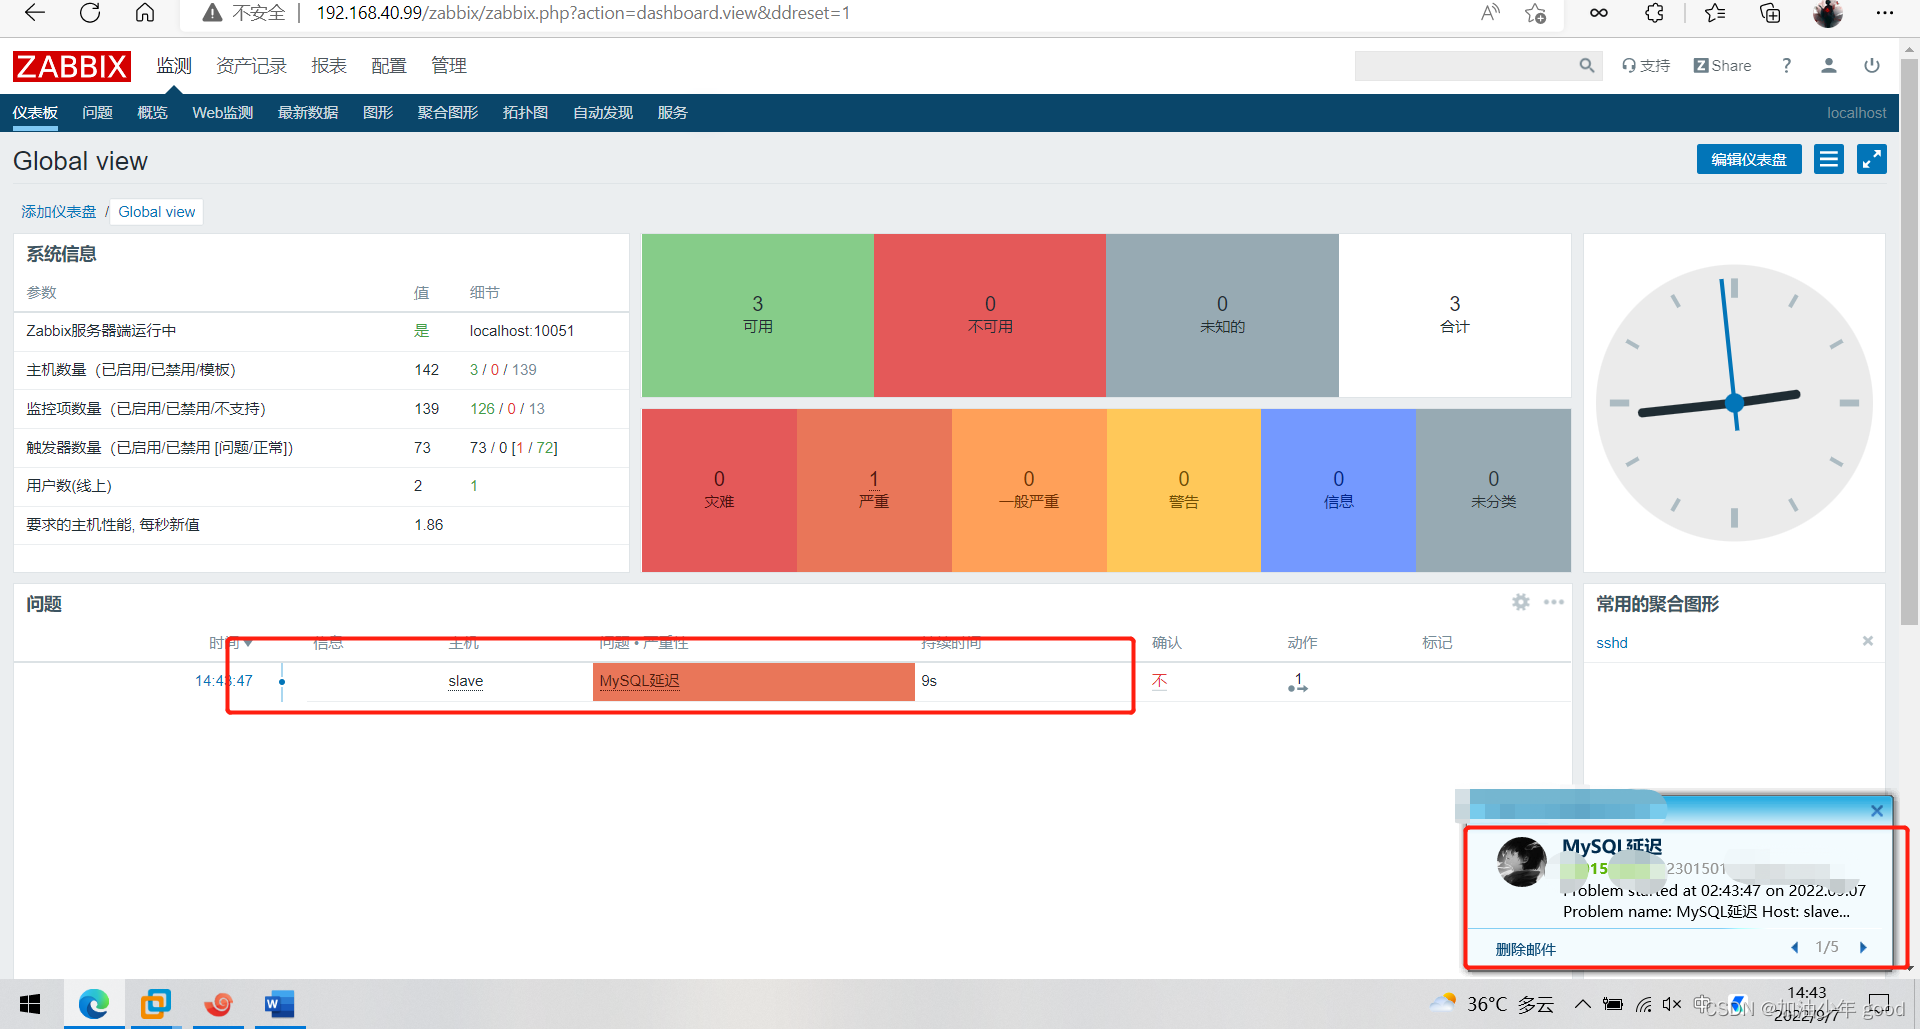
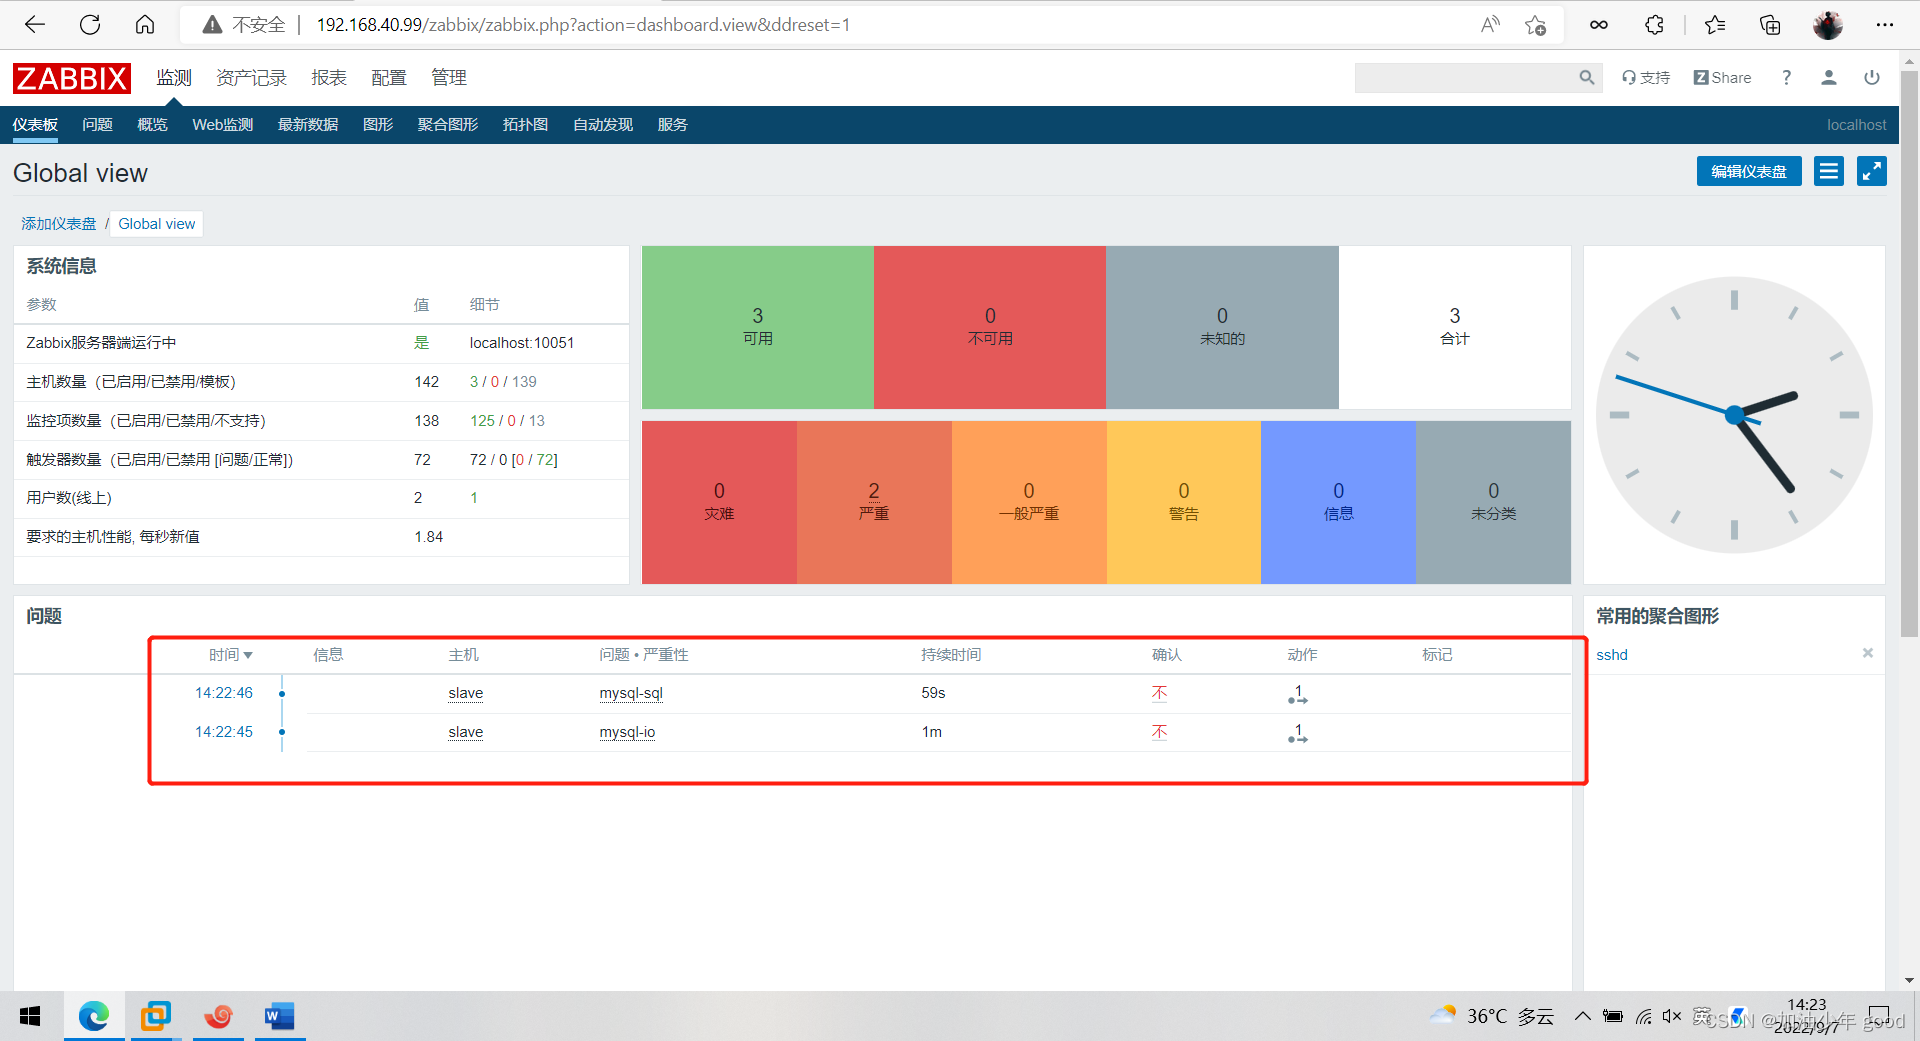
测试验证,将mysql主从关闭,查看zabbix告警信息,验证邮箱是否能接收到邮件
[root@slave ~]# mysql -u root -p123456 -e "stop slave;"

zabbix监控主从延迟
配置库脚本
[root@slave ]# cd /haha/
[root@slave haha]# vim sb.sh
#Behind:落后主库多少秒,存在秒数则出现主库复制之间的延迟
#只要当延迟数据为NULL,以及0-200是正常的,否则其他数字输入1表示错误
#!/bin/bash
delay=$(mysql -uroot -p123456 -e 'show slave status\G' 2> /dev/null | grep 'Seconds_Behind_Master' | awk '{print $2}')
if [ $delay == "NULL" ];then
echo 0
elif [ $delay -ge 0 ] && [ $delay -le 200 ];then
echo 0
else
echo 1
fi
[root@slave haha]# chmod +x sb.sh
[root@slave haha]# chown zabbix.zabbix sb.sh
配置agentd文件,并重启服务
[root@slave ~]# vim /etc/zabbix/zabbix_agentd.conf
# Default:
 UserParameter=mysql.slave[*],/haha/hehe.sh $1
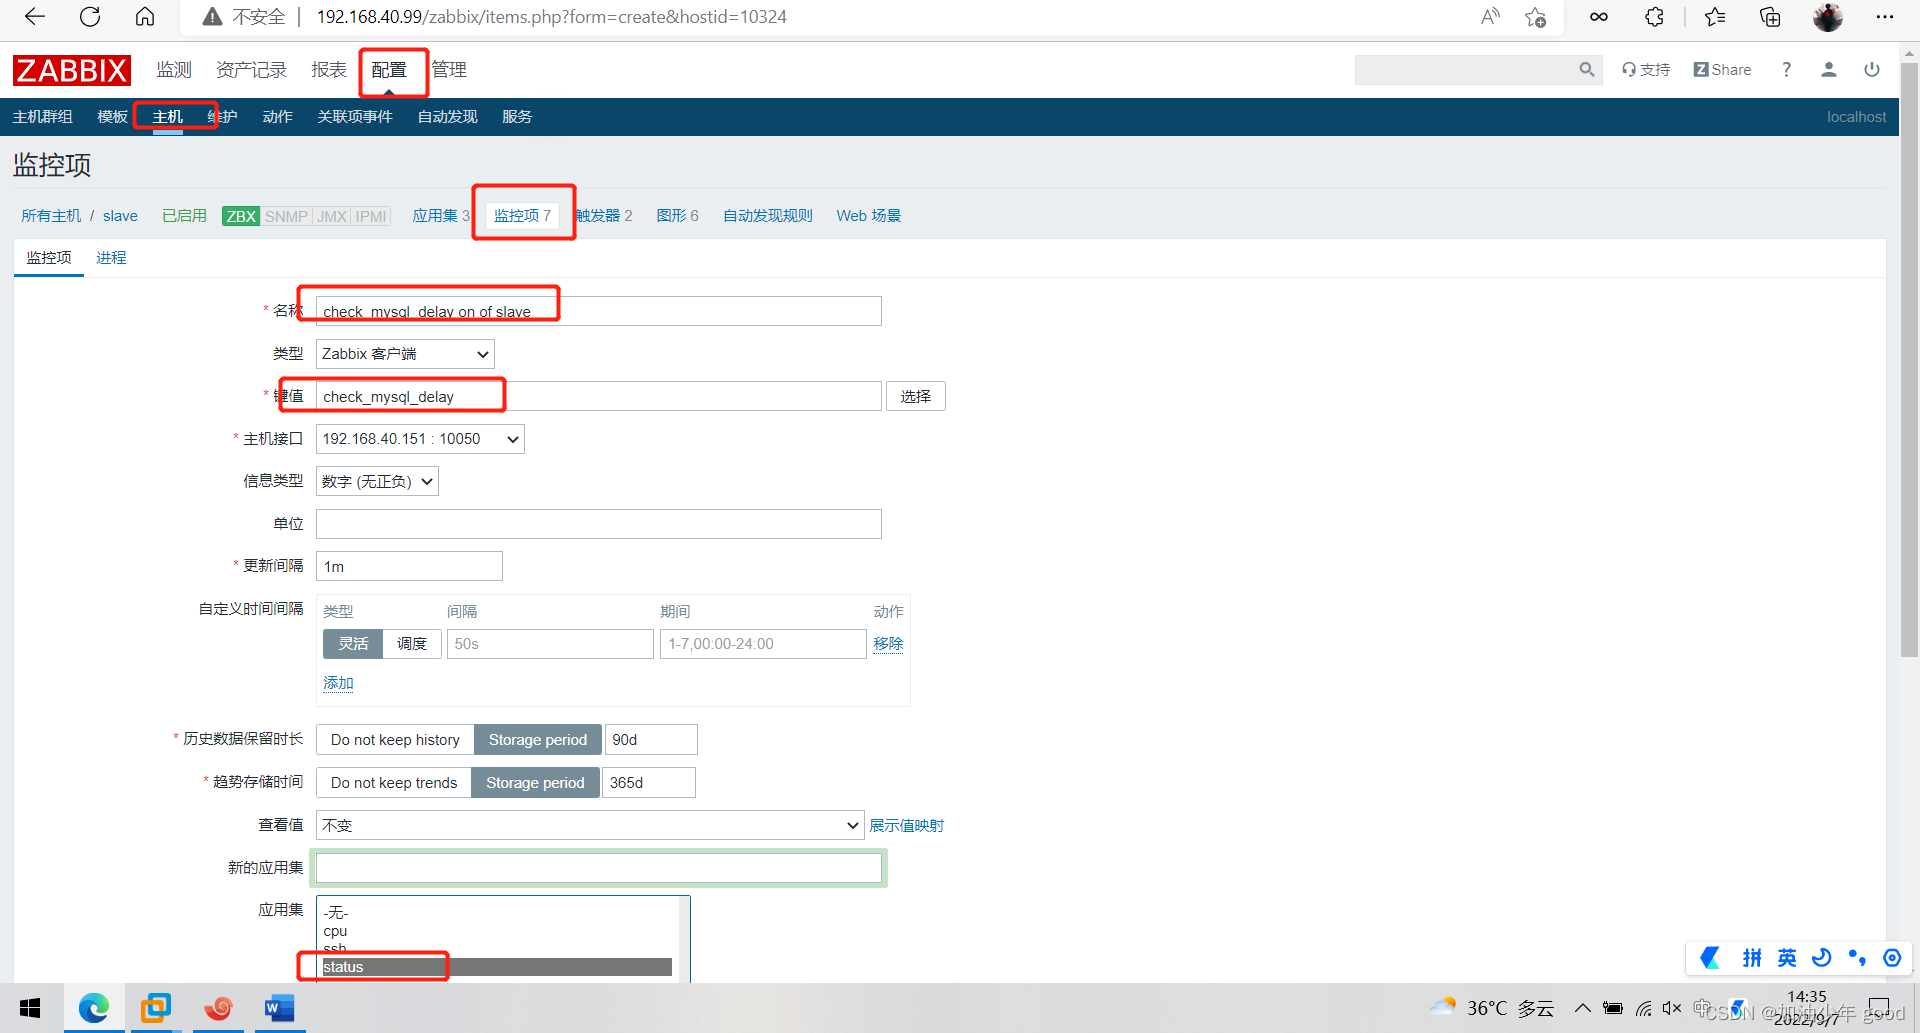
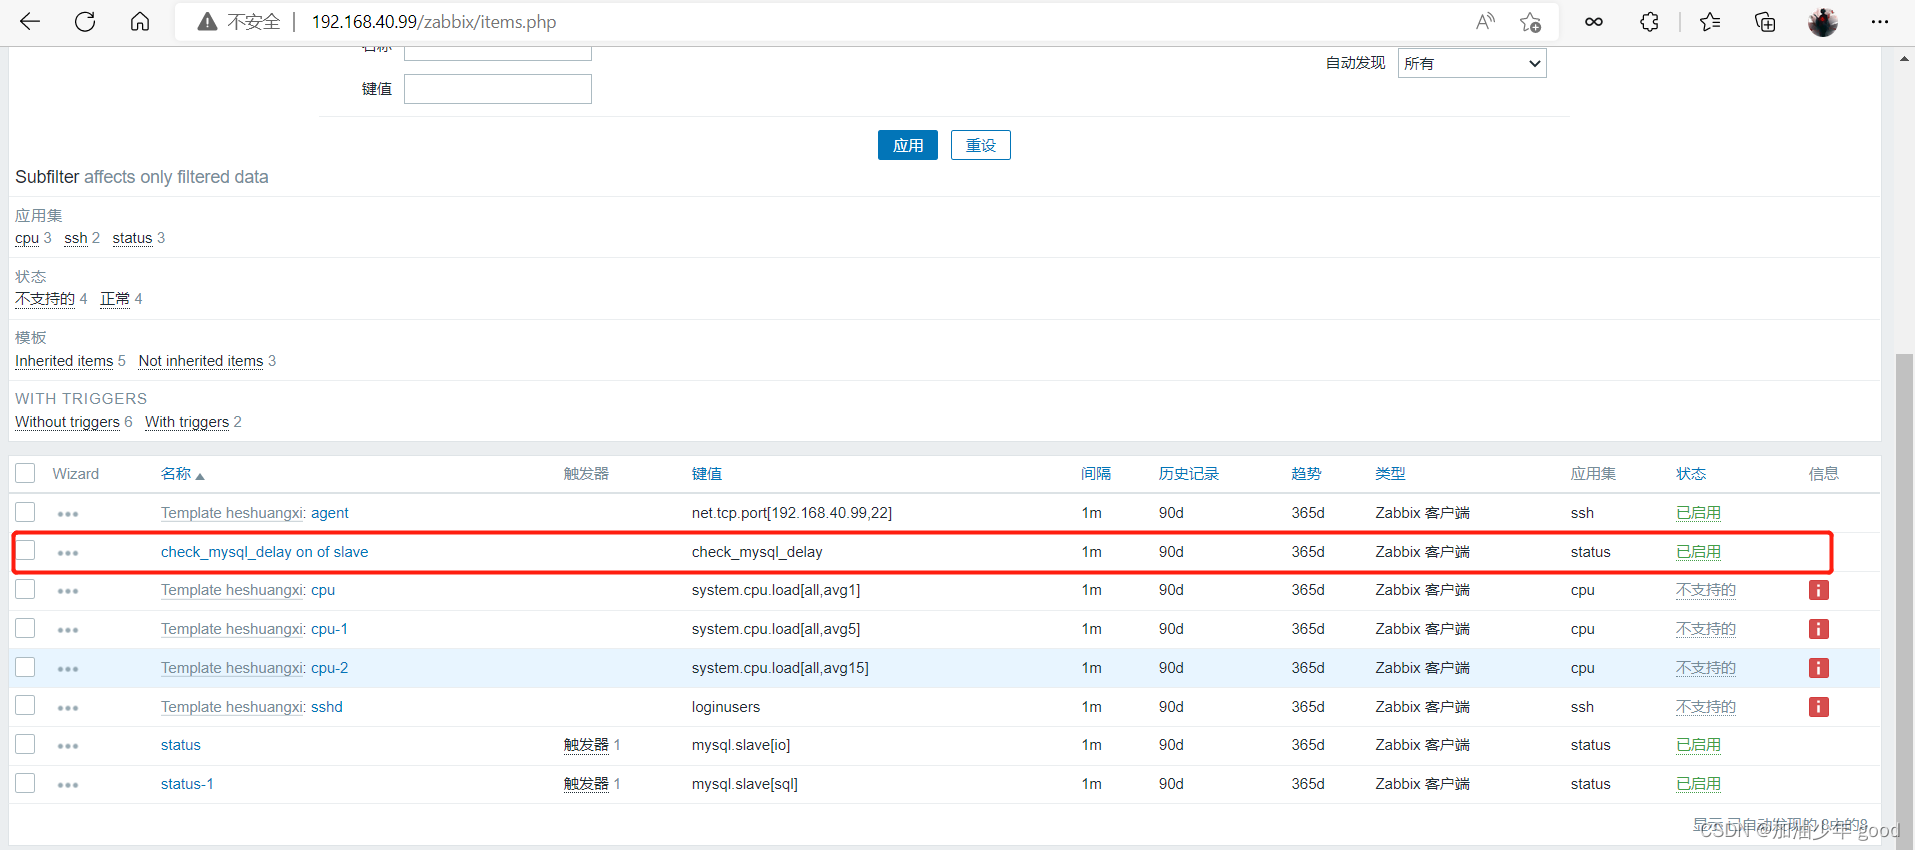
 UserParameter=check_mysql_delay,/bin/bash /haha/sb.sh

[root@slave ~]# systemctl restart zabbix-agent.service
测试sb.sh脚本
[root@slave ~]# cd /haha/
[root@slave haha]# ./sb.sh
0
zabbix 服务端进行脚本测试
[root@haha ~]# zabbix_get -s 192.168.40.151 -k check_mysql_delay
0
在zabbix web平台操作
添加监控项
创建触发器
