1. Linux启动流程
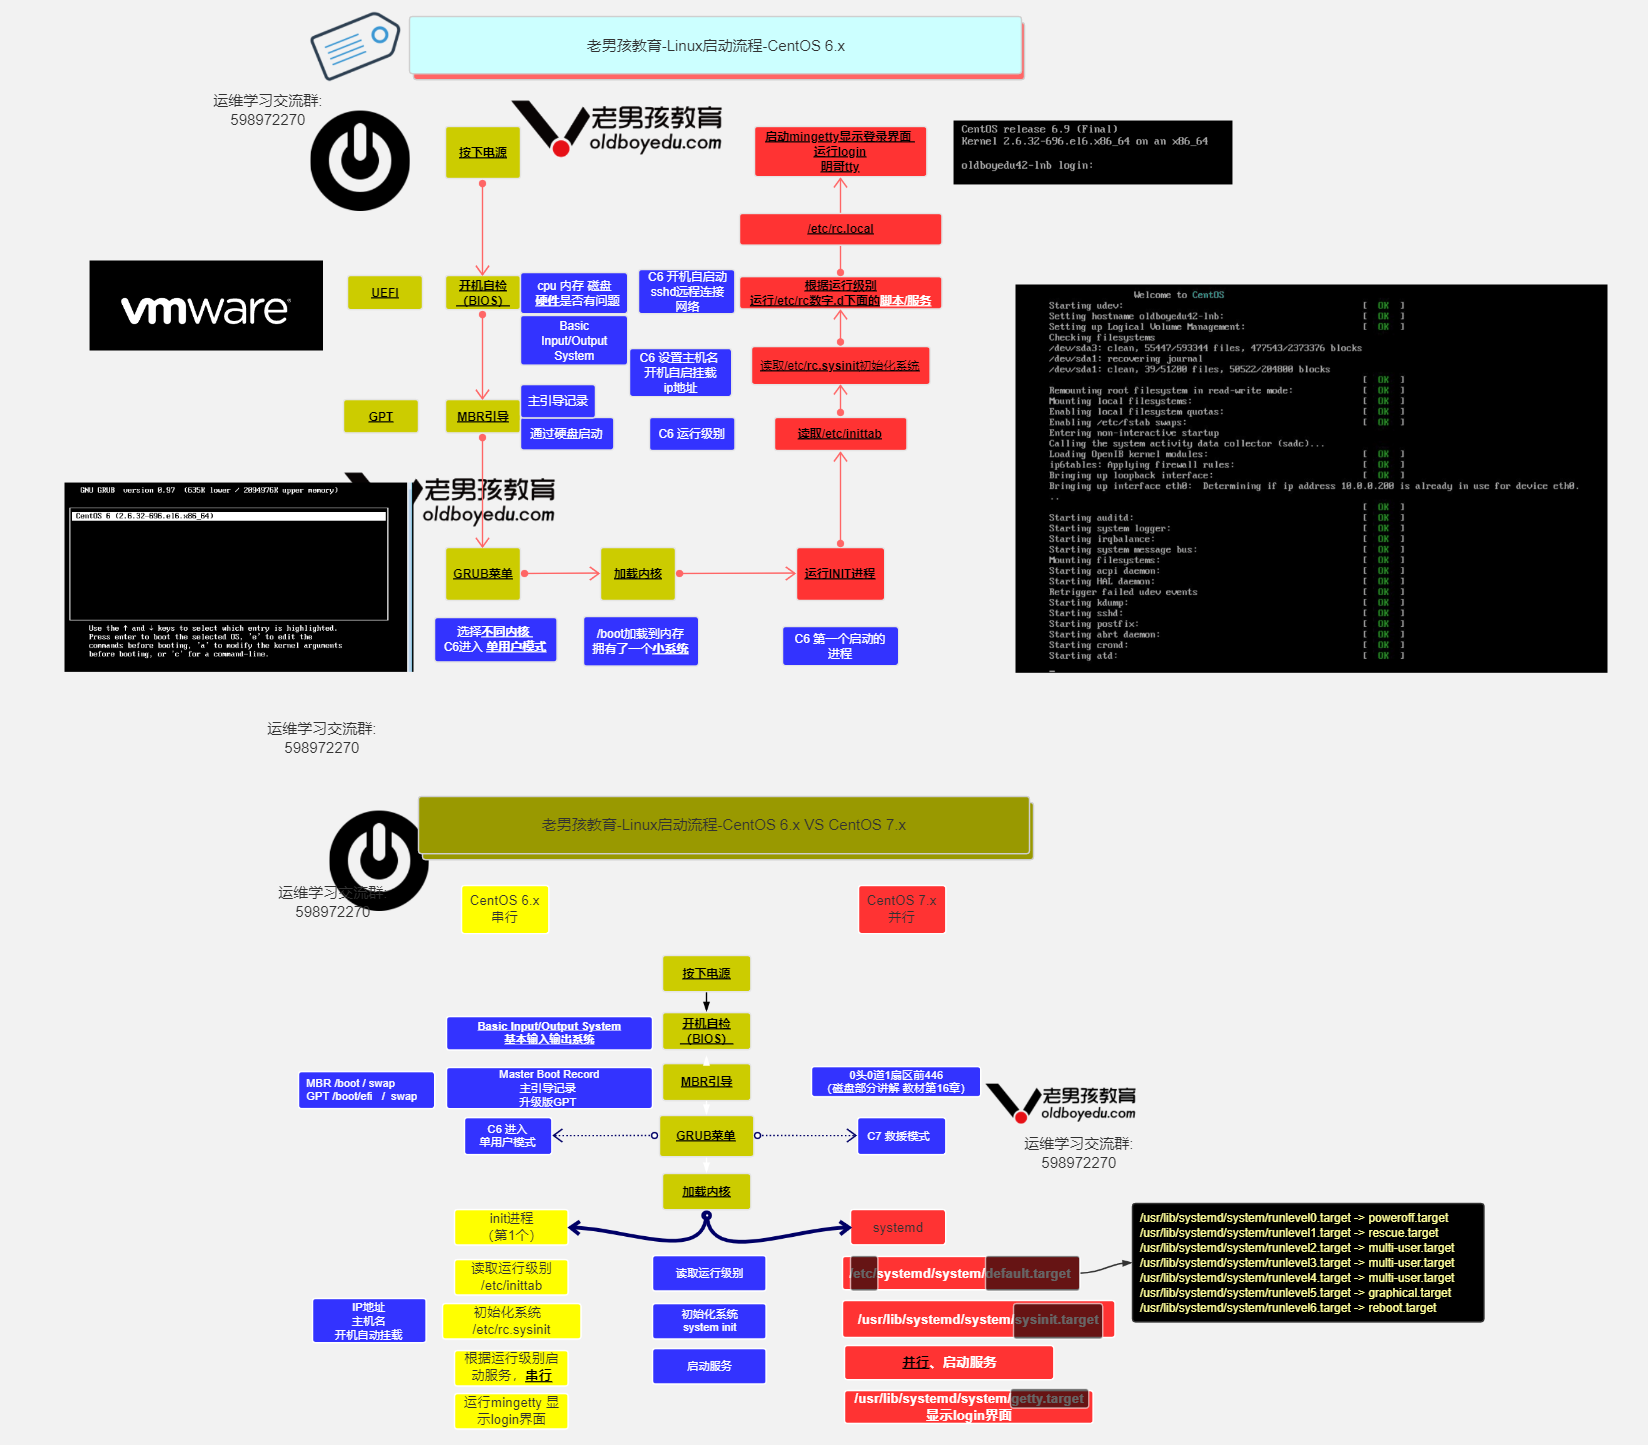
1.1 CentOS6启动流程
CentOS6启动流程:
https://www.runoob.com/linux/linux-system-boot.html
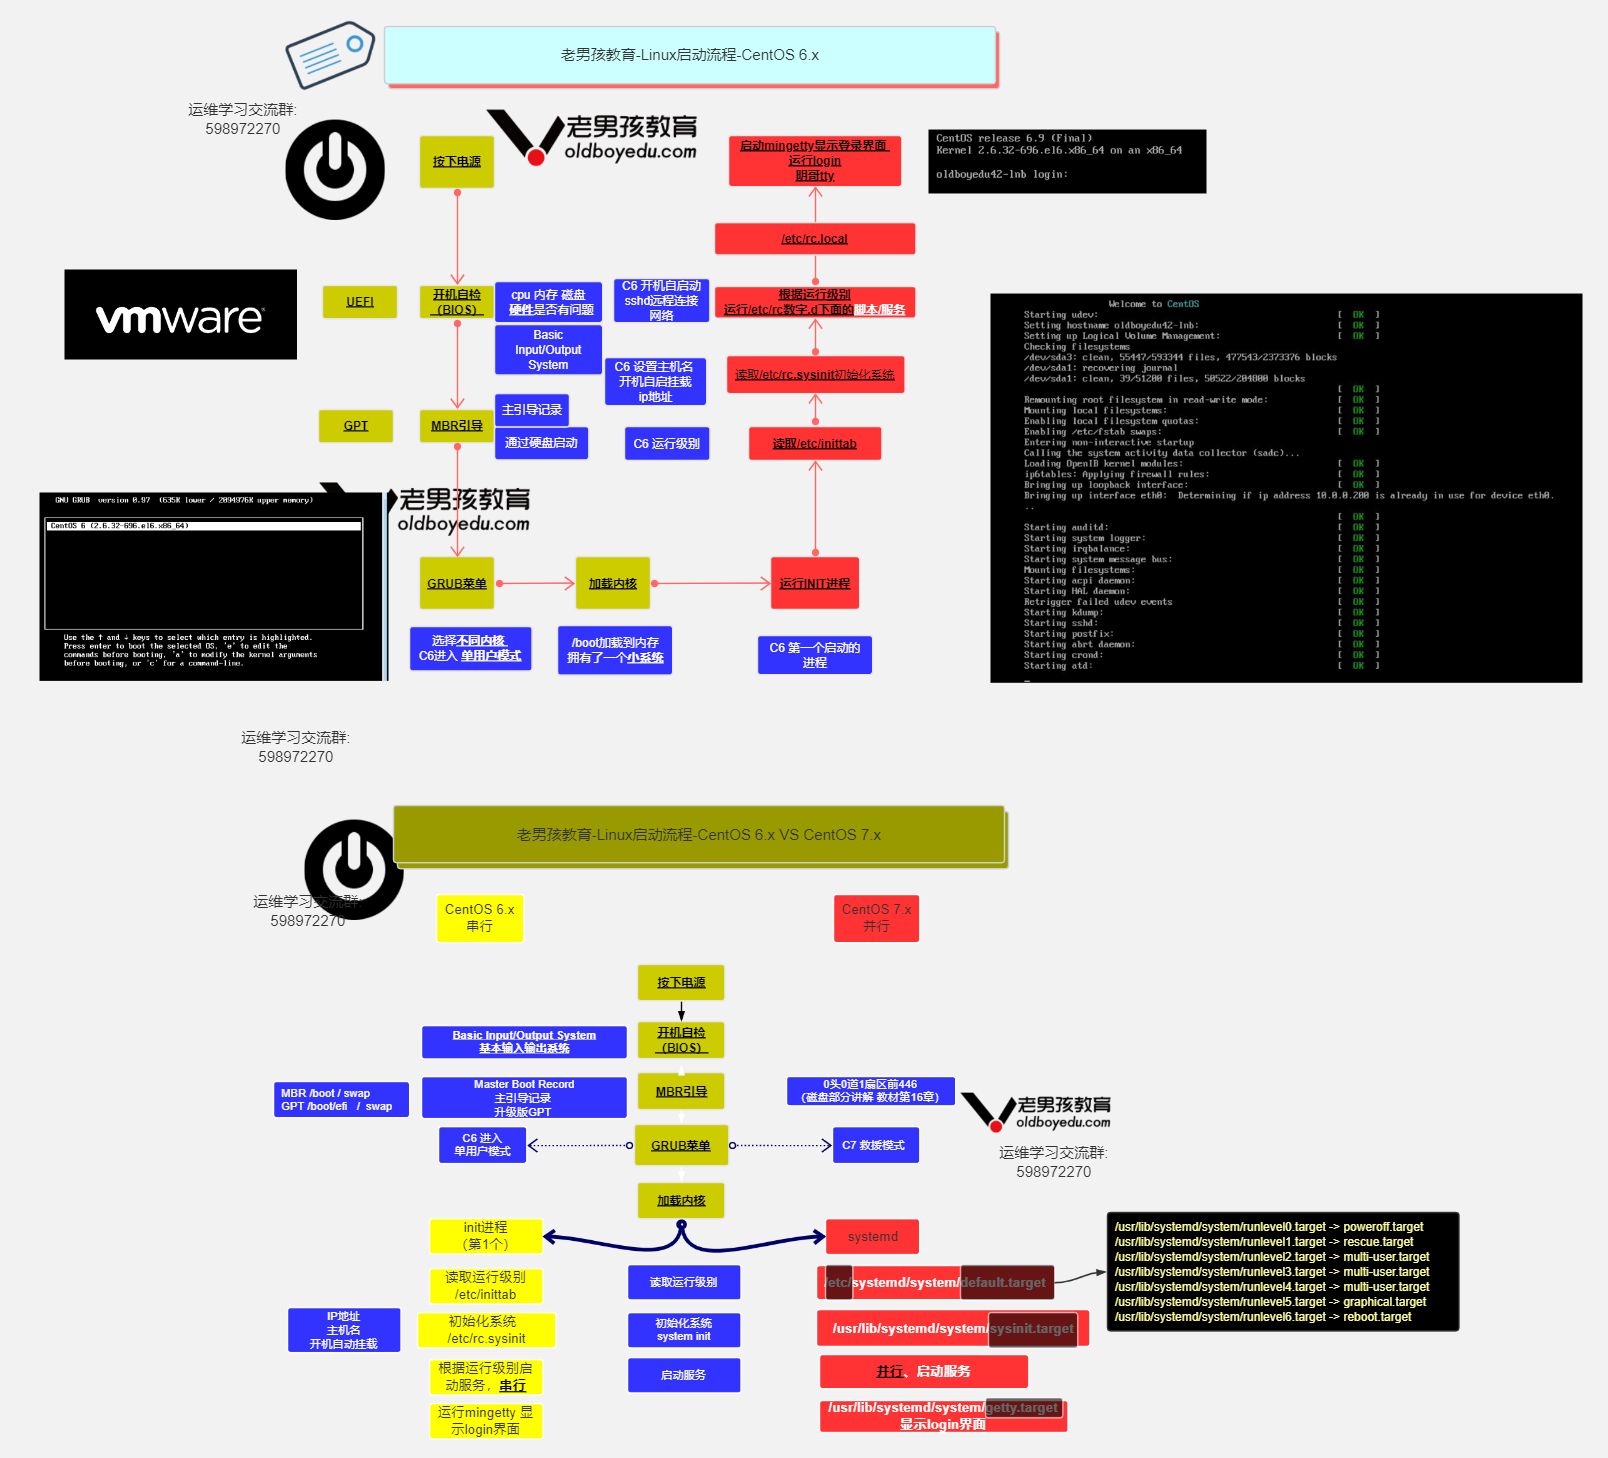
1.2 CentOS7启动流程
CentOS6 VS Centos7开机启动流程图解: https://www.processon.com/view/link/5bffde0ae4b0f012f2382181
2. Linux运行级别
2.1 运行级别介绍
运行级别, 运行级别就是操作系统当前正在运行的功能级别.
| System V init运行级别 | systemd目标名称 | 作用 |
|---|---|---|
| 0 | runlevel0.target, poweroff.target | 关机 |
| 1 | runlevel1.target, rescue.target | 单用户模式 |
| 2 | runlevel2.target, multi-user.target | 暂未使用 |
| 3 | runlevel3.target, multi-user.target | 多用户的文本界面(黑框) |
| 4 | runlevel4.target, multi-user.target | 没有使用 |
| 5 | runlevel5.target, graphical.target | 多用户的图形界面 |
| 6 | runlevel6.target, reboot.target | 重启 |
2.2 查看所有运行级别
# 查看所有运行级别 0-6
[root@kid ~]# ls /usr/lib/systemd/system/runlevel*
/usr/lib/systemd/system/runlevel0.target  /usr/lib/systemd/system/runlevel4.target
/usr/lib/systemd/system/runlevel1.target  /usr/lib/systemd/system/runlevel5.target
/usr/lib/systemd/system/runlevel2.target  /usr/lib/systemd/system/runlevel6.target
/usr/lib/systemd/system/runlevel3.target

/usr/lib/systemd/system/runlevel1.target.wants:
systemd-update-utmp-runlevel.service

/usr/lib/systemd/system/runlevel2.target.wants:
systemd-update-utmp-runlevel.service

/usr/lib/systemd/system/runlevel3.target.wants:
systemd-update-utmp-runlevel.service

/usr/lib/systemd/system/runlevel4.target.wants:
systemd-update-utmp-runlevel.service

/usr/lib/systemd/system/runlevel5.target.wants:
systemd-update-utmp-runlevel.service
2.4 查看默认启动级别
# 查看系统默认运行级别(3 multi-user.target 黑框显示)
# runlevel 6 7版本通用
[root@kid ~]# runlevel
N 3

[root@kid ~]# systemctl get-default
multi-user.target
2.5 修改默认启动级别
CentOS7的systemd使用targets而不是runlevels. (runlevels几.targets)
默认情况下, 有两个主要目标:

multi-user.target: 类似于运行级别3  黑框
graphical.target: 类似于运行级别5   图形化界面
# 没有安装图形化界面就不尝试了
# 切换图形界面
[root@student ~]# systemctl set-default graphical.target
# 切换命令界面
[root@student ~]# systemctl set-default multi-user.target
3. Linux systemd
3.1 systemd的由来
Linux一直以来都是采用init进程作为祖宗进程, 但是init有两个缺点:

1. 启动时间长. Init进程是串行启动, 只有前一个进程启动完, 才会启动下一个进程.

2. 启动脚本复杂, 初始化完成后系统会加载很多脚本, 脚本都会处理各自的情况,
   这会让脚本多而复杂.

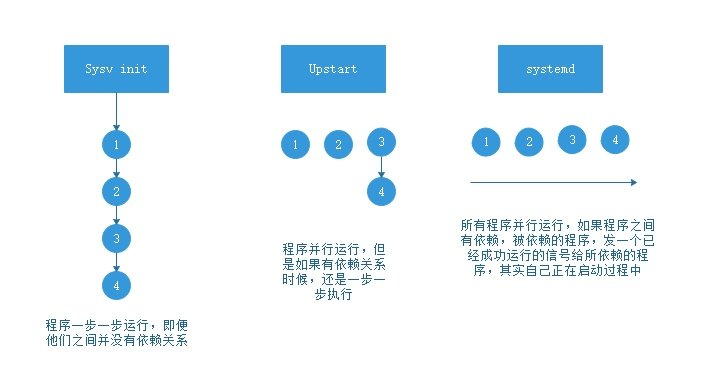
Centos5 是启动速度最慢的, 串行启动过程, 无论进程相互之间有无依赖关系.

Centos6 相对启动速度有所改进.
有依赖的进程之间依次启动而其他与之没有依赖关系的则并行同步启动.

Centos7 所有进程无论有无依赖关系则都是并行启动
(当然很多时候进程没有真正启动而是只有一个信号或者说是标记而已,
在真正利用的时候才会真正启动.)
3.2 什么是systemd
systemd即为system
daemon守护进程, systemd主要解决上文的问题而诞生,
systemd的目标是, 为系统的启动和管理提供一套完整的解决方案.
3.3 systemd的优势
1. 最新系统都采用systemd管理(RedHat7,CentOS7,Ubuntu15等)
2. Centos7支持开机并行启动服务, 显著提高开机启动效率.
3. Centos7关机只关闭正在运行的服务, 而Centos6全部都关闭一次.
4. Centos7服务的启动与停止不在使用脚本进行管理, 也就是/etc/init.d下不在有脚本.
5. Centos7使用systemd解决原有模式缺陷, 比如原有service不会关闭程序产生的子进程.

systemd相关配置文件
/usr/lib/systemd/system/ # 类似Centos6系统的启动脚本 /etc/init.d/
/etc/systemd/system/     # 类似Centos6系统的 /etc/rc.d/rcN.d/
/etc/systemd/system/multi-user.target.wants/, 开机要启动的程序
3.4 systemd管理服务相关命令
systemctl管理服务的启动、重启、停止、重载、查看状态等常用命令
| systemctl命令 | 作用 |
|---|---|
| systemctl start crond.service | 启动服务 |
| systemctl stop crond.service | 停止服务 |
| systemctl restart crond.service | 重启服务 |
| systemctl reload crond.service | 重新加载配置 |
| systemctl status crond.servre | 查看服务运行状态 |
| systemctl is-active sshd.service | 查看服务是否在运行中 |
| systemctl mask crond.servre | 禁止服务运行 |
| systemctl unmask crond.servre | 取消禁止服务运行 |
| systemctl cat vsftpd | 查看启动文件 |
# centos6启动
/etc/init.d/network restart  # 找到服务文件 执行启动
service network restart  # 子进程不会被杀死

# 在centos7中可以执行但是不推荐使用
[root@kid ~]# service network restart
Restarting network (via systemctl):                        [  OK  ]

# centos7启动服务
systemctl restart network

# 所有服务都放在 /usr/lib/systemd/system/目录下
[root@kid ~]# ll /usr/lib/systemd/system/vsftpd.service
-rw-r--r--. 1 root root 171 Jun 10  2021 /usr/lib/systemd/system/vsftpd.service
3.5 服务状态
当我们使用systemctl启动一个守护进程后,
可以通过sysytemctl status查看此守护进程的状态.
| 状态 | 描述 |
|---|---|
| loaded | 服务单元的配置文件已经被处理 |
| active(running) | 服务持续运行 |
| active(exited) | 服务成功完成一次的配置 |
| active(waiting) | 服务已经运行但在等待某个事件 |
| inactive | |
| enabled | 服务设定为开机运行 |
| disabled | 服务设定为开机不运行 |
| static | 服务开机不启动, 但可以被其他服务调用启动 |
# 查看nginx服务的状态
[root@kid ~]# systemctl status nginx -l
● nginx.service - The nginx HTTP and reverse proxy server
   Loaded: loaded (/usr/lib/systemd/system/nginx.service; disabled; vendor preset: disabled)
   # 活动:服务没有在运行(死的)
   Active: inactive (dead)
3.6 服务开机启动相关
systemctl 设置服务开机启动、不启动、查看各级别下服务启动状态等常用命令
| systemctl命令(7系统) | 作用 |
|---|---|
| systemctl enable crond.service | 开机自动启动 |
| systemctl disable crond.service | 开机不自动启动 |
| systemctl list-unit-files | 查看各个级别下服务的启动与禁用 |
| systemctl is-enabled crond.service | 查看特定服务是否为开机自启动 |
| systemctl daemon-reload | 创建新服务文件需要重载变更 |
CentOS7系统, 管理员可以使用 systemctl 命令来管理服务器启动与停止
# 关机相关命令
systemctl poweroff  # 立即关机, 常用
# 重启相关命令
systemctl reboot  # 重启命令, 常用
3.7 journalctl日志
journalctl是systemctl的日志, 记录包括了手动执行以及开机启动的服务操作记录...
journalctl -n 20     查看最后20行
journalctl -f        动态查看日志
journalctl -p err    查看日志的级别
journalctl -u crond 查看某个服务的单元的日志
journalctl -xe
# -x 是目录(catalog)的意思,在报错的信息下会,附加解决问题的网址
# -e  pager-end 从末尾开始看
3.8 制作系统服务
通过yum安装的软件一般都会配置在/usr/lib/systemd/system/创建服务文件.
二进制编译安装的软件, 则需要自己制作系统服务.
制作系统服务后则可以通过systemd来管理这个软件.
# 查看vsftpd服务配置文件(参照)
[root@kid ~]# cat /usr/lib/systemd/system/vsftpd.service
[Unit]
# 描述
Description=Vsftpd ftp daemon
# 在XX后启动
After=network.target

[Service]
# 程序后台运行
Type=forking
# 命令
ExecStart=/usr/sbin/vsftpd /etc/vsftpd/vsftpd.conf
# ExecStartPre 启动之前执行
# ExecStop 停止
# ExecRestart 重启
# ExecReload 重新加载

[Install]
# 在哪个运行级别下
WantedBy=multi-user.target
源码方式安装nginx, 否则自定义服务/usr/local/nginx/sbin/nginx目录不存在.
安装方式 https://blog.csdn.net/qq_46137324/article/details/126728149
# 制作系统服务
# 先切换到/usr/lib/systemd/system/ 目录下
[root@kid ~]# cd /usr/lib/systemd/system/

# 编辑自定义的nginx服务 服务后缀为.service
[root@kid system]# vim mynginx.service
[Unit]
# 描述
Description=my nginx
# 在XX后启动, 需要网络服务启动, nginx才启动, 否则直接报错
After=network.target

[Service]
# 程序后台运行
Type=forking
# 命令
# 启动命令
ExecStart=/usr/local/nginx/sbin/nginx
# 停止命令
ExecStop=/usr/local/nginx/sbin/nginx -s stop
# 重启命令
ExecRestart=/usr/local/nginx/sbin/nginx -s restart
# 重载命令
ExecReload=/usr/local/nginx/sbin/nginx -s reload

[Install]
# 在哪个运行级别下
WantedBy=multi-user.target
注释和配置不能在同一行否则会提示无效的配置 #...
# 修改文件的权限(主要是root用户有执行权限)
[root@kid system]#  chmod 754 mynginx.service

# 启动nginx, .service 都可以省略掉
[root@kid system]# systemctl start mynginx
# 如果启动出现错误 使用 journalctl -xe 查看报错信息 , 一般就是端口占用报错

# 开机启动
[root@kid system]# systemctl enable mynginx.service
# 创建一个软链接
Created symlink from /etc/systemd/system/multi-user.target.wants/mynginx.service to /usr/lib/systemd/system/mynginx.service.

# 查看是否成功
[root@kid system]# systemctl status mynginx.service
● mynginx.service - my nginx
   # enabled 开机自启
   Loaded: loaded (/usr/lib/systemd/system/mynginx.service; enabled; vendor preset: disabled)
   Active: inactive (dead)

Sep 11 17:53:11 kid systemd[1]: [/usr/lib/systemd/system/mynginx.service:13] Unk...ce'
Sep 11 17:53:11 kid systemd[1]: [/usr/lib/systemd/system/mynginx.service:13] Unk...ce'
Hint: Some lines were ellipsized, use -l to show in full.

# 取消开机启动 (移除软链接)
[root@kid system]# systemctl disable mynginx.service
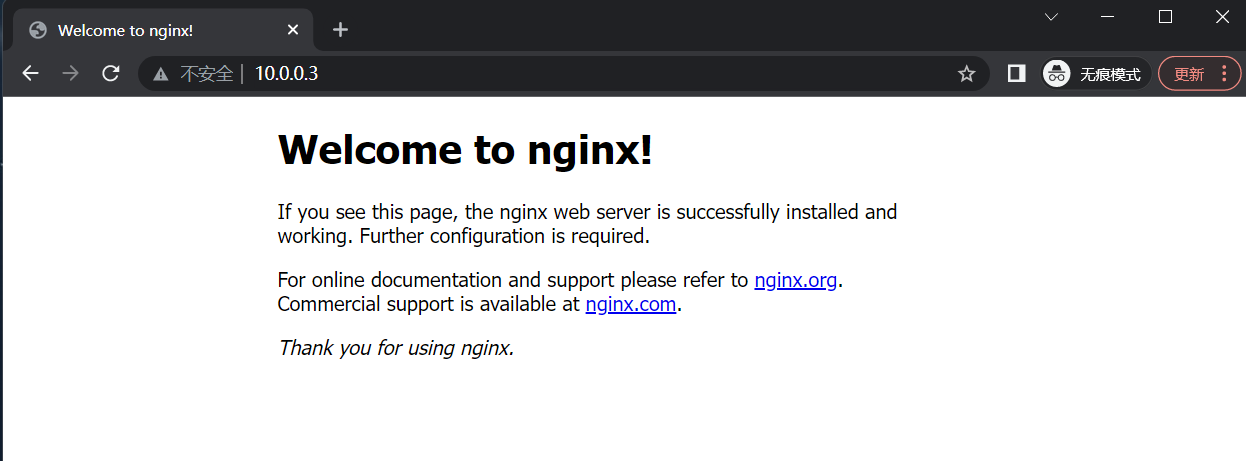
重启电脑, 使用本地浏览器访问 10.0.0.3:80
出现下图提示则说明设置成功...
 4. Linux单用户模式破解密码
如何使用单用户模式进行变更系统密码?
以Centos7系统为例:(Centos6破解方式请自行百度)
第1步:重启Linux系统主机并出现引导界面时, 按下键盘上的e键进入内核编辑界面
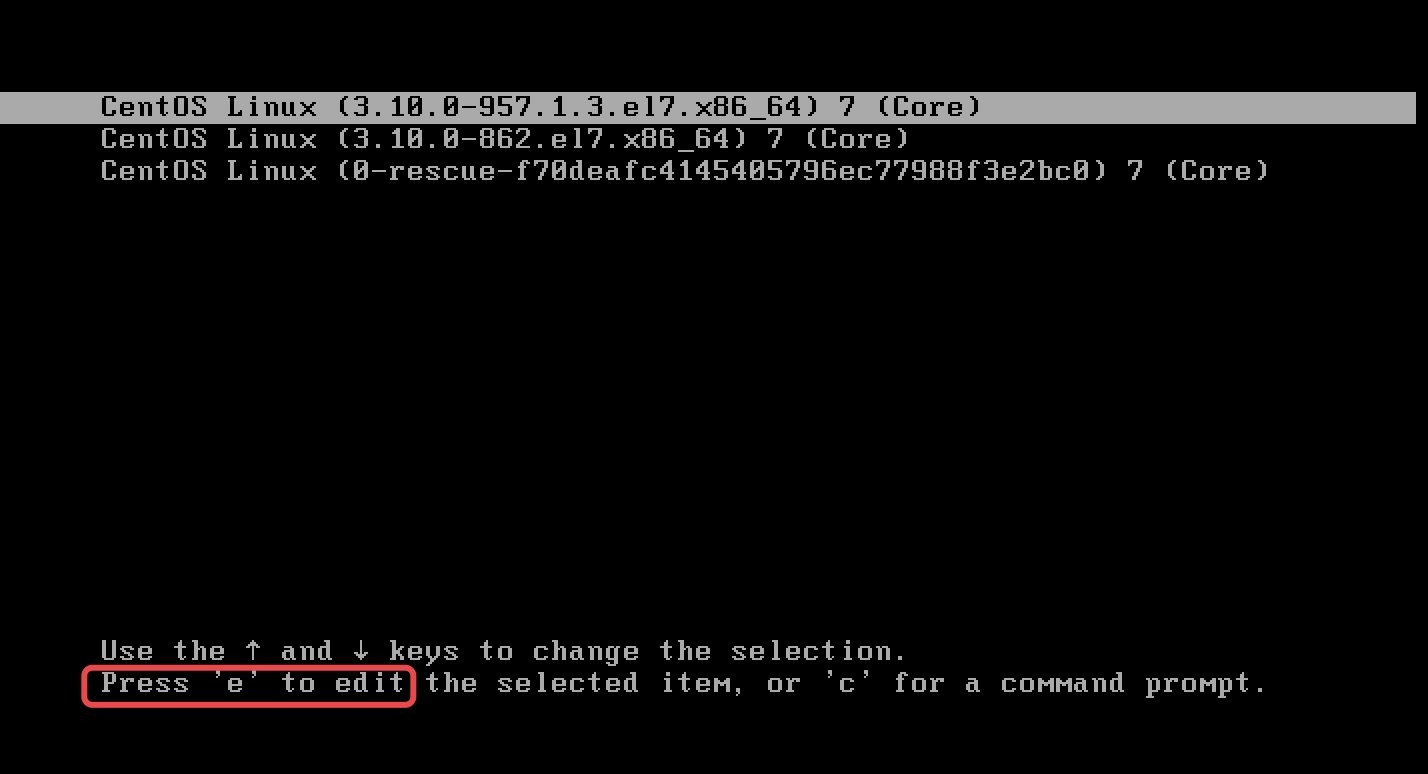
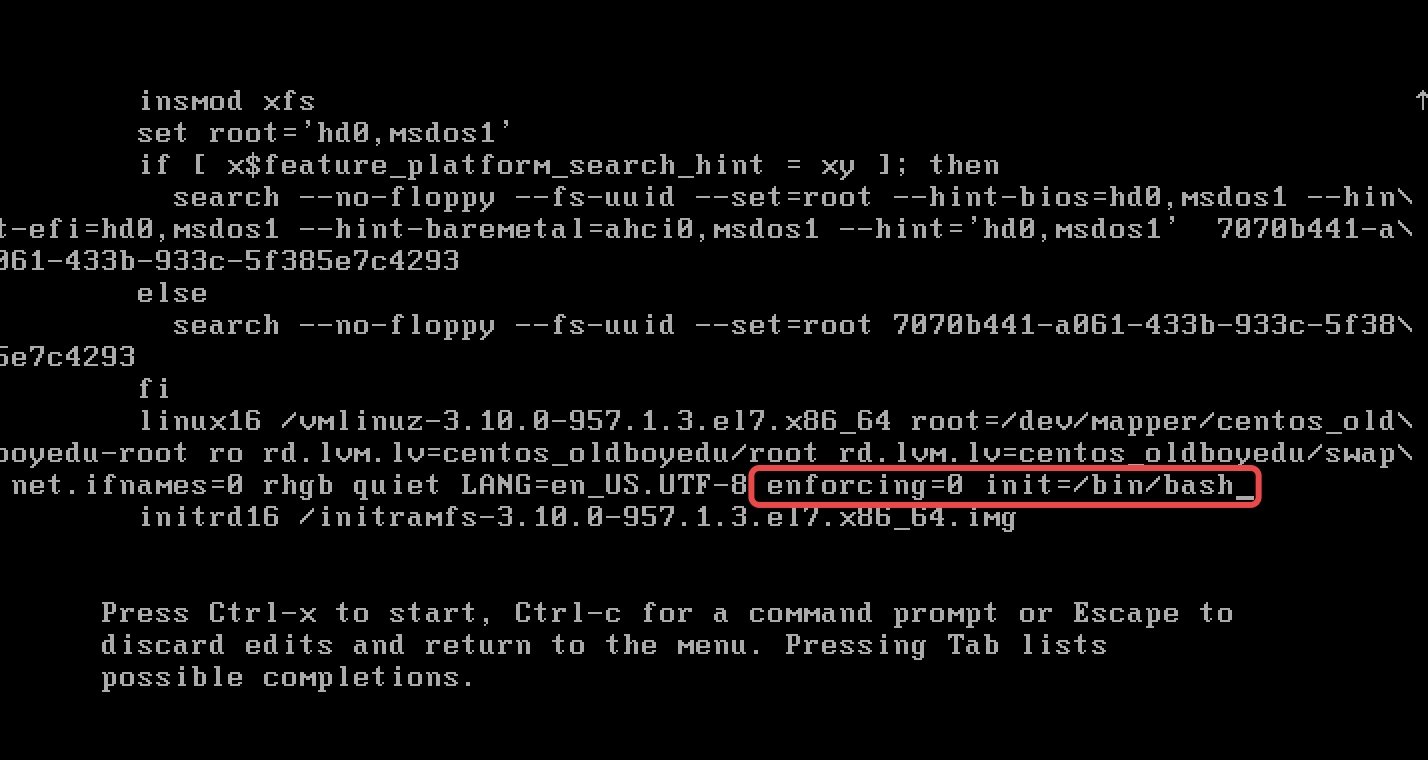
第2步:在linux16这行的后面添加 enforcing=0 init=/bin/bash,
然后按下Ctrl + X组合键来运行修改过的内核程序
第3步:大约5秒过后, 进入到系统的单用户模式, 依次输入以下命令, 等
待系统重启操作完毕, 然后就可以使用新密码来登录Linux系统了.
命令行执行效果如图所示.

5. Linux下救援模式
5.1 场景1
当系统坏了, 无法登陆系统, 但需要把里面的数据复制出来, 怎么办?
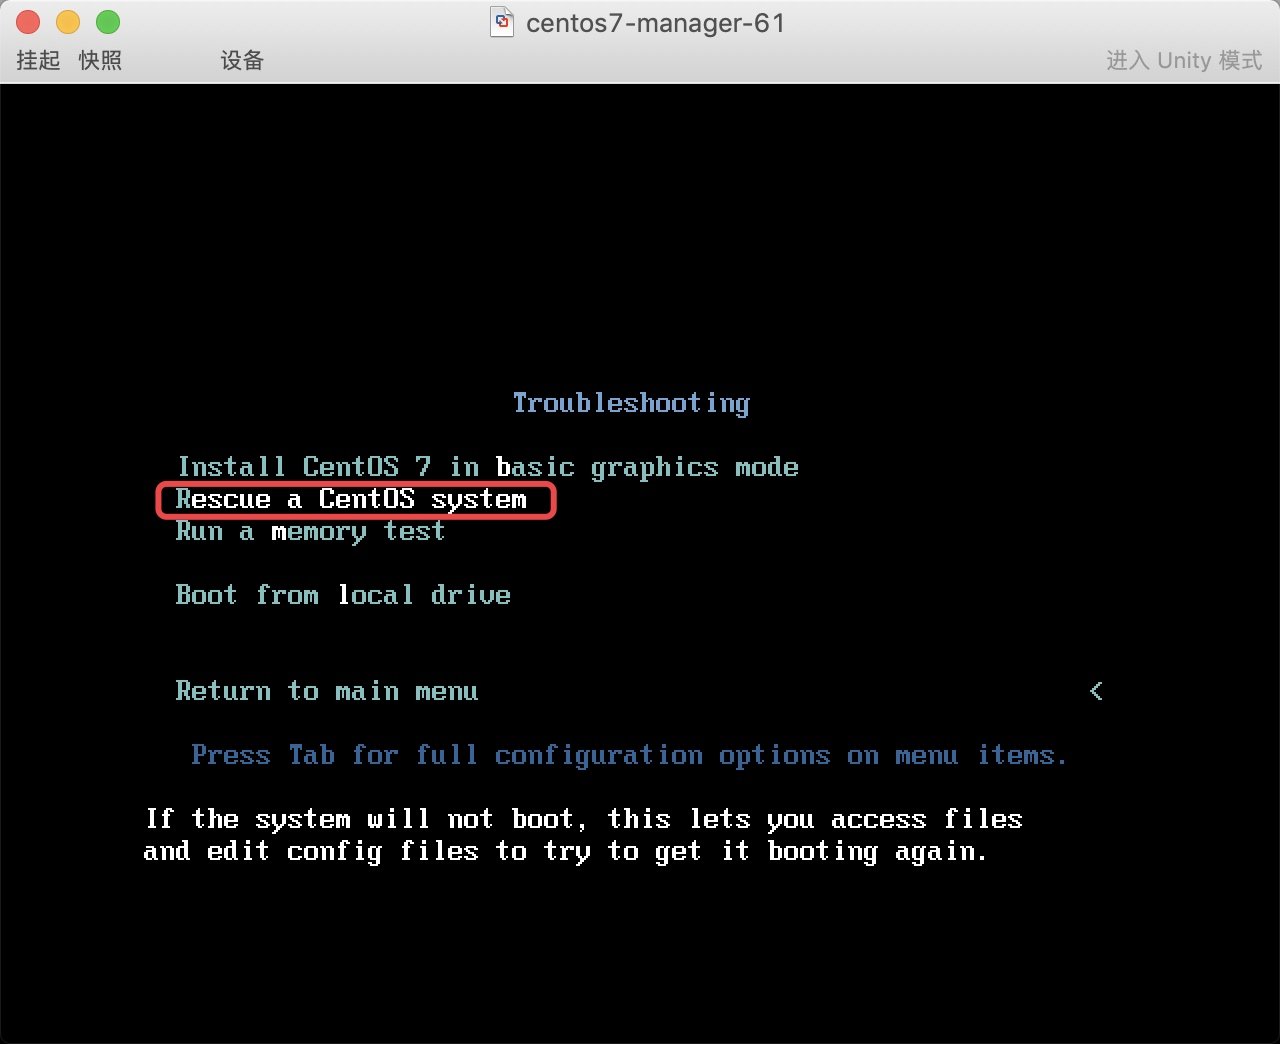
* 1. 先挂载光盘, 然后选择光盘引导为第一位
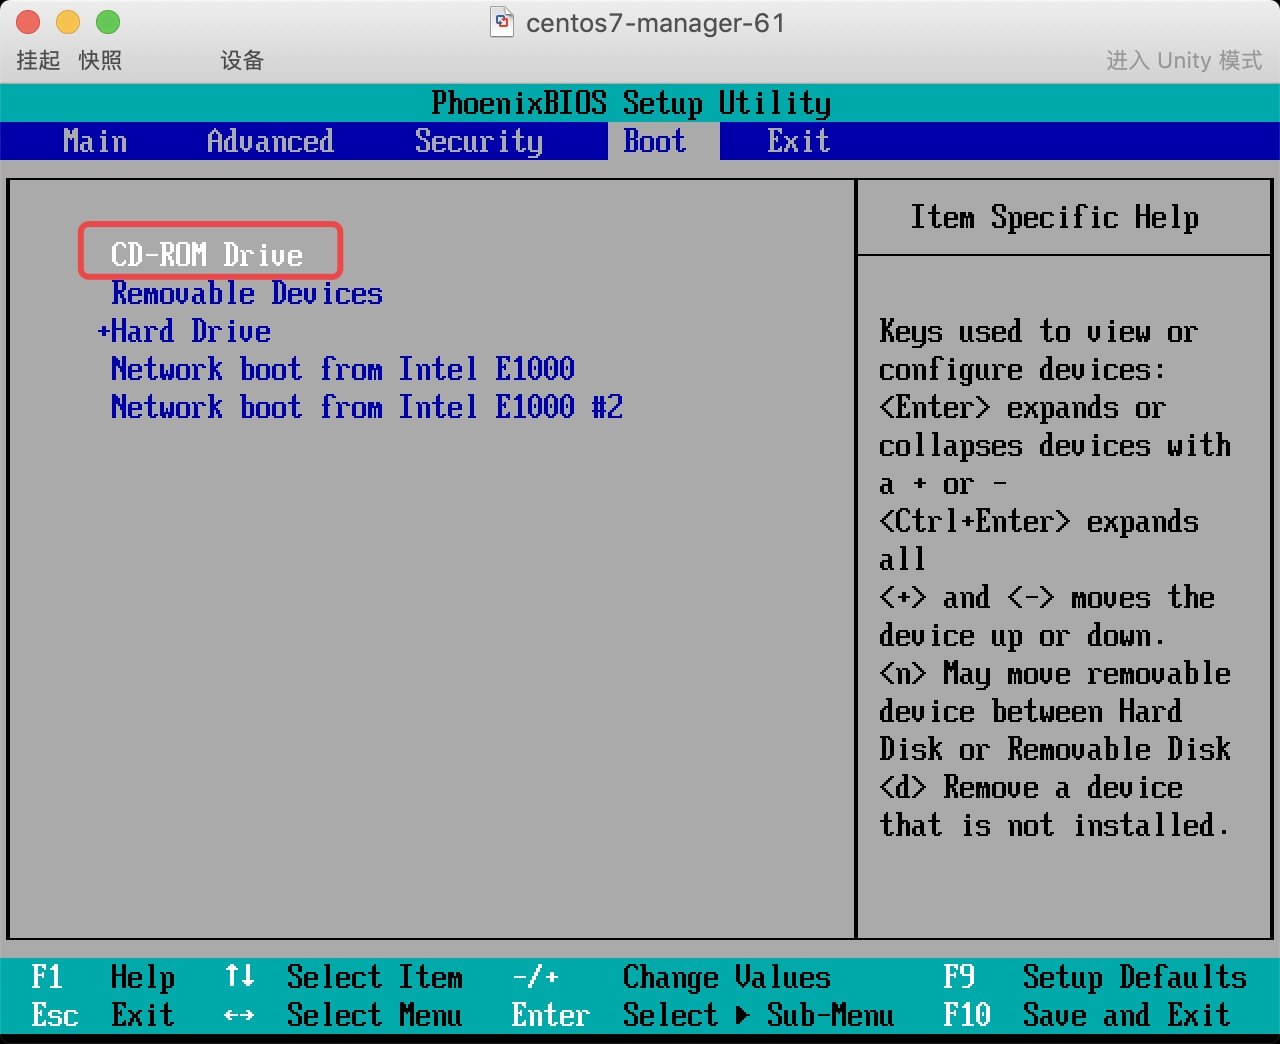
* 2. 进入故障排除模式–>然后选择救援模式
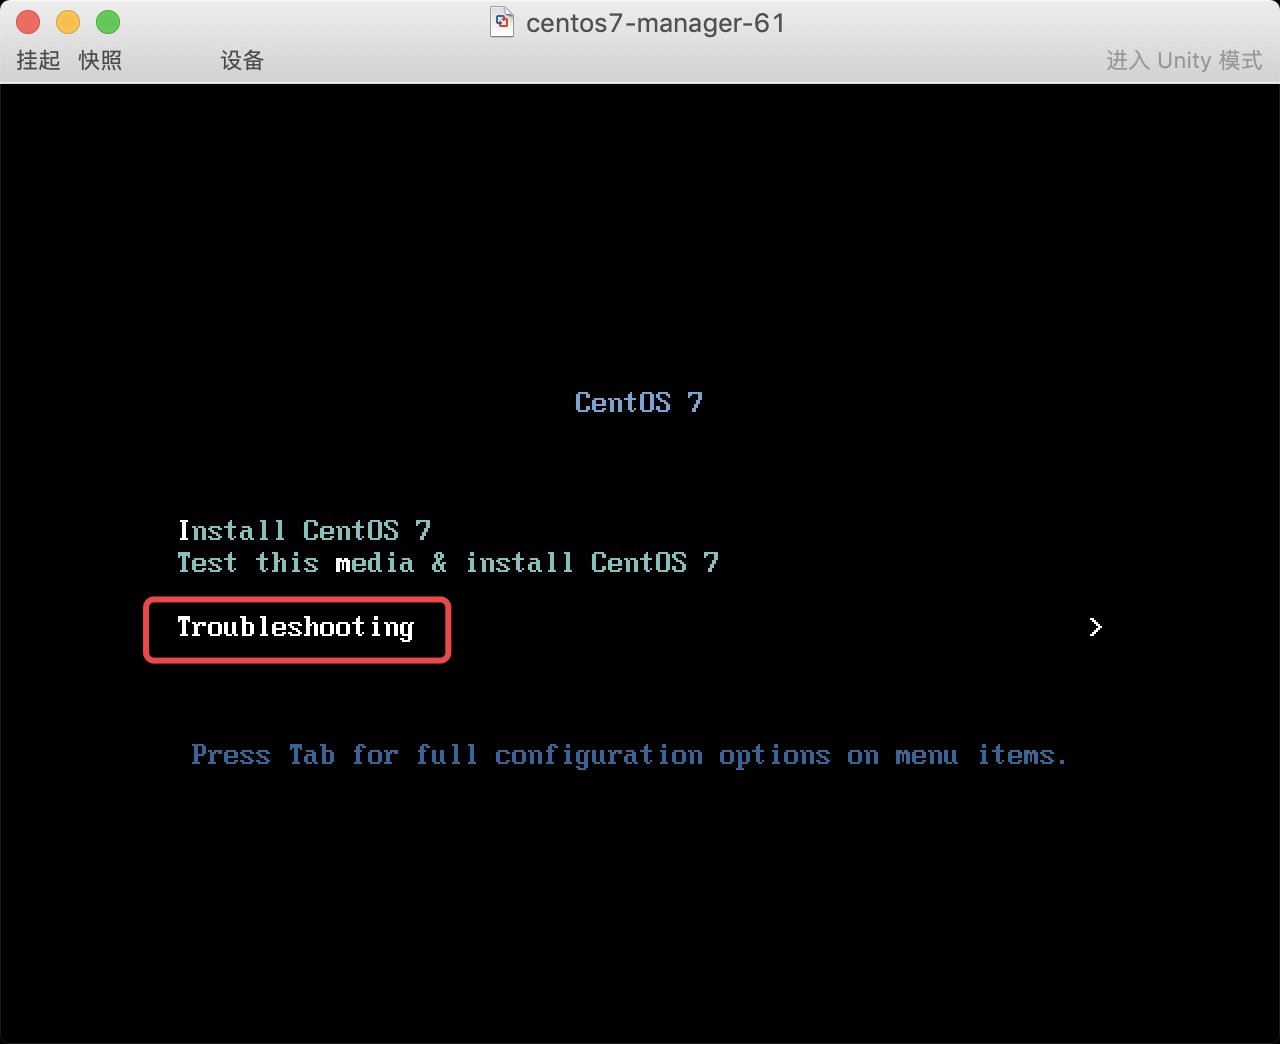
* 3. 挂载真实系统后, 发现数据都还存在
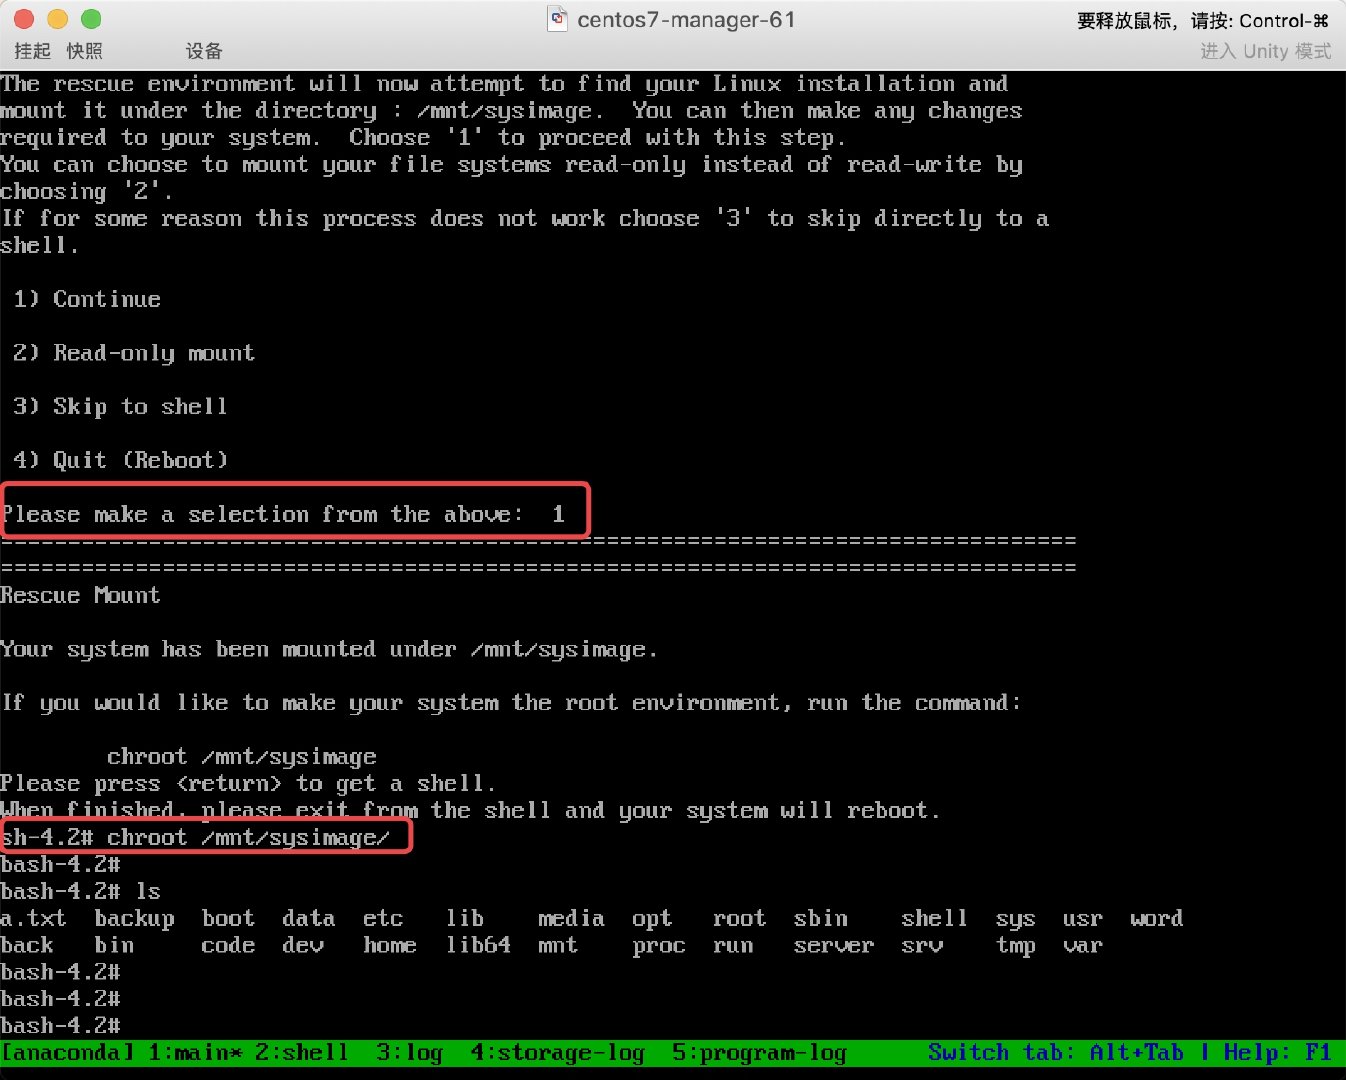
5.2 场景2
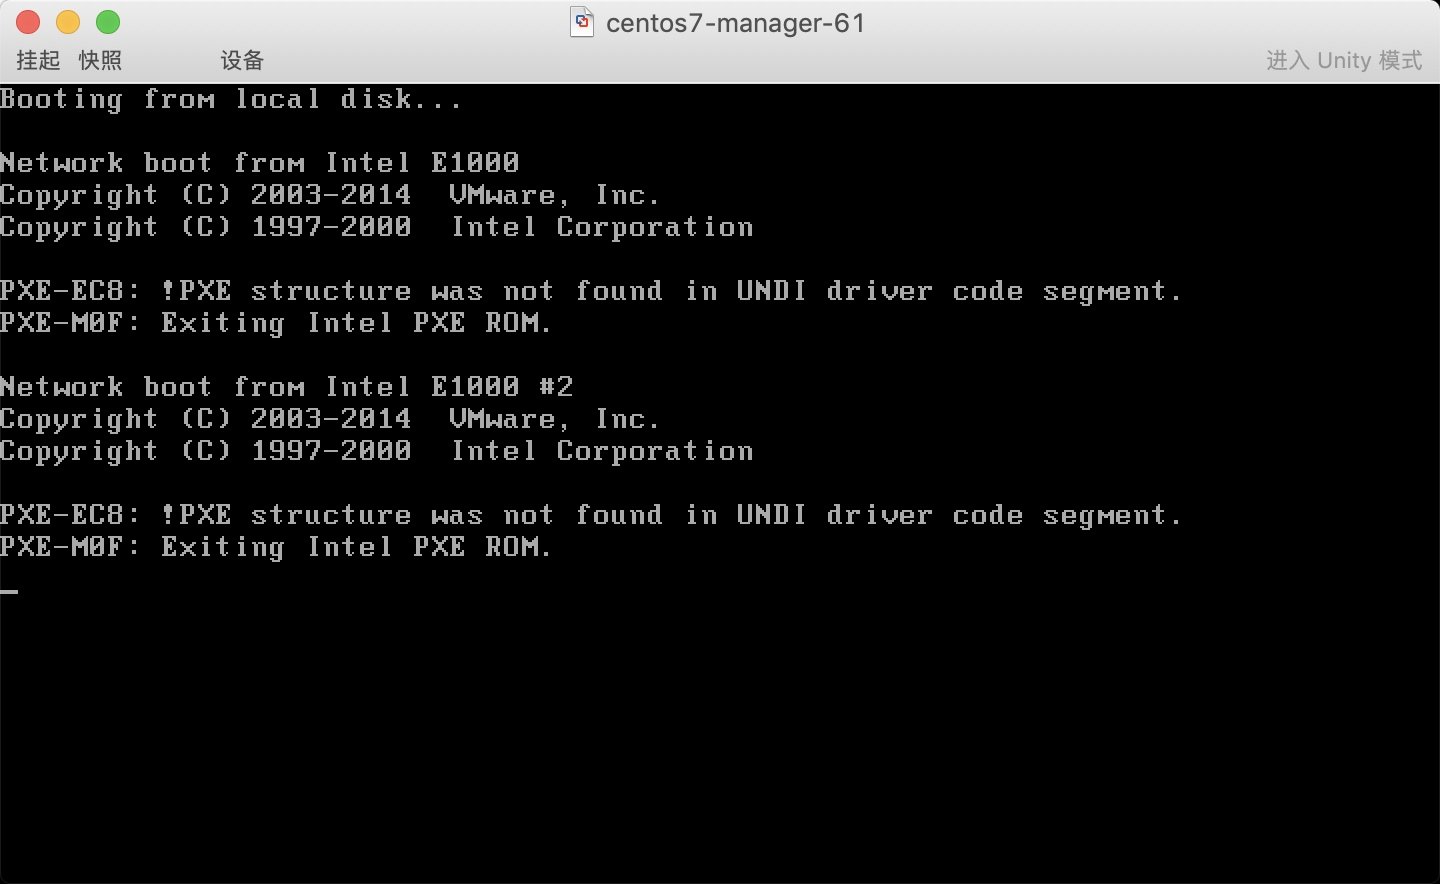
修复MBR, 主要出现在安装双系统时, 后安装的系统把原来系统的MBR删除了, 需要修复.
# 破坏硬盘的前446字节,模拟MBR引号损坏,会发现重启无法启动系统
[root@kid ~]# dd if=/dev/zero of=/dev/sda bs=1 count=446
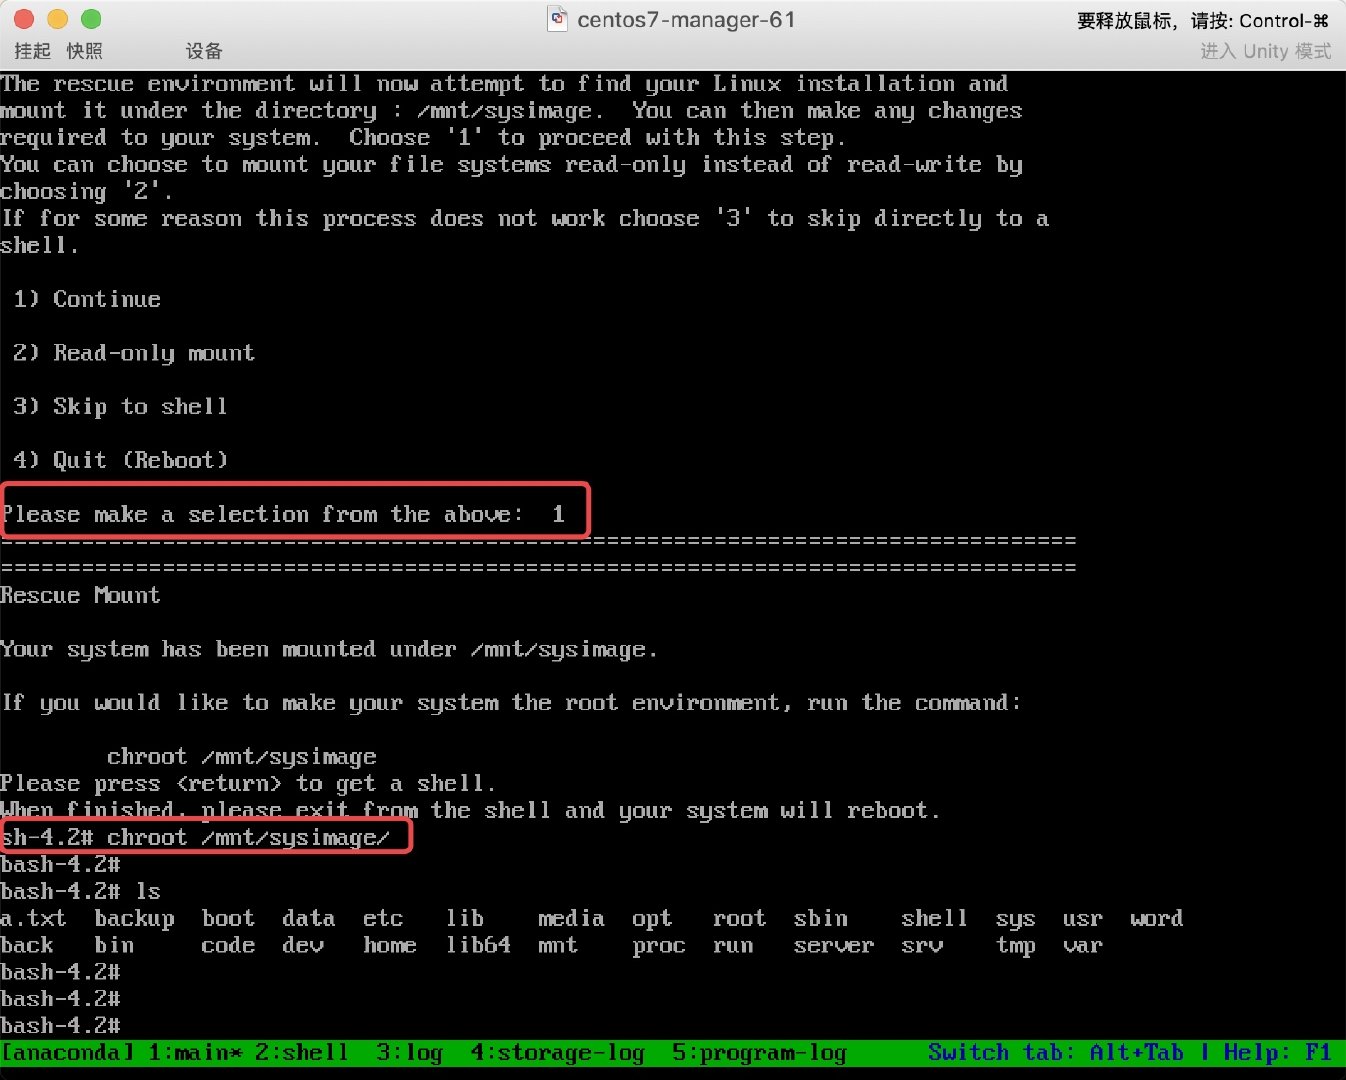
* 1. 重启系统, 然后按照之前的操作进入救援模式, 然后分配一个shell终端,
     挂载真实的操作系统进行修复
* 2. 修复MBR引导, 然后重启连接服务器
# 1.使用grub修复
grub2-install /dev/sda

# 2.然后退出
# exit

# 3.最后重启进入系统
# reboot
5.3 场景3
Centos7误删除grub文件如何进行修复.
# 模拟误删故障
# 1.删除grub2
[root@m01 ~]# rm -rf  /boot/grub2
# 2.重启计算机
[root@m01 ~]# reboot
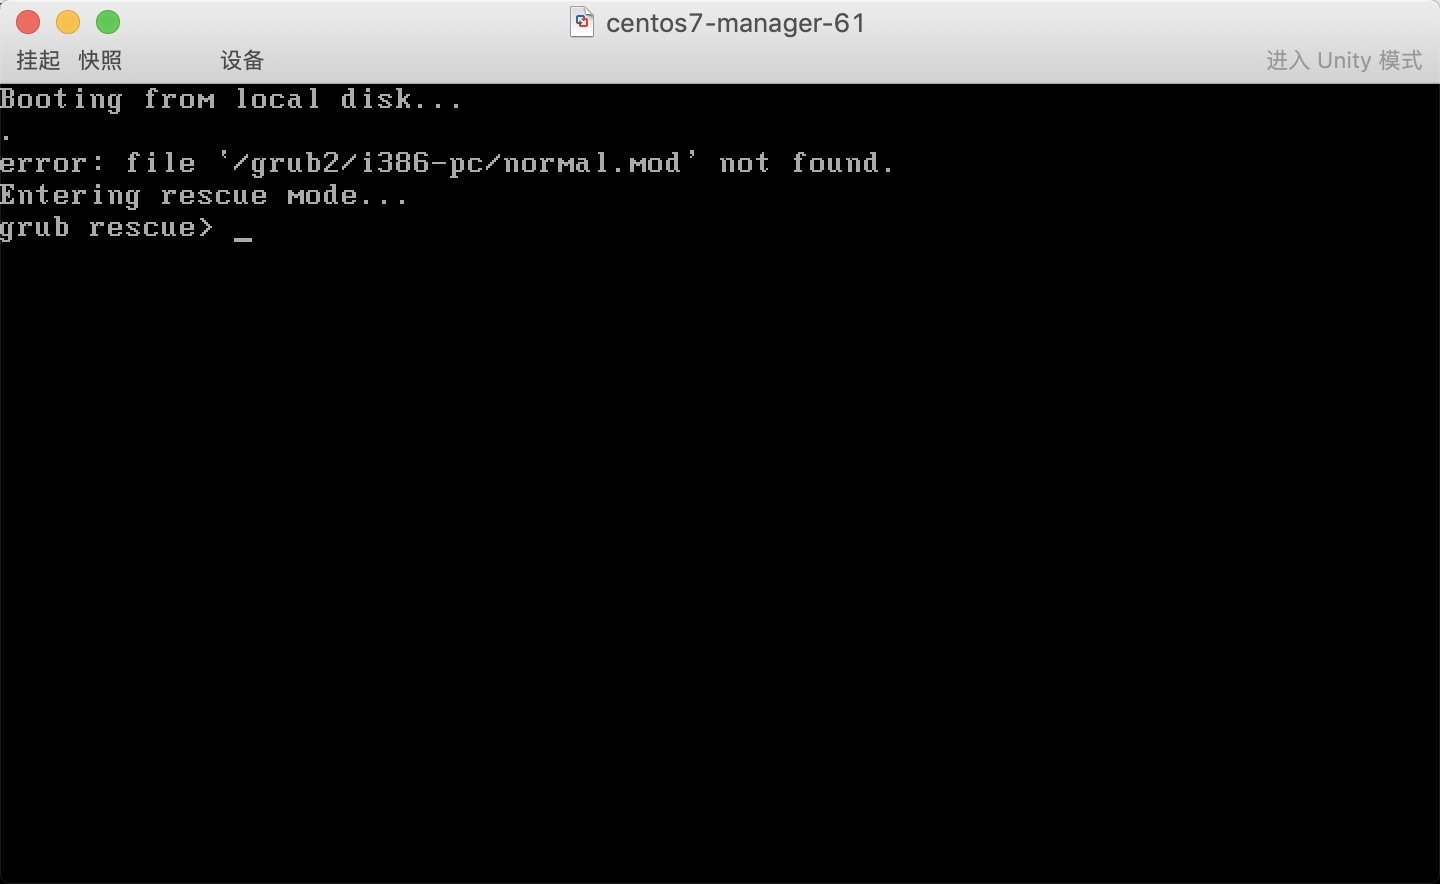
* 1. 重启系统, 然后按照之前的操作进入救援模式, 然后分配一个shell终端,
     挂载真实的操作系统进行修复
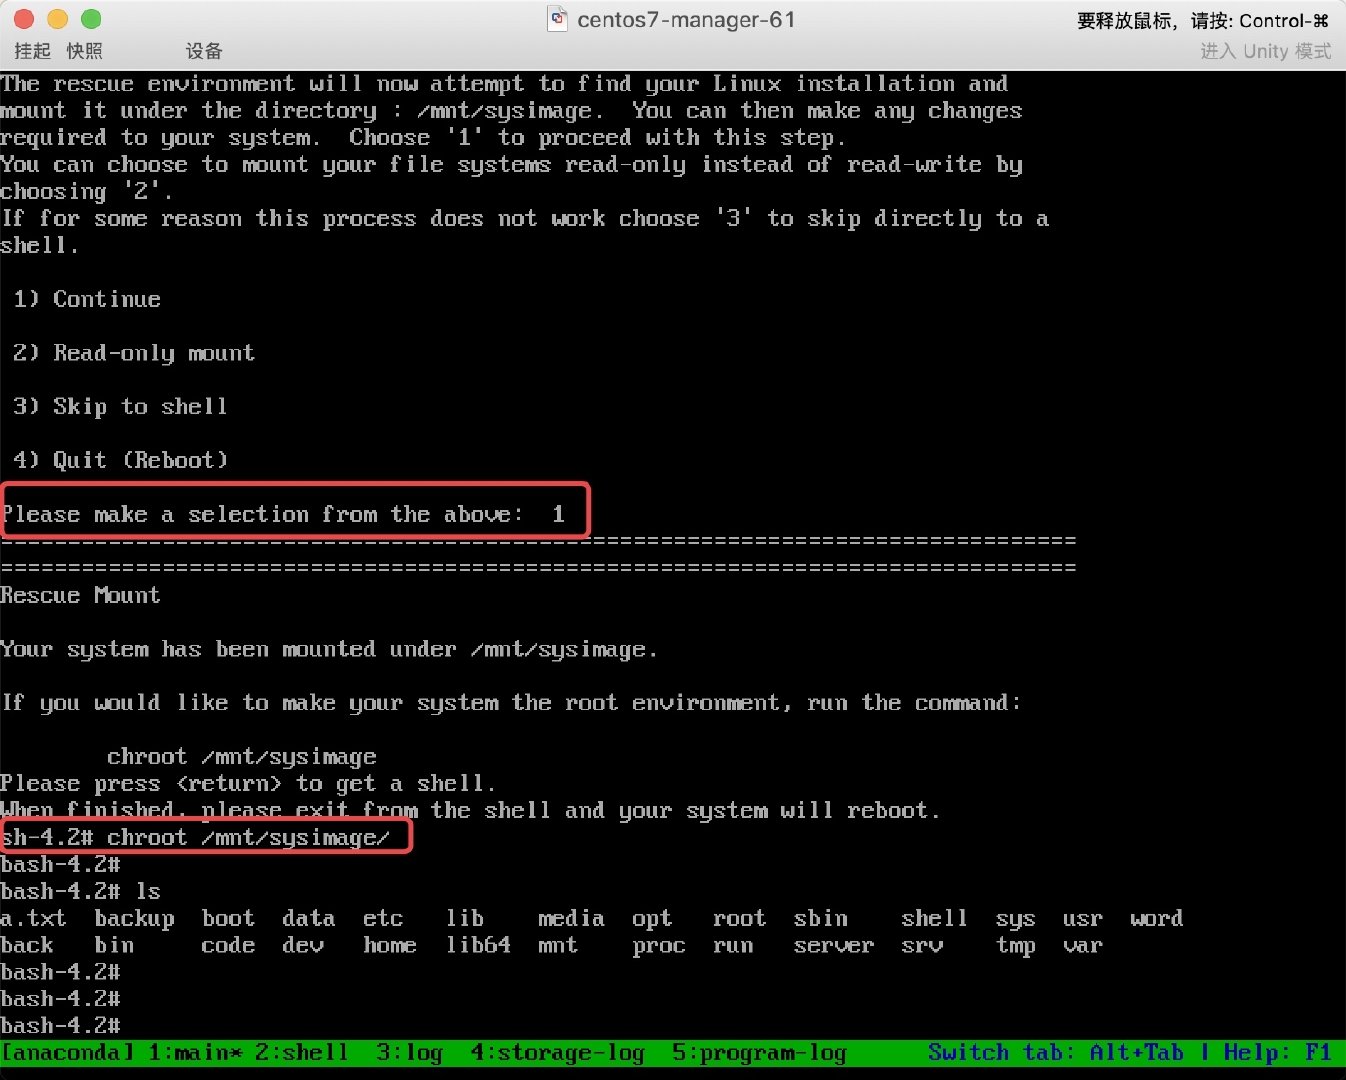
* 2. 使用grub2-install、grub2-mkconfig恢复配置文件
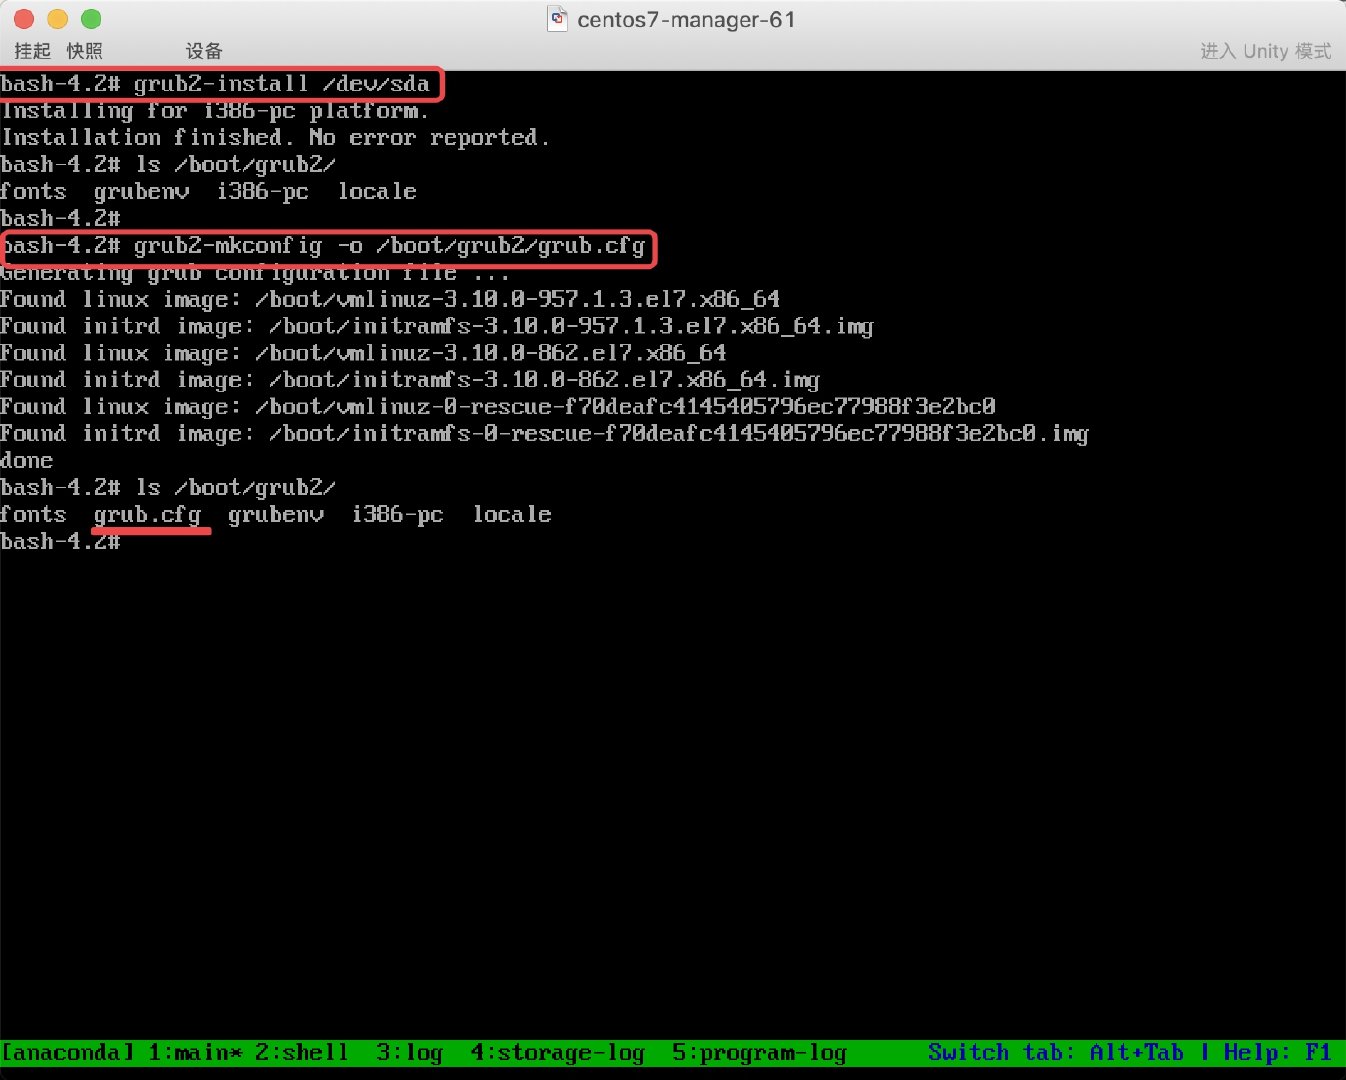
PS: 最后别忘记修改 BIOS 引导, 让硬盘回归到第一引导
————————————————
文章的段落全是代码块包裹的, 留言是为了避免文章提示质量低.
文章的段落全是代码块包裹的, 留言是为了避免文章提示质量低.
文章的段落全是代码块包裹的, 留言是为了避免文章提示质量低.
文章的段落全是代码块包裹的, 留言是为了避免文章提示质量低.
文章的段落全是代码块包裹的, 留言是为了避免文章提示质量低.
文章的段落全是代码块包裹的, 留言是为了避免文章提示质量低.
文章的段落全是代码块包裹的, 留言是为了避免文章提示质量低.
文章的段落全是代码块包裹的, 留言是为了避免文章提示质量低.
文章的段落全是代码块包裹的, 留言是为了避免文章提示质量低.
文章的段落全是代码块包裹的, 留言是为了避免文章提示质量低.
————————————————