文章目录
一、service配置介绍
1.1 service配置文件
??每一个 Unit 都有一个配置文件,告诉 Systemd 怎么启动这个 Unit 。Systemd 默认从目录/etc/systemd/system/读取配置文件。但是,里面存放的大部分文件都是符号链接,指向目录/lib/systemd/system/,真正的配置文件存放在那个目录。
??systemctl enable命令用于在上面两个目录之间,建立符号链接关系。
??开机时,Systemd只执行/etc/systemd/system目录里面的配置文件,因此需要建立/etc目录下的符号链接到/lib目录下,才能保证程序开机自启动。
service文件定义了一个服务,分为[Unit],[Service],[Install]三个小节,如下:
[Unit]
Description:描述,
After:在network.target,auditd.service启动后才启动
ConditionPathExists: 执行条件

[Service]
EnvironmentFile:变量所在文件
ExecStart: 执行启动脚本
Restart: fail时重启

[Install]
Alias:服务别名
WangtedBy: 多用户模式下需要的
1.2 配置文件的区块
??[Unit]区块通常是配置文件的第一个区块,用来定义 Unit 的元数据,以及配置与其他 Unit 的关系。它的主要字段如下:
Description:简短描述
Documentation:文档地址
Requires:当前 Unit 依赖的其他 Unit,如果它们没有运行,当前 Unit 会启动失败
Wants:与当前 Unit 配合的其他 Unit,如果它们没有运行,当前 Unit 不会启动失败
BindsTo:与Requires类似,它指定的 Unit 如果退出,会导致当前 Unit 停止运行
Before:如果该字段指定的 Unit 也要启动,那么必须在当前 Unit 之后启动
After:如果该字段指定的 Unit 也要启动,那么必须在当前 Unit 之前启动
Conflicts:这里指定的 Unit 不能与当前 Unit 同时运行
Condition...:当前 Unit 运行必须满足的条件,否则不会运行
Assert...:当前 Unit 运行必须满足的条件,否则会报启动失败
??[Install]通常是配置文件的最后一个区块,用来定义如何启动,以及是否开机启动。它的主要字段如下:
WantedBy:它的值是一个或多个 Target,当前 Unit 激活时(enable)符号链接会放入/etc/systemd/system目录下面以 Target 名 + .wants后缀构成的子目录中
RequiredBy:它的值是一个或多个 Target,当前 Unit 激活时,符号链接会放入/etc/systemd/system目录下面以 Target 名 + .required后缀构成的子目录中
Alias:当前 Unit 可用于启动的别名
Also:当前 Unit 激活(enable)时,会被同时激活的其他 Unit
??[Service]区块用来 Service 的配置,只有 Service 类型的 Unit 才有这个区块。它的主要字段如下:
Type:定义启动时的进程行为。它有以下几种值。
Type=simple:默认值,执行ExecStart指定的命令,启动主进程
Type=forking:以 fork 方式从父进程创建子进程,创建后父进程会立即退出
Type=oneshot:一次性进程,Systemd 会等当前服务退出,再继续往下执行
Type=dbus:当前服务通过D-Bus启动
Type=notify:当前服务启动完毕,会通知Systemd,再继续往下执行
Type=idle:若有其他任务执行完毕,当前服务才会运行
ExecStart:启动当前服务的命令
ExecStartPre:启动当前服务之前执行的命令
ExecStartPost:启动当前服务之后执行的命令
ExecReload:重启当前服务时执行的命令
ExecStop:停止当前服务时执行的命令
ExecStopPost:停止当其服务之后执行的命令
RestartSec:自动重启当前服务间隔的秒数
Restart:定义何种情况 Systemd 会自动重启当前服务,可能的值包括always(总是重启)、on-success、on-failure、on-abnormal、on-abort、on-watchdog
TimeoutSec:定义 Systemd 停止当前服务之前等待的秒数
Environment:指定环境变量
1.3 修改配置文件后重启
修改配置文件以后,需要重新加载配置文件,然后重新启动相关服务。
# 重新加载配置文件
$ sudo systemctl daemon-reload

# 重启相关服务
$ sudo systemctl restart foobar
1.4 服务管理
systemctl start 服务名            开启服务
systemctl stop 服务名            关闭服务
systemctl status 服务名        显示状态
systemctl restart 服务名        重启服务
systemctl enable 服务名        开机启动服务
systemctl disable 服务名        禁止开机启动
systemctl list-units              查看系统中所有正在运行的服务
systemctl list-unit-files        查看系统中所有服务的开机启动状态
systemctl list-dependencies 服务名          查看系统中服务的依赖关系
systemctl mask 服务名                        冻结服务
systemctl unmask 服务名                      解冻服务
systemctl set-default multi-user.target     开机时不启动图形界面
systemctl set-default graphical.target      开机时启动图形界面
  修改服务配置文件后需要
  systemctl daemon-reload

  设置服务开机自启动
  systemctl enable postgresql.service

  查询是否自启动服务
  systemctl is-enabled postgresql.service

  取消服务器开机自启动
  systemctl disable postgresql.service

# 显示某个 Unit 是否正在运行
$ systemctl is-active application.service

# 显示某个 Unit 是否处于启动失败状态
$ systemctl is-failed application.service

# 显示某个 Unit 服务是否建立了启动链接
$ systemctl is-enabled application.service

# 查看每个服务的启动耗时
$ systemd-analyze blame
# 查看当前运行的所有服务
$ systemctl list-units
# 查看服务是否开机启动
$ systemctl list-unit-files
systemctl list-unit-files命令如下:

这个列表显示每个配置文件的状态,一共有四种。
- enabled:已建立启动链接;表示允许开机启动
- disabled:没建立启动链接;表示禁止开机启动
- static:该配置文件没有[Install]部分(无法执行),只能作为其他配置文件的依赖
- masked:该配置文件被禁止建立启动链接
显示sshd服务的状态
$ systemctl status sshd

二、设计一个可执行程序
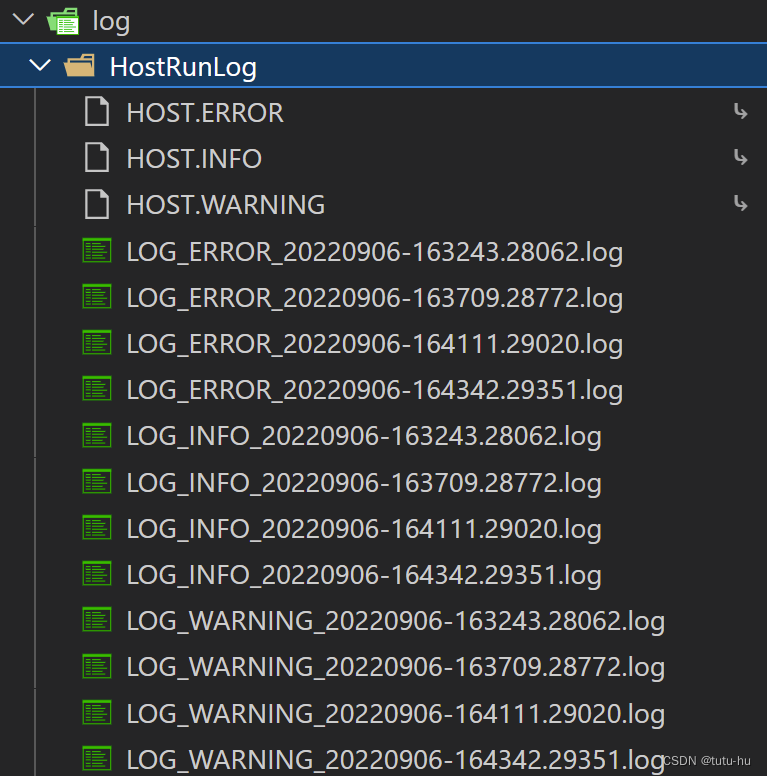
下面程序实现了定期向/log/HostRunLog目录下打印log信息
#include <glog/logging.h>               //log信息库,glog Google开源日志库:https://www.cnblogs.com/haomiao/p/11647340.html
#include <iostream>
#include <thread>

using namespace std;
// 初始化google log库
void log_init()
{
    // glog参考链接:https://blog.csdn.net/yao_hou/article/details/125044275
    // FLAGS_log_dir = "/log/TcuRunLog";                                          //设置日志文件保存目录,必须在初始化库之前调用。
    if (!google::IsGoogleLoggingInitialized())                         //若是GoogleLog库没有被初始化,则调用下面函数InitGoogleLogging进行log库初始化
        google::InitGoogleLogging("HOST");                              //!< Init libglog with program name
    google::SetLogDestination(google::INFO, "/log/HostRunLog/LOG_INFO_");         //设置INFO目录:/log/TCU_INFO_
    google::SetLogDestination(google::WARNING, "/log/HostRunLog/LOG_WARNING_");   //设置WARNING目录:/log/TCU_WARNING_
    google::SetLogDestination(google::ERROR, "/log/HostRunLog/LOG_ERROR_");       //设置ERROR目录:/log/TCU_ERROR_
    google::SetStderrLogging(google::INFO);                            //!< Log also out to stderr
    google::InstallFailureSignalHandler();                             //!< Capture SIGSEGV info and out to stderr
	google::SetLogFilenameExtension(".log"); 	                       //在日志文件名中级别后添加一个扩展名。适用于所有严重级别

    FLAGS_logbufsecs = 0;                                              //设置实时输出日志,实时刷新(必须设置为0)
    FLAGS_max_log_size = 1024;                                         //max_log_size:1024MB 设置日志记录文件最大大小,MB为单位,默认值为1800,当前超过当前大小,则保存剩余数据至文件,并创建新的文件保存其他日志信息;
}

int main(int argc, char** argv)
{
    log_init();                        //1.首先初始化log库,并设置各种log信息存储的前缀信息
    LOG(INFO) << "test11111111111...";  //LOG(INFO):日志等级宏,记录日志信息;“LOG”宏为日志输出关键字,“INFO”为严重性程度(包括INFO WARNING ERROR)
    LOG(WARNING) << "test222222222222...";  //LOG(INFO):日志等级宏,记录日志信息;“LOG”宏为日志输出关键字,“INFO”为严重性程度(包括INFO WARNING ERROR)
    LOG(ERROR) << "test3333333333333...\n";  //LOG(INFO):日志等级宏,记录日志信息;“LOG”宏为日志输出关键字,“INFO”为严重性程度(包括INFO WARNING ERROR)

    int i = 0;
    while (1)
    {
        LOG(INFO) << "running....,i = "<<i++;
        this_thread::sleep_for(1s);
    }

    return 0;
}
g++ servicetest.cpp -o servicetest -lglog -lpthread -std=c++17
生成/home/ubuntu/test/servicetest可执行文件。
关于glog库的使用,可参考上一篇博客:基于google glog库实现log信息存储
三、设计一个service管理/home/ubuntu/test/servicetest可执行程序
??下面自己设计一个service,实现对/home/ubuntu/test/servicetest路径程序的管理。
3.1 test.service源文件设计
??在/lib/systemd/system/目录下新建test.service文件如下:
[Unit]
After=network.target ssh.service

[Service]
User=ubuntu
Group=ubuntu

ExecStart=/usr/bin/taskset -c 1 /home/ubuntu/test/servicetest
ExecReload=/usr/bin/killall servicetest && /usr/bin/taskset -c 1 /home/ubuntu/test/servicetest
ExecStop=/usr/bin/killall servicetest

[Install]
WantedBy=multi-user.target
??可以看出该service管理一个/home/ubuntu/test/servicetest可执行程序,实现对该程序的启动、重载、停止。
3.2 test.service符号链接文件设计
??在/etc/systemd/system/multi-user.target.wants/目录下通过符号链接创建test.service文件如下:
sudo ln -s /lib/systemd/system/test.service /etc/systemd/system/multi-user.target.wants/test.service

3.3 通过service管理test
开启test service:
service test start
查看进程状态:
ps -axu | grep servicetest

查看service服务状态:
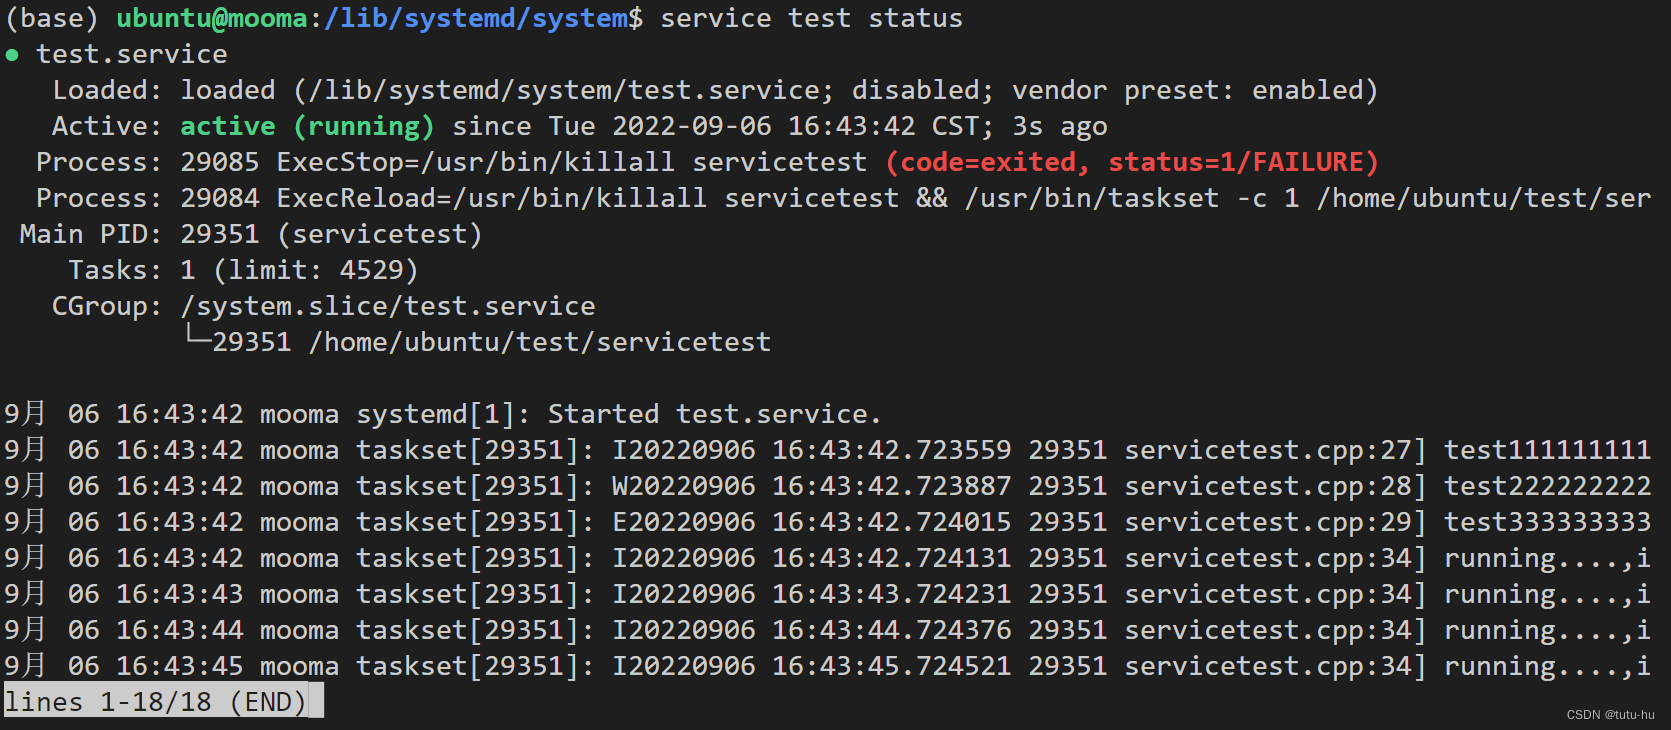
service test status

关闭test service:
service test stop
查看进程状态:
ps -axu | grep servicetest

查看service服务状态:
service test status

重新装载service服务:
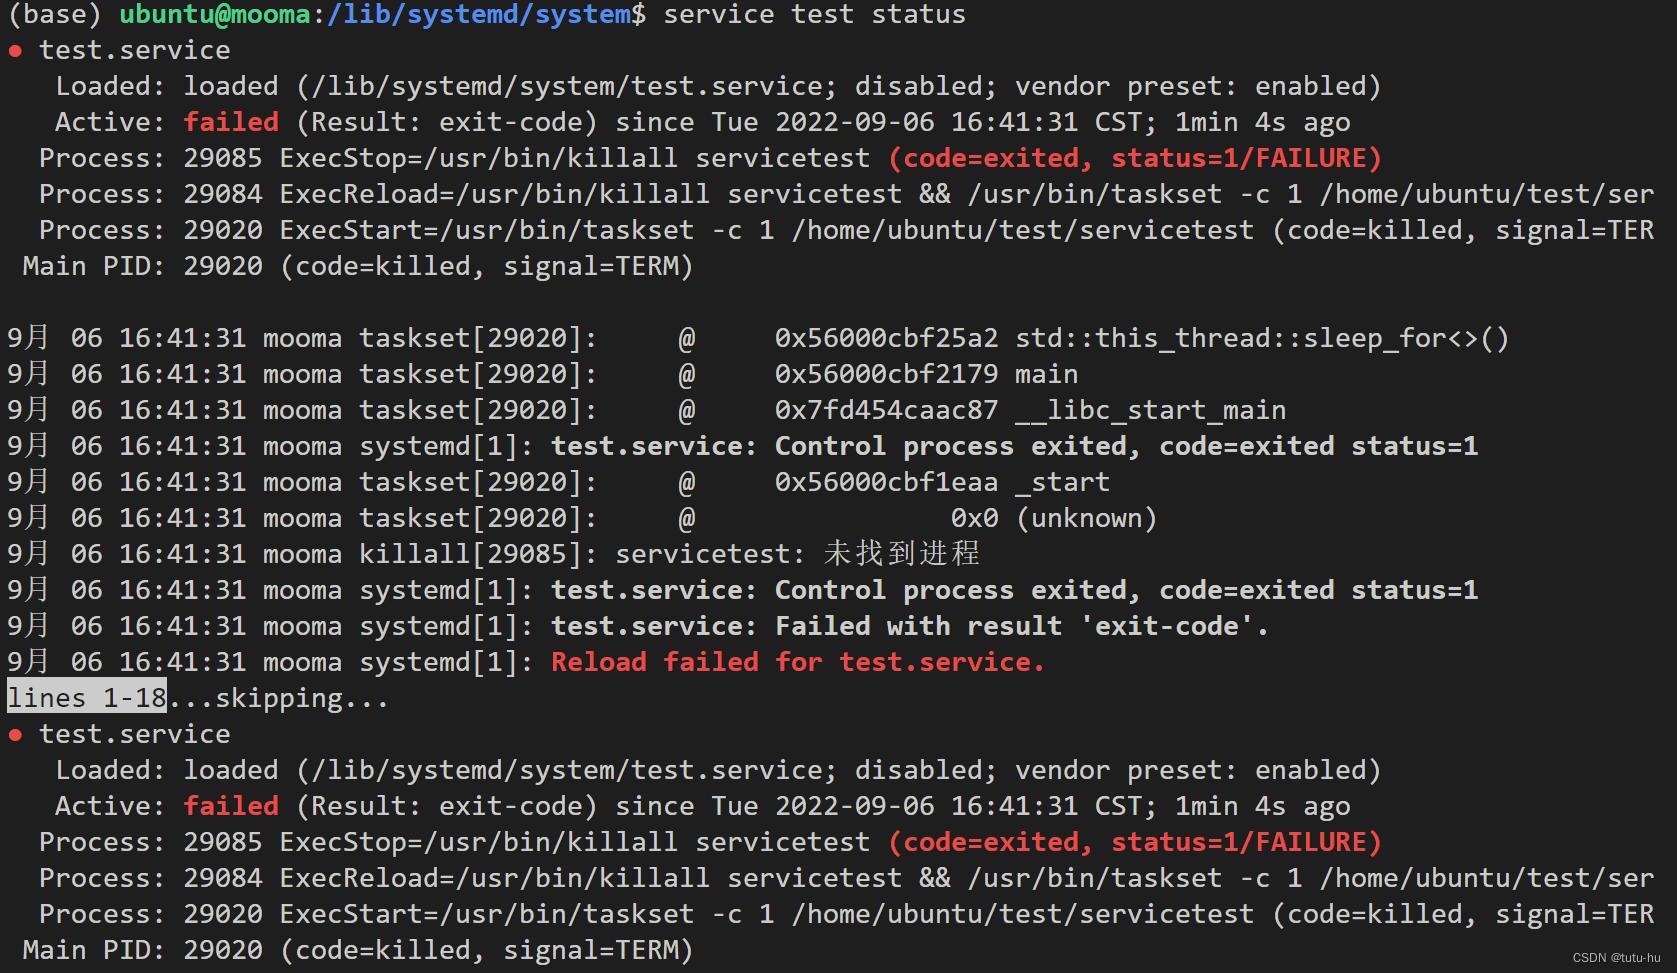
service test reload

重新加载失败,具体原因待查。
3.4 程序执行结果

四、总结
??通过service可以方便的管理用户程序,通过命令的方式可以自由的启动、关闭进程,不受当前路径限制,并且可以设置开机自启动,程序在后台运行,方便产品开发、维护。