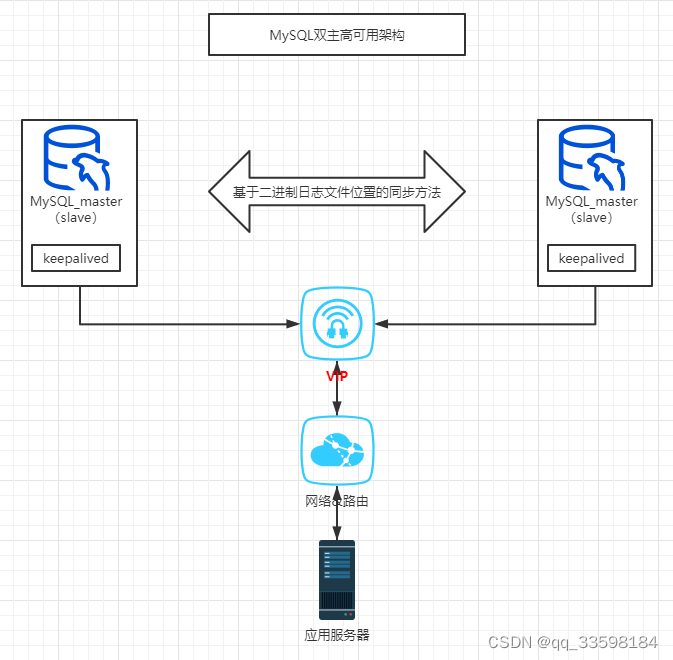
MySQL双主高可用配置
前言
主服务器:192.168.56.101
备服务器:192.168.56.100
系统:centos_7.9_x86-64
基于bin-log二进制日志实现主从同步设置。

一、MySQL的安装
1、清除系统自带MySQL或mariadb
rpm -qa | egrep 'maria|mysql' | xargs rpm -e --nodeps
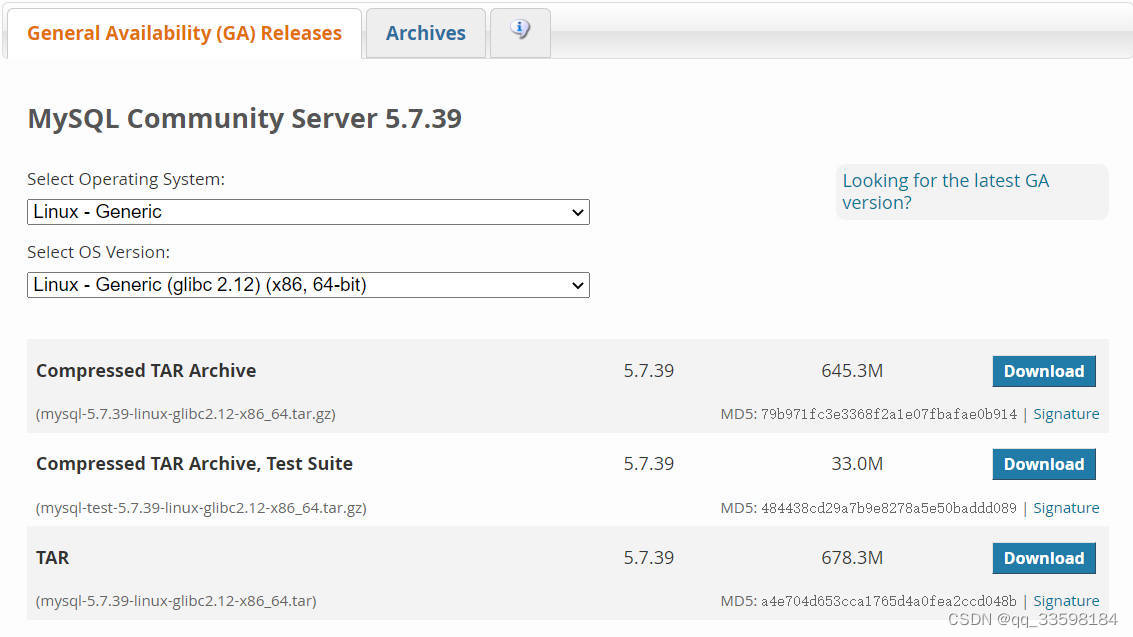
2、获取对应版本MySQL程序
官网提供多种安装方式,可根据实际情况选择,本文以二进制包的安装方式为例。
获取地址为https://dev.mysql.com/downloads/mysql/

3、安装并初始化
- MySQL依赖libaio及linuma库。如果未在本地安装此库,则数据目录初始化和后续服务器启动步骤将失败。如有必要,请使用适当的软件包管理器进行安装。例如,在基于YUM-based的系统上:
先判断是否有安装libaio
[root@testing ~] rpm -qa | egrep 'libaio|numactl'
libaio-0.3.109-13.el7.x86_64
numactl-libs-2.0.12-5.el7.x86_64
如果没有安装可使用yum命令进行安装
[root@testing ~] yum search libnuma libaio
已加载插件:fastestmirror
Loading mirror speeds from cached hostfile
 * base: mirrors.aliyun.com
 * extras: mirrors.aliyun.com
 * updates: mirrors.aliyun.com
=============================================== N/S matched: libnuma ===============================================
numactl-libs.i686 : libnuma libraries
numactl-libs.x86_64 : libnuma libraries

=============================================== N/S matched: libaio ================================================
libaio.i686 : Linux-native asynchronous I/O access library
libaio.x86_64 : Linux-native asynchronous I/O access library
libaio-devel.i686 : Development files for Linux-native asynchronous I/O access
libaio-devel.x86_64 : Development files for Linux-native asynchronous I/O access

[root@testing ~] yum install -y libaio.x86_64 numactl-libs.x86_64
或下载rpm包安装
[root@testing ~] rpm -ivh http://mirror.centos.org/centos/7/os/x86_64/Packages/libaio-0.3.109-13.el7.x86_64.rpm
[root@testing ~] rpm -ivh http://mirror.centos.org/centos/7/os/x86_64/Packages/numactl-2.0.12-5.el7.x86_64.rpm
- 创建mysql用户(可选)
解压MySQL二进制压缩包之/usr/local目录
[root@testing ~] groupadd mysql
[root@testing ~] useradd -r -g mysql -s /bin/false mysql
[root@testing ~] cd /usr/local
[root@testing local] tar zxvf /path/to/mysql-VERSION-OS.tar.gz
[root@testing local] ln -s full-path-to-mysql-VERSION-OS mysql
[root@testing local] cd mysql
[root@testing mysql] mkdir mysql-files
[root@testing mysql] chown mysql:mysql mysql-files
[root@testing mysql] chmod 750 mysql-files
$> #bin/mysqld --initialize --user=mysql
[root@testing mysql] bin/mysqld --defaults-file=mysql-file/mysql_3306.cnf --user=mysql --initialize --initialize-insecure
$> #bin/mysql_ssl_rsa_setup
[root@testing mysql] bin/mysql_ssl_rsa_setup --datadir=mysql的数据存放路径
$> #bin/mysqld_safe --user=mysql &
[root@testing mysql] bin/mysql_safe --defaults-file=mysql-file/mysql_3306.cnf &
#首次登陆会要求修改密码
#bin/mysqladmin -uroot password "123456" -S "./mysql.sock"
# 以下配置可选
[root@testing mysql] cp support-files/mysql.server /etc/init.d/mysql.server
[root@testing mysql] ln -snf mysql_file/mysql_3306.cnf /etc/my.cnf
[root@testing mysql] ln -s /etc/init.d/mysql.server /etc/rc3.d/S99mysql
[root@testing mysql] ln -s /etc/init.d/mysql.server /etc/rc0.d/K01mysql
二、MySQL双主搭建
以下操作主库从库均需操作,可先在主库执行一遍后,再从库再重新执行一遍
1、创建同步用户
bin/mysql -h 127.0.0.1 -u root -P 3306 -p'123456' -e "CREATE USER 'repl'@'%192.168.56.%' IDENTIFIED BY 'repl';GRANT REPLICATION SLAVE ON *.* TO 'repl'@'192.168.56.%';FLUSH PRIVILEGES;“
2、确保每台数据库服务器的id唯一,并设置开机自动开启复制
可在mysql.cnf文件中设置server_id
[mysqld]
server_id=239
#skip-slave-start
3、锁表 - - -锁表过程中不要退出
mysql> FLUSH TABLES WITH READ LOCK;
4、确认二进制文件名及位置
mysql > SHOW MASTER STATUS;
+------------------+----------+--------------+------------------+
| File             | Position | Binlog_Do_DB | Binlog_Ignore_DB |
+------------------+----------+--------------+------------------+
| mysql-bin.000003 | 73       | test         | manual,mysql     |
+------------------+----------+--------------+------------------+
5、解锁
mysql> UNLOCK TABLES;
6、设置复制同步位
mysql> CHANGE MASTER TO
    -> MASTER_HOST='source_host_name',             #主库的ip或hostname
    -> MASTER_PORT=3306 ,                          #主库端口
    -> MASTER_USER='replication_user_name',        #同步用户,本文中为‘repl’
    -> MASTER_PASSWORD='replication_password',     #同步用户密码,本文中为‘repl’
    -> MASTER_LOG_FILE='recorded_log_file_name',   #二进制文件名。对应‘show master status’中File值
    -> MASTER_LOG_POS=recorded_log_position;       #文件位置。对应‘show master status’中Position值
7、开启复制
mysql> START SLAVE;
mysql> SHOW SLAVE STATUS\G;
可以看到Slave_IO_Running Yes和Slave_SQL_Running Yes即为同步正常。
8、验证
随意在任一台数据库进行增删改查,另一台服务器均会得到一致的结果。
三、高可用搭建
1、关闭防火墙或开放vrrp协议
[root@testing ~] firewall-cmd --permanent --add-rule ipv4 filter INPUT 0 --protocol vrrp -j ACCEPT
2、安装keepalived
- 可从官网下载最新版本的源码安装,下载地址为
https://keepalived.org/download.html
[root@testing ~] tar -zxvf keepalived-2.2.7.tar.gz
[root@testing ~] cd keepalived-2.2.7
[root@testing ~] ./configure --prefix=/keepalived
[root@testing ~] make && make install
- 编写keepalived配置文件
! Configuration File for keepalived

global_defs {
    script_user root
    enable_script_security
}

vrrp_script chk_mysql {
    script "/keepalived/share/chk_mysql.sh"   #根据实际脚本路径修改
    interval 10
}

vrrp_instance VI_1 {
    state BACKUP
    interface enp0s8          #修改成现场实际的网卡名称
    virtual_router_id 51      #两台服务器的id保持一致
    nopreempt
    priority 100              #保证两台服务器的值不一致
    advert_int 1
    authentication {
        auth_type PASS
        auth_pass 1111        #可以修改,但要保持两台服务器密码一致
    }
    virtual_ipaddress {
        192.168.56.17         #虚拟IP,根据现场实际修改
    }
    track_script {
        chk_mysql
    }
}
- 编写
chk_mysql.sh脚本
#!/bin/bash

aa=`systemctl status mysql | grep -w 'Active' | awk '{print $3}'`
if [ $aa != \(running\) ]; then
    systemctl restart mysql
    sleep 5
    bb=`systemctl status mysql | grep -w 'Active' | awk '{print $3}'`
    if [ $bb != \(running\) ]; then
         systemctl restart keepalived
    fi
fi
- 配置keepalived开机自启动
编辑/usr/lib/systemd/system/keepalived.service,配置如下,路径可根据实际情况修改
[Unit]
Description=LVS and VRRP High Availability Monitor
After=syslog.target network-online.target

[Service]
Type=forking
PIDFile=/run/keepalived.pid
KillMode=process
#EnvironmentFile=-/etc/sysconfig/keepalived
ExecStart=/keepalived/sbin/keepalived -D -f /keepalived/etc/keepalived/keepalived.conf
ExecReload=/bin/kill -HUP $MAINPID

[Install]
WantedBy=multi-user.target
[root@testing ~] systemctl daeon-reload && systemctl start keepalived && systemctl enable keepalived
四、验证
通过VIP连接数据库进行操作结果的查看验证。分别通过192.168.56.101和192.168.56.100连接数据库进行增删改操作、并对任意数据库(或服务器)进行重启、关机后,vip连接的数据库数据均保持同主库从库数据一致。
五、旧项目、主库有旧数据的主主架构数据库搭建
- 备份主库数据,并导入从库。
- 按照上述方法搭建双主架构数据库。