将虚拟机改为静态IP
VMware虚拟机中配置静态IP_chaofengdev的博客-CSDN博客_虚拟机设置静态ip
环境检查
[root@localhost ~]# cat /etc/redhat-release
CentOS Linux release 7.9.2009 (Core)
安装必要软件包(所有节点)
保证可以正常执行killall命令
[root@localhost ~]# yum install -y psmisc
[root@localhost ~]# which killall
/usr/bin/killall
[root@localhost ~]# yum install -y bzip2.x86_64
[root@localhost ~]# yum install -y pcre pcre-devel
修改文件系统(建议)
建议给数据库准备单独的物理磁盘并做 Raid,不与操作系统共用。
RHEL6.X建议文件系统为ext4
RHEL7.X建议文件系统为xfs
1.虚拟机添加磁盘(系统与数据分离)
TiDB部署_GNAIXGNAHZ的博客-CSDN博客_tidb部署
2.创建分区
[root@localhost ~]# fdisk -l
[root@localhost ~]# fdisk /dev/sdb
Command (m for help): p n wq p
3.格式化分区
[root@localhost ~]# mkfs.xfs /dev/sdb -f4.挂载分区
[root@localhost ~]# mount /dev/sdb /opt
[root@localhost ~]# df -Th
Filesystem              Type      Size  Used Avail Use% Mounted on
devtmpfs                devtmpfs  898M     0  898M   0% /dev
tmpfs                   tmpfs     910M     0  910M   0% /dev/shm
tmpfs                   tmpfs     910M  9.6M  901M   2% /run
tmpfs                   tmpfs     910M     0  910M   0% /sys/fs/cgroup
/dev/mapper/centos-root xfs        17G  1.4G   16G   9% /
/dev/sda1               xfs      1014M  150M  865M  15% /boot
tmpfs                   tmpfs     182M     0  182M   0% /run/user/0
/dev/sdb                xfs        10G   33M   10G   1% /opt
?5.开机自动挂载
[root@localhost ~]# vi /etc/fstab/dev/sdb ? ? ? ? ? ? ? ?/opt ? ? ? ? ? ? ? ? ? ?xfs ? ? defaults,noatime,nodiratime,nobarrier 0 0
配置主机名
[root@localhost ~]# vi /etc/hosts192.168.61.133 www.gba01.com gba01
[root@localhost ~]# vi /etc/sysconfig/networkNETWORKING=yes
HOSTNAME=gba01
?关闭防火墙或者开放端口
| 组件 | 端口 | 说明 |
|---|---|---|
| Gcluster | 5258 | Coordinator集群对外服务端口 |
| Gnode | 5050 | Data集群对外服务端口 |
| Gcware | 5918 | gcware节点通讯端口 |
| gcware | 5919 | 外部连接gcware端口 |
| Recover_monit_port | 6268 | 监控信息收集端口 |
| syncServer | 5288 | sysncserver服务端口 |
| GcrecoverMonit | 6268 | Gcrecover服务端口 |
| 数据导出 | 16066-16166 | 数据导出端口 |
查看端口是否被占用
[root@gba01 ~]# lsof -i:5258开放端口
[root@gba01 ~]# firewall-cmd --zone=public --add-port=5258/tcp --permanent
[root@gba01 ~]# firewall-cmd --zone=public --add-port=16066-16166/tcp --permanent
[root@gba01 ~]# firewall-cmd --reload
[root@gba01 ~]# firewall-cmd --list-ports
?或者关闭防火墙
[root@gba01 ~]# systemctl stop firewalld.service
[root@gba01 ~]# systemctl status firewalld.service
开启sshd服务
[root@gba01 ~]# systemctl enable sshd.service
[root@gba01 ~]# systemctl status sshd.service
关闭selinux【所有节点】
[root@gba01 ~]# vi /etc/selinux/config
[root@gba01 ~]# reboot
[root@gba01 ~]# sestatus
SELINUX=disabled
配置虚拟内存
[root@gba01 opt]# vi /etc/security/limits.conf#<domain> ? ? ?<type> ?<item> ? ? ? ? <value>
? ? ?*? ? ? ? ? ? ? ? ? soft? ? ? ? ?as? ? ? ? ? ? ? unlimited
? ? ?*? ? ? ? ? ? ? ? ? hard? ? ? ??as? ? ? ? ? ? ? unlimited
IO参数调整
[root@gba01 opt]# vi /etc/default/grub
[root@gba01 opt]# grub2-mkconfig -o /boot/grub2/grub.cfg
GRUB_CMDLINE_LINUX="crashkernel=auto rd.lvm.lv=centos/root rd.lvm.lv=centos/swap rhgb quiet elevator=deadline
transparent_hugepage=never"
不限制最大进程数
[root@gba01 opt]# vi /etc/systemd/system.conf
[root@gba01 opt]# reboot
DefaultTasksMax=infinity
准备好安装包解压
[root@gba01 gcinstall]# tar xfj GBase8a*****.tar.bz2修改文件权限
[root@gba01 opt]# chown -R gbase:gbase gcinstall修改安装目录权限(installPrefix 参数)
[root@gba01 opt]# chown -R gbase:gbase /opt使用 root 用户在所有节点上给 DBA 用户赋予安装 GBase 相关的权限(所有节点)
解压完后会出现文件?gcinstall/SetSysEnv.py ,将该文件拷贝到所有节点 并用root执行
--dbaUser=gbase??必须为 demo.options 中的 dbaUser。
--installPrefix? ? ? ? ?必 须 为 demo.options 中 installPrefix
[root@gba01 opt]# cd gcinstall/
[root@gba01 gcinstall]# scp SetSysEnv.py root@192.168.61.133:/opt
[root@gba01 gcinstall]# scp SetSysEnv.py root@192.168.61.134:/opt
[root@gba01 gcinstall]# python SetSysEnv.py --dbaUser=gbase --installPrefix=/opt
配置集群(在一个管理节点执行即可)
[root@gba01 opt]# su - gbase
[gbase@gba01 opt]$ vi /opt/gcinstall/demo.options
installPrefix= /opt
coordinateHost = 192.168.61.132,192.168.61.133,192.168.61.134
coordinateHostNodeID = 132,133,134
dataHost = 192.168.61.132,192.168.61.133,192.168.61.134
#existCoordinateHost =
#existDataHost =
#existGcwareHost=
gcwareHost = 192.168.61.132,192.168.61.133,192.168.61.134
gcwareHostNodeID = 132,133,134
dbaUser = gbase
dbaGroup = gbase
dbaPwd = 'gbase'
rootPwd = '111111'
#dbRootPwd = ''
#rootPwdFile = rootPwd.json
#characterSet = utf8
#sshPort = 22
| installPrefix | 指定安装目录 |
| coordinateHost | 所有集群调度节点列表,可以是 IPV4、IPV6、主机名,但不 建议使用 IPV4 和 IPV6 混合方式部署集群,地址之间用“,” 分隔; |
| coordinateHostNodeID | 每个 Coordinator 节点的 nodeid,在 IPV6 和域名安装时,必须指定,IPV4 安装时可不指定 用“,”分隔; |
| dataHost | 所有集群 Data 节点列表,可以是 IPV4、IPV6、主机名 |
| existCoordinateHost | 所有已存在的 Coordinator 节点列表,IP 地址之间用“,”分 隔, 在集群扩容安装新节点时使用; |
| existDataHost | 所有已存在的 Data 节点 IP 列表,IP 地址之间用“,”分隔,在集群扩容安装新节点时使用; |
| dbaUser | 集群安装和运行时使用的操作系统用户名。在安装/扩展/替换节点前,需要创建该用户; |
| dbaGroup | 集群安装和运行时使用的操作系统用户所属的组名; |
| dbaPwd | 集群安装和运行时使用的操作系统用户的密码; |
| rootPwd | 安装集群节点机器中 linux 操作系统中 root 用户的统一密码。 因旧版集群 GCWare 版本依然需要 root 权限,所以升级时 仍然需要提供用户 root 密码,其它情况不需要使用; |
| rootPwdFile | 该参数支持 root 用户在多节点不同密码方式,与参数 rootPwd 不能同时使用,否则报错。默认密码 111111。因旧版集群版本依然需要 root 权限,所以升级时,仍然需要提供 用户 root 密码,其它情况不需要使用; |
| characterSet | 系统支持指定字符集安装,默认不在 demo.options 文件中显示。952 的默认字符集是 utf8mb4(4 字节),可选值为[utf8,gbk,gb18030,utf8mb4] |
| sshPort | 用于指定安装集群的机器的 ssh port,要求所有节点 ssh port 一致。默认不在 demo.options 中显示。默认值为 22。 |
采集指纹(不需要license可以略过)
[gbase@gba01 gcinstall]$ ./getesn.py --silent=demo.options > hostsfinger.txt获取license(邮件咨询官方 获取test.lic)
安装
[root@gba01 /]# su - gbase
[gbase@gba01 /]$ cd /opt/gcinstall/
[gbase@gba01 gcinstall]$ ./gcinstall.py --silent=demo.options --license_file=test.lic
安装过程中遇到的问题
可能会报错,libssl.so.1.1 库文件找不到
我的机子版本还是libssl.so.1.0 ,可以先将1.0升级为1.1,然后再修改软链接

软链接解决方法
(网上查到的方法是直接修改软链接,但是不要用这种方法,虽然解决了库文件找不到的问题,但是版本太低 后面还是会报错,建议使用使用下面的方法)
[root@gba01 gcinstall]# ll /usr/lib64 | grep libssl
-rwxr-xr-x.  1 root root  370584 Dec 10  2019 libssl3.so
lrwxrwxrwx   1 root root      16 Sep 23 04:09 libssl.so.10 -> libssl.so.1.0.2k
-rwxr-xr-x   1 root root  470328 Mar 28 11:42 libssl.so.1.0.2k
[root@gba01 gcinstall]# ln -s /usr/lib64/libssl.so.1.0.2k /usr/lib64/libssl.so.1.1

[root@gba01 lib64]# ll /usr/lib64 | grep libcrypto
lrwxrwxrwx   1 root root      19 Sep 23 04:09 libcrypto.so.10 -> libcrypto.so.1.0.2k
-rwxr-xr-x   1 root root 2520920 Mar 28 11:42 libcrypto.so.1.0.2k
[root@gba01 lib64]# ln -s /usr/lib64/libcrypto.so.1.0.2k /usr/lib64/libcrypto.so.1.1
[root@gba01 lib64]# ll /usr/lib64 | grep libcrypto
lrwxrwxrwx   1 root root      19 Sep 23 04:09 libcrypto.so.10 -> libcrypto.so.1.0.2k
-rwxr-xr-x   1 root root 2520920 Mar 28 11:42 libcrypto.so.1.0.2k
lrwxrwxrwx 1 root root 30 Sep 23 04:46 libcrypto.so.1.1 -> /usr/lib64/libcrypto.so.1.0.2k解决?libssl.so.1.1(建议使用这种方法)
[root@gba01 opt]# ll
-rw-r--r--  1 root root  9864061 Sep 23 05:00 openssl-1.1.1q.tar.gz
[root@gba01 opt]# tar -zxvf openssl-1.1.1q.tar.gz
[root@gba01 opt]# cd openssl-1.1.1q
[root@gba01 openssl-1.1.1q]# ./config shared --openssldir=/usr/local/openssl --prefix=/usr/local/openssl
[root@gba01 openssl-1.1.1q]# make
[root@gba01 openssl-1.1.1q]# make install
安装完指定版本(1.1.1)可以看到库文件,然后再创建软链接
[root@gba01 openssl-1.1.1q]# ll | grep so.1.1
-rwxr-xr-x  1 root root 3388808 Sep 23 05:04 libcrypto.so.1.1
-rwxr-xr-x  1 root root  689576 Sep 23 05:04 libssl.so.1.1
[root@gba01 openssl-1.1.1q]# ln -s /opt/openssl-1.1.1q/libssl.so /usr/lib64/libssl.so.1.1
libssl.so      libssl.so.1.1
[root@gba01 openssl-1.1.1q]# ln -s /opt/openssl-1.1.1q/libcrypto.so.1.1 /usr/lib64/libcrypto.so.1.1
其他库报错
/lib64/libstdc++.so.6: version `GLIBCXX_3.4.20' not found

?当前版本是这样,少了 3.4.20 和 3.4.21 ,装上就好了
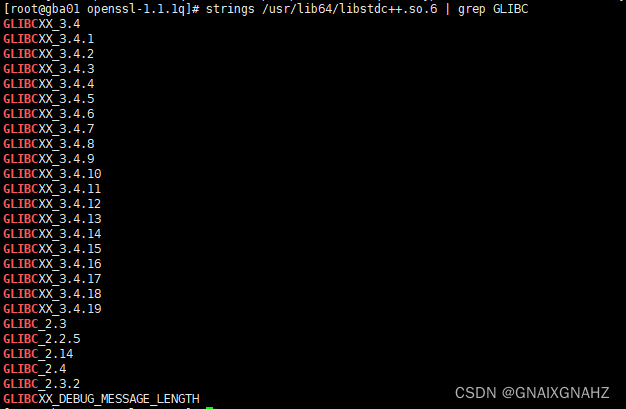
1.可以直接用编译好的文件
[root@gba01 opt]# wget http://www.vuln.cn/wp-content/uploads/2019/08/libstdc.so_.6.0.26.zip
[root@gba01 opt]# unzip libstdc.so_.6.0.26.zip
[root@gba01 opt]# ll
-rwxrwxr-x  1 root  root   13172960 Jun  9  2019 libstdc++.so.6.0.26
[root@gba01 opt]# ls -al /usr/lib64/ | grep libstdc
lrwxrwxrwx.  1 root root      19 Sep 20 09:05 libstdc++.so.6 -> libstdc++.so.6.0.19
-rwxr-xr-x.  1 root root  995840 Sep 29  2020 libstdc++.so.6.0.19
[root@gba01 opt]# mv /usr/lib64/libstdc++.so.6 /usr/lib64/libstdc++.so.6.bak
[root@gba01 opt]# mv /usr/lib64/libstdc++.so.6.0.19 /usr/lib64/libstdc++.so.6.0.19.bak
[root@gba01 opt]# cp /opt/libstdc++.so.6.0.26 /usr/lib64/
[root@gba01 opt]# ln -s /usr/lib64/libstdc++.so.6.0.26 /usr/lib64/libstdc++.so.6
[root@gba01 opt]# strings /usr/lib64/libstdc++.so.6 | grep GLIBCXX
GLIBCXX_3.4
GLIBCXX_3.4.1
GLIBCXX_3.4.2
GLIBCXX_3.4.3
GLIBCXX_3.4.4
GLIBCXX_3.4.5
GLIBCXX_3.4.6
GLIBCXX_3.4.7
GLIBCXX_3.4.8
GLIBCXX_3.4.9
GLIBCXX_3.4.10
GLIBCXX_3.4.11
GLIBCXX_3.4.12
GLIBCXX_3.4.13
GLIBCXX_3.4.14
GLIBCXX_3.4.15
GLIBCXX_3.4.16
GLIBCXX_3.4.17
GLIBCXX_3.4.18
GLIBCXX_3.4.19
GLIBCXX_3.4.20
GLIBCXX_3.4.21
GLIBCXX_3.4.22
GLIBCXX_3.4.23
GLIBCXX_3.4.24
GLIBCXX_3.4.25
GLIBCXX_3.4.26
version `GLIBCXX_3.4.20' not found 解决方法 - 简书 (jianshu.com)
2.也可以编译安装glibc(这里我在编译安装的时候 缺少很多包 或者版本不对 搞依赖包搞了好久,还是建议 用第1种方法,但是编译好的文件不是很安全,安全考虑 不嫌麻烦 还是自己编译吧 )
[root@gba01 glibc-2.36]# mkdir build
[root@gba01 glibc-2.36]# cd build/
[root@gba01 build]# ../configure --prefix=/usr --disable-profile --enable-add-ons --with-headers=/usr/include --with-binutils=/usr/bin
[root@gba01 build]# make
[root@gba01 build]# make install
安装glibc时 需要python3,如果python是2.7版本 也需要升级(谨慎升级,gcinstall.py安装时用的是2.7版python,升级为python3 安装会语法报错,我是升级到python3安装完之后? 又回退到python2了? 改一下软链接就回退了)
[root@gba01 Python-3.7.2]# yum install -y zlib*
[root@gba01 Python-3.7.2]# yum install -y libffi-devel
[root@gba01 build]# yum install -y bison
[root@gba01 build]# yum install -y gcc gcc-c++
[root@gba01 build]# yum install -y texinfo

[root@gba01 opt]# wget https://www.python.org/ftp/python/3.7.2/Python-3.7.2.tgz
[root@gba01 opt]# tar -xvf Python-3.7.2.tgz
[root@gba01 opt]# cd Python-3.7.2
[root@gba01 Python-3.7.2]# ./configure
[root@gba01 Python-3.7.2]# make
[root@gba01 Python-3.7.2]# make install

[root@gba01 Python-3.7.2]# python -V
Python 2.7.5
[root@gba01 Python-3.7.2]# whereis python
python: /usr/bin/python /usr/bin/python2.7 /usr/lib/python2.7 /usr/lib64/python2.7 /etc/python /usr/local/bin/python3.7m /usr/local/bin/python3.7 /usr/local/bin/python3.7m-config /usr/local/bin/python3.7-config /usr/local/lib/python3.7 /usr/include/python2.7 /usr/share/man/man1/python.1.gz
[root@gba01 Python-3.7.2]# ls -al /usr/bin/ | grep python
lrwxrwxrwx   1 root root         7 Sep 23 20:25 python -> python2
lrwxrwxrwx   1 root root         9 Sep 23 20:25 python2 -> python2.7
-rwxr-xr-x   1 root root      7144 Jun 28 11:30 python2.7
[root@gba01 Python-3.7.2]# mv /usr/bin/python /usr/bin/python.bak
[root@gba01 Python-3.7.2]# ln -s /usr/local/bin/python3 /usr/bin/python
[root@gba01 Python-3.7.2]# python -V
Python 3.7.2

[root@gba01 build]# vi /usr/bin/yum
[root@gba01 build]# vi /usr/libexec/urlgrabber-ext-down
/usr/bin/python 改为?/usr/bin/python2.7
CentOS7 Python2.7升级Python3_Deepcoldwing的博客-CSDN博客
gmake 要求3.8.2以上版本
[root@gba01 make-4.3]# ./configure --prefix=$HOME/local
[root@gba01 make-4.3]# make
[root@gba01 make-4.3]# make install

[root@gba01 bin]# which make
/usr/bin/make
[root@gba01 bin]# pwd
/root/local/bin
[root@gba01 bin]# ll
total 660
-rwxr-xr-x 1 root root 671960 Sep 23 21:01 make
[root@gba01 bin]# ls -al /usr/bin/ | grep make
lrwxrwxrwx.  1 root root         4 Sep 20 09:05 gmake -> make
-rwxr-xr-x.  1 root root    182752 Aug  8  2019 make
-rwxr-xr-x   1 root root     18544 May 18 12:18 makedb
-rwxr-xr-x.  1 root root     11392 Apr 10  2018 pwmake
[root@gba01 bin]# mv /usr/bin/make /usr/bin/make.bak
[root@gba01 bin]# ln -s /root/local/bin/make /usr/bin/make
[root@gba01 bin]# mv /usr/bin/gmake /usr/bin/gmake.bak
[root@gba01 bin]# ln -s /root/local/bin/make /usr/bin/gmake
[root@gba01 bin]# ln -s /root/local/bin/make /usr/bin/gnumake
[root@gba01 bin]# make --version
GNU Make 4.3
报错 checking for gnumsgfmt... no
报错?checking for gmsgfmt... no(这种就是命令找不到 可以安装一下 或者做个软链接)
[root@gba01 build]# which msgfmt
/usr/bin/msgfmt
[root@gba01 build]# whereis msgfmt
msgfmt: /usr/bin/msgfmt /usr/share/man/man1/msgfmt.1.gz
[root@gba01 build]# ln -s /usr/bin/msgfmt /usr/bin/gnumsgfmt
[root@gba01 build]# ln -s /usr/bin/msgfmt /usr/bin/gmsgfmt
报错?Error: gcinstall.py(line 3198) -- host number:3 is different with host md5 number:1

看了一下安装脚本的3198行 是 CheckLicenseHostNum() 函数报错,脚本注释也有相应的解释,因为我的是虚拟机,也确实是克隆出来的,所以删除掉?/etc/ssh_host_* 然后重启就好了
def CheckLicenseHostNum():
? ? """
? ? GBase8a MPP identifys a machine by /etc/ssh/ssh_host_rsa_key.pub file, if this file is NOT qualified, it is a security problem.
? ? The function CheckLicenseHostNum is to check whether /etc/ssh/ssh_host_rsa_key.pub is qualified for identifying a machine.
? ? There are cases that if a VM is a hard copy/clone of another one, but the /etc/ssh/ssh_host_rsa_key.pub is NOT regenerated.
? ? To fix the error, locate the conflict machine,just rm /etc/ssh_host_* and reboot it, rerun gcinstall.py will probably work.
? ? """(这里官方脚本的注释写错了 rm /etc/ssh_host_*? 应该是 rm /etc/ssh/ssh_host_* )
[root@gba03 etc]# ll /etc/ssh/
total 604
-rw-r--r--. 1 root root     581843 Aug  8  2019 moduli
-rw-r--r--. 1 root root       2276 Aug  8  2019 ssh_config
-rw-------. 1 root root       3907 Aug  8  2019 sshd_config
-rw-r-----. 1 root ssh_keys    227 Sep 20 09:08 ssh_host_ecdsa_key
-rw-r--r--. 1 root root        162 Sep 20 09:08 ssh_host_ecdsa_key.pub
-rw-r-----. 1 root ssh_keys    387 Sep 20 09:08 ssh_host_ed25519_key
-rw-r--r--. 1 root root         82 Sep 20 09:08 ssh_host_ed25519_key.pub
-rw-r-----. 1 root ssh_keys   1679 Sep 20 09:08 ssh_host_rsa_key
-rw-r--r--. 1 root root        382 Sep 20 09:08 ssh_host_rsa_key.pub
[root@gba03 etc]# rm /etc/ssh/ssh_host_*
rm: remove regular file ‘/etc/ssh/ssh_host_ecdsa_key’? y
rm: remove regular file ‘/etc/ssh/ssh_host_ecdsa_key.pub’? y
rm: remove regular file ‘/etc/ssh/ssh_host_ed25519_key’? y
rm: remove regular file ‘/etc/ssh/ssh_host_ed25519_key.pub’? y
rm: remove regular file ‘/etc/ssh/ssh_host_rsa_key’? y
rm: remove regular file ‘/etc/ssh/ssh_host_rsa_key.pub’? y
[root@gba03 etc]# reboot
[root@gba02 etc]# rm -f /etc/ssh/ssh_host_*
[root@gba02 etc]# reboot缺少包【这三个rpm 我最终也没能解决? 是改了gcinstall.py才过去的 ,以后有机会再解决吧】
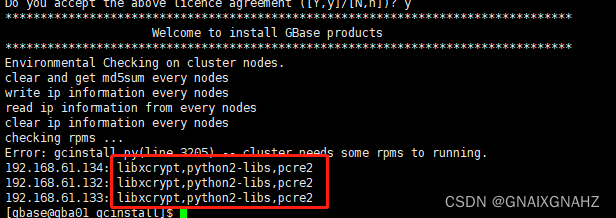
安装libxcrypt(下面是依赖包顺序)
1.安装gpg-error
ftp.gnupg.org:gcrypt/libgpg-error/
2.安装libgcrypt
ftp.gnupg.org:gcrypt/libgcrypt/
3.安装libassuan
ftp.gnupg.org:gcrypt/libassuan/
4.安装libksba
5.安装npth
6.安装gpg
7.安装gcc(升级)
CentOS升级gcc到高版本(全部版本详细过程)_乞力马扎罗の黎明的博客-CSDN博客_centos 升级gcc
[root@localhost opt]# yum -y install centos-release-scl
[root@localhost opt]# yum -y install devtoolset-9-gcc devtoolset-9-gcc-c++ devtoolset-9-binutils
[root@localhost opt]# scl enable devtoolset-9 bash
[root@localhost opt]# echo "source /opt/rh/devtoolset-9/enable" >>/etc/profile
8.安装glibc
最后 找不到安装包 就来这里
安装python2-libs
Python2-libs(x86-64) Download (RPM) (pkgs.org)
[root@gba01 opt]# rpm -ivh python-libs-2.7.5-90.el7.x86_64.rpm安装pcre2
PCRE - Browse /pcre2/10.37 at SourceForge.net
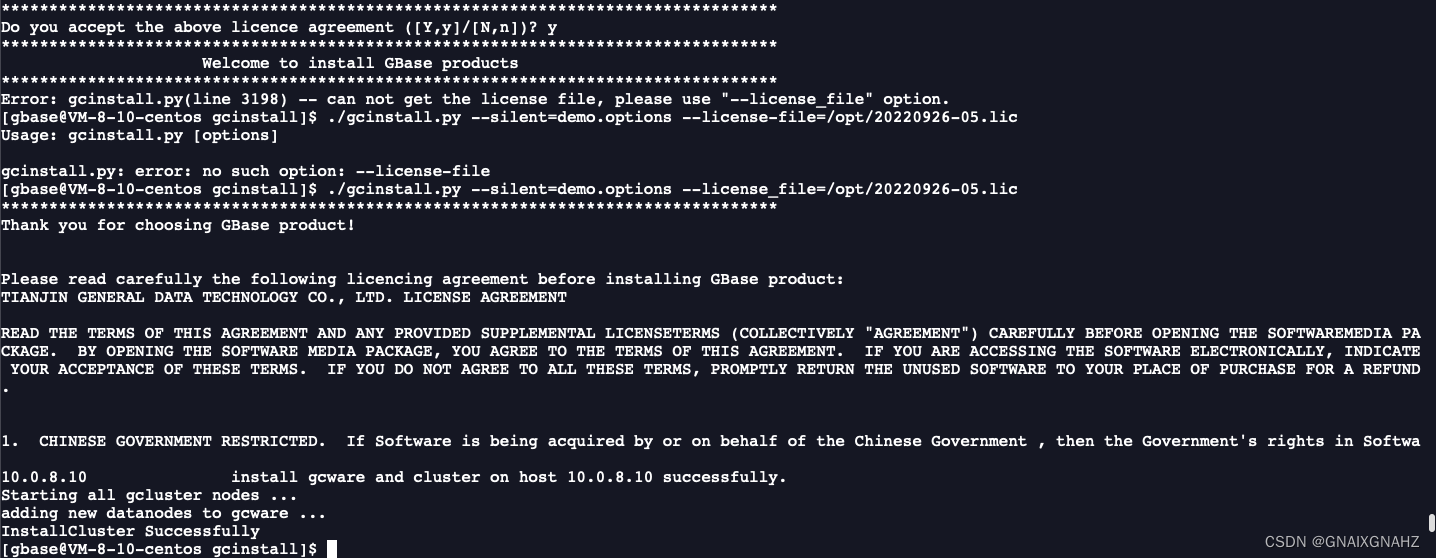
我人麻了? 这三个依赖包搞得我心态崩了,后面这三个包 怎么装 都过去不 一直报上面图片上那个错误,主要是glibc这个库 很难装 ,装了两次 全都卡住了? ,python2-libs 和 pcre2 装上了 但是还是检查不通过? 不知道什么原因 ,然后没什么办法? 我就把脚本改了 ,让他不检查依赖了? 所以才继续往下走了【20220927更新:今天问题解决了,原来是数据库版本跟操作系统不匹配,选择数据库的时候 一定要确定好CPU版本和操作系统版本,换了相应的版本 重装一下就过去了,原来的arm cenots8版本 改为了x86 cenots7版本】
源码是这样的
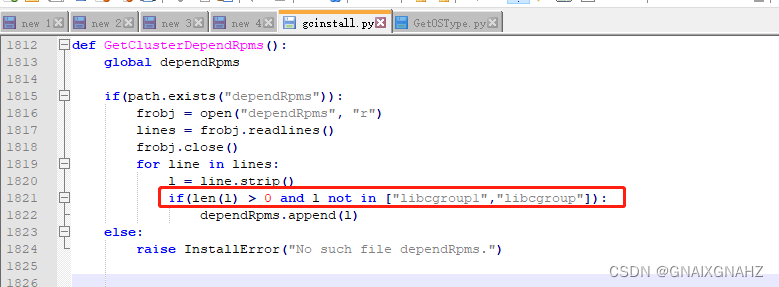
我改成了这样

?往下走就遇到了一个命令不存在的问题,装上就好了
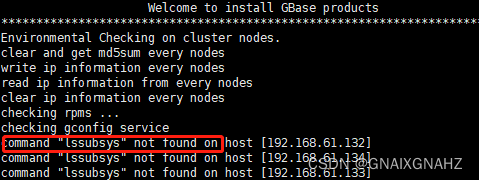
[root@gba01 opt]# yum install -y libcgroup
[root@gba01 opt]# yum install -y libcgroup-tools
然后就可以继续了,但是还是有问题,以后再说吧,明天重装一遍,反正流程是没问题,问题全出现在依赖包上面? 或者 软件版本太低 ,获取指纹 和 导入 license? 方法都是可以的

生效环境变量
[gbase@VM-8-10-centos gcinstall]$ source ~/.bash_profile
[gbase@VM-8-10-centos gcinstall]$ gcadmin
CLUSTER STATE:         ACTIVE

====================================
| GBASE GCWARE CLUSTER INFORMATION |
====================================
| NodeName |  IpAddress   | gcware |
------------------------------------
| gcware1  |  10.0.8.10   |  OPEN  |
------------------------------------
===================================================
|      GBASE COORDINATOR CLUSTER INFORMATION      |
===================================================
|   NodeName   | IpAddress | gcluster | DataState |
---------------------------------------------------
| coordinator1 | 10.0.8.10 |   OPEN   |     0     |
---------------------------------------------------
==========================================================
|        GBASE CLUSTER FREE DATA NODE INFORMATION        |
==========================================================
| NodeName  | IpAddress | gnode | syncserver | DataState |
----------------------------------------------------------
| FreeNode1 | 10.0.8.10 | OPEN  |    OPEN    |     0     |
----------------------------------------------------------

0 virtual cluster
1 coordinator node
1 free data node
修改分布模式
GBase 8a 部署(8.6)_GNAIXGNAHZ的博客-CSDN博客
修改数据库初始密码
在集群安装完毕后,集群会创建两个默认的数据库超级帐号?root?账号 和?gbase?账号。首次登录?GBase 8a MPP Cluster?后,管理员必须为?root?帐号和?gbase?账号设置一个安全密码,不要使用默认密码
[root@gba01 opt]# su - gbase

$ gccli –uroot
GBase client 9.5.3.17.117651. Copyright (c) 2004-2020, GBase. All Rights Reserved.
gbase> SET PASSWORD FOR root = PASSWORD('H133%_h');
Query OK, 0 rows affected
# 退出登录的命令为在gbase>提示符下,键入“\q”。
gbase> \q

# 修改root的口令后,重新登录集群。
$ gccli -uroot -p
Enter password:
GBase client 9.5.2.17.111533. Copyright (c) 2004-2020, GBase. Reserved.
gbase >