在适配系统移植后接下来就是对于驱动框架的学习
首先配置下驱动框架开发所需要的环境
驱动编译所需的linux内核的源码树目录,对于在Ubuntu下的内核源码树可以通过shell命令去分配,
KERN_VER = $(shell uname -r)
KERN_DIR = /lib/modules/$(KERN_VER)/build
为对应在Ubuntu下的源码树目录,而对于我们开发板所烧录的linux系统则需要提供内核源码树,原因是我们后面编写的驱动是在对应的系统下去安装的,为了保证可以进行同时避免不同版本的兼容性问题最好选择我们所烧录的内核版本作为其驱动的内核源码树
我这里指定的就是我开发板上烧录的内核源码的目录
KERN_DIR = /home/hawen/zyp_linux/driver_kernel/kernel
简单驱动程序下的Makefile文件
#ubuntu的内核源码树,如果要编译在ubuntu中安装的模块就打开这2个


#KERN_VER = $(shell uname -r)
#KERN_DIR = /lib/modules/$(KERN_VER)/build


# 开发板的linux内核的源码树目录
KERN_DIR = /home/hawen/zyp_linux/driver_kernel/kernel

obj-m	+= module_test.o

all:
	make -C $(KERN_DIR) M=`pwd` modules

cp:
	cp *.ko /root/porting_x210/rootfs/rootfs/driver_test

.PHONY: clean
clean:
	make -C $(KERN_DIR) M=`pwd` modules clean
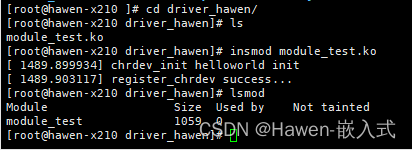
然后通过Makefile帮助编译,在通过cp命令将.ko文件拷贝到我们挂载的根文件系统上,接下来就是开发板开机挂载上根目录然后进入到驱动文件目录下去安转驱动文件
insmod module.ko安转驱动模块
lsmod查看已经按装的驱动模块
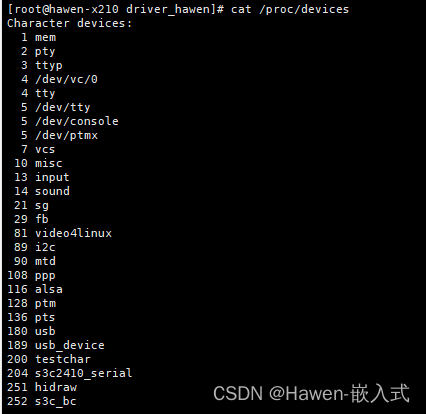
进入到根目录下的/proc目录下的文件devices通过cat命令可以查看其运行的设备信息
proc目录是系统运行时产生的临时文件存放的目录这里就不在详细说明

cat /proc/devices

可以看到我们所分配的设备信息,主设备号为200,设备名为testchar
卸载驱动模块rmmod 驱动模块名称

附录
#include <linux/module.h>		// module_init  module_exit
#include <linux/init.h>			// __init   __exit
#include <linux/fs.h>

#define MYMAJOR		200
#define MYNAME		"testchar"


static int test_chrdev_open(struct inode *inode, struct file *file)
{
	// 这个函数中真正应该放置的是打开这个设备的硬件操作代码部分
	// 但是现在暂时我们写不了这么多,所以用一个printk打印个信息来做代表。
	printk(KERN_INFO "test_chrdev_open\n");

	return 0;
}

static int test_chrdev_release(struct inode *inode, struct file *file)
{
	printk(KERN_INFO "test_chrdev_release\n");

	return 0;
}

// 自定义一个file_operations结构体变量,并且去填充
static const struct file_operations test_fops = {
	.owner		= THIS_MODULE,				// 惯例,直接写即可

	.open		= test_chrdev_open,			// 将来应用open打开这个设备时实际调用的
	.release	= test_chrdev_release,		// 就是这个.open对应的函数
};


// 模块安装函数
static int __init chrdev_init(void)
{
	int ret = -1;

	printk(KERN_INFO "chrdev_init helloworld init\n");

	// 在module_init宏调用的函数中去注册字符设备驱动
	ret = register_chrdev(MYMAJOR, MYNAME, &test_fops);
	if (ret)
	{
		printk(KERN_ERR "register_chrdev fail\n");
		return -EINVAL;
	}
	printk(KERN_INFO "register_chrdev success...\n");

	return 0;
}

// 模块下载函数
static void __exit chrdev_exit(void)
{
	printk(KERN_INFO "chrdev_exit helloworld exit\n");

	// 在module_exit宏调用的函数中去注销字符设备驱动
	unregister_chrdev(MYMAJOR, MYNAME);

}


module_init(chrdev_init);
module_exit(chrdev_exit);

// MODULE_xxx这种宏作用是用来添加模块描述信息
MODULE_LICENSE("GPL");				// 描述模块的许可证
MODULE_AUTHOR("");				// 描述模块的作者
MODULE_DESCRIPTION("module test");	// 描述模块的介绍信息
MODULE_ALIAS("alias xxx");			// 描述模块的别名信息
就先记录到这里吧,算半只脚踏入入门阶段。